Easy as peach pie cobbler
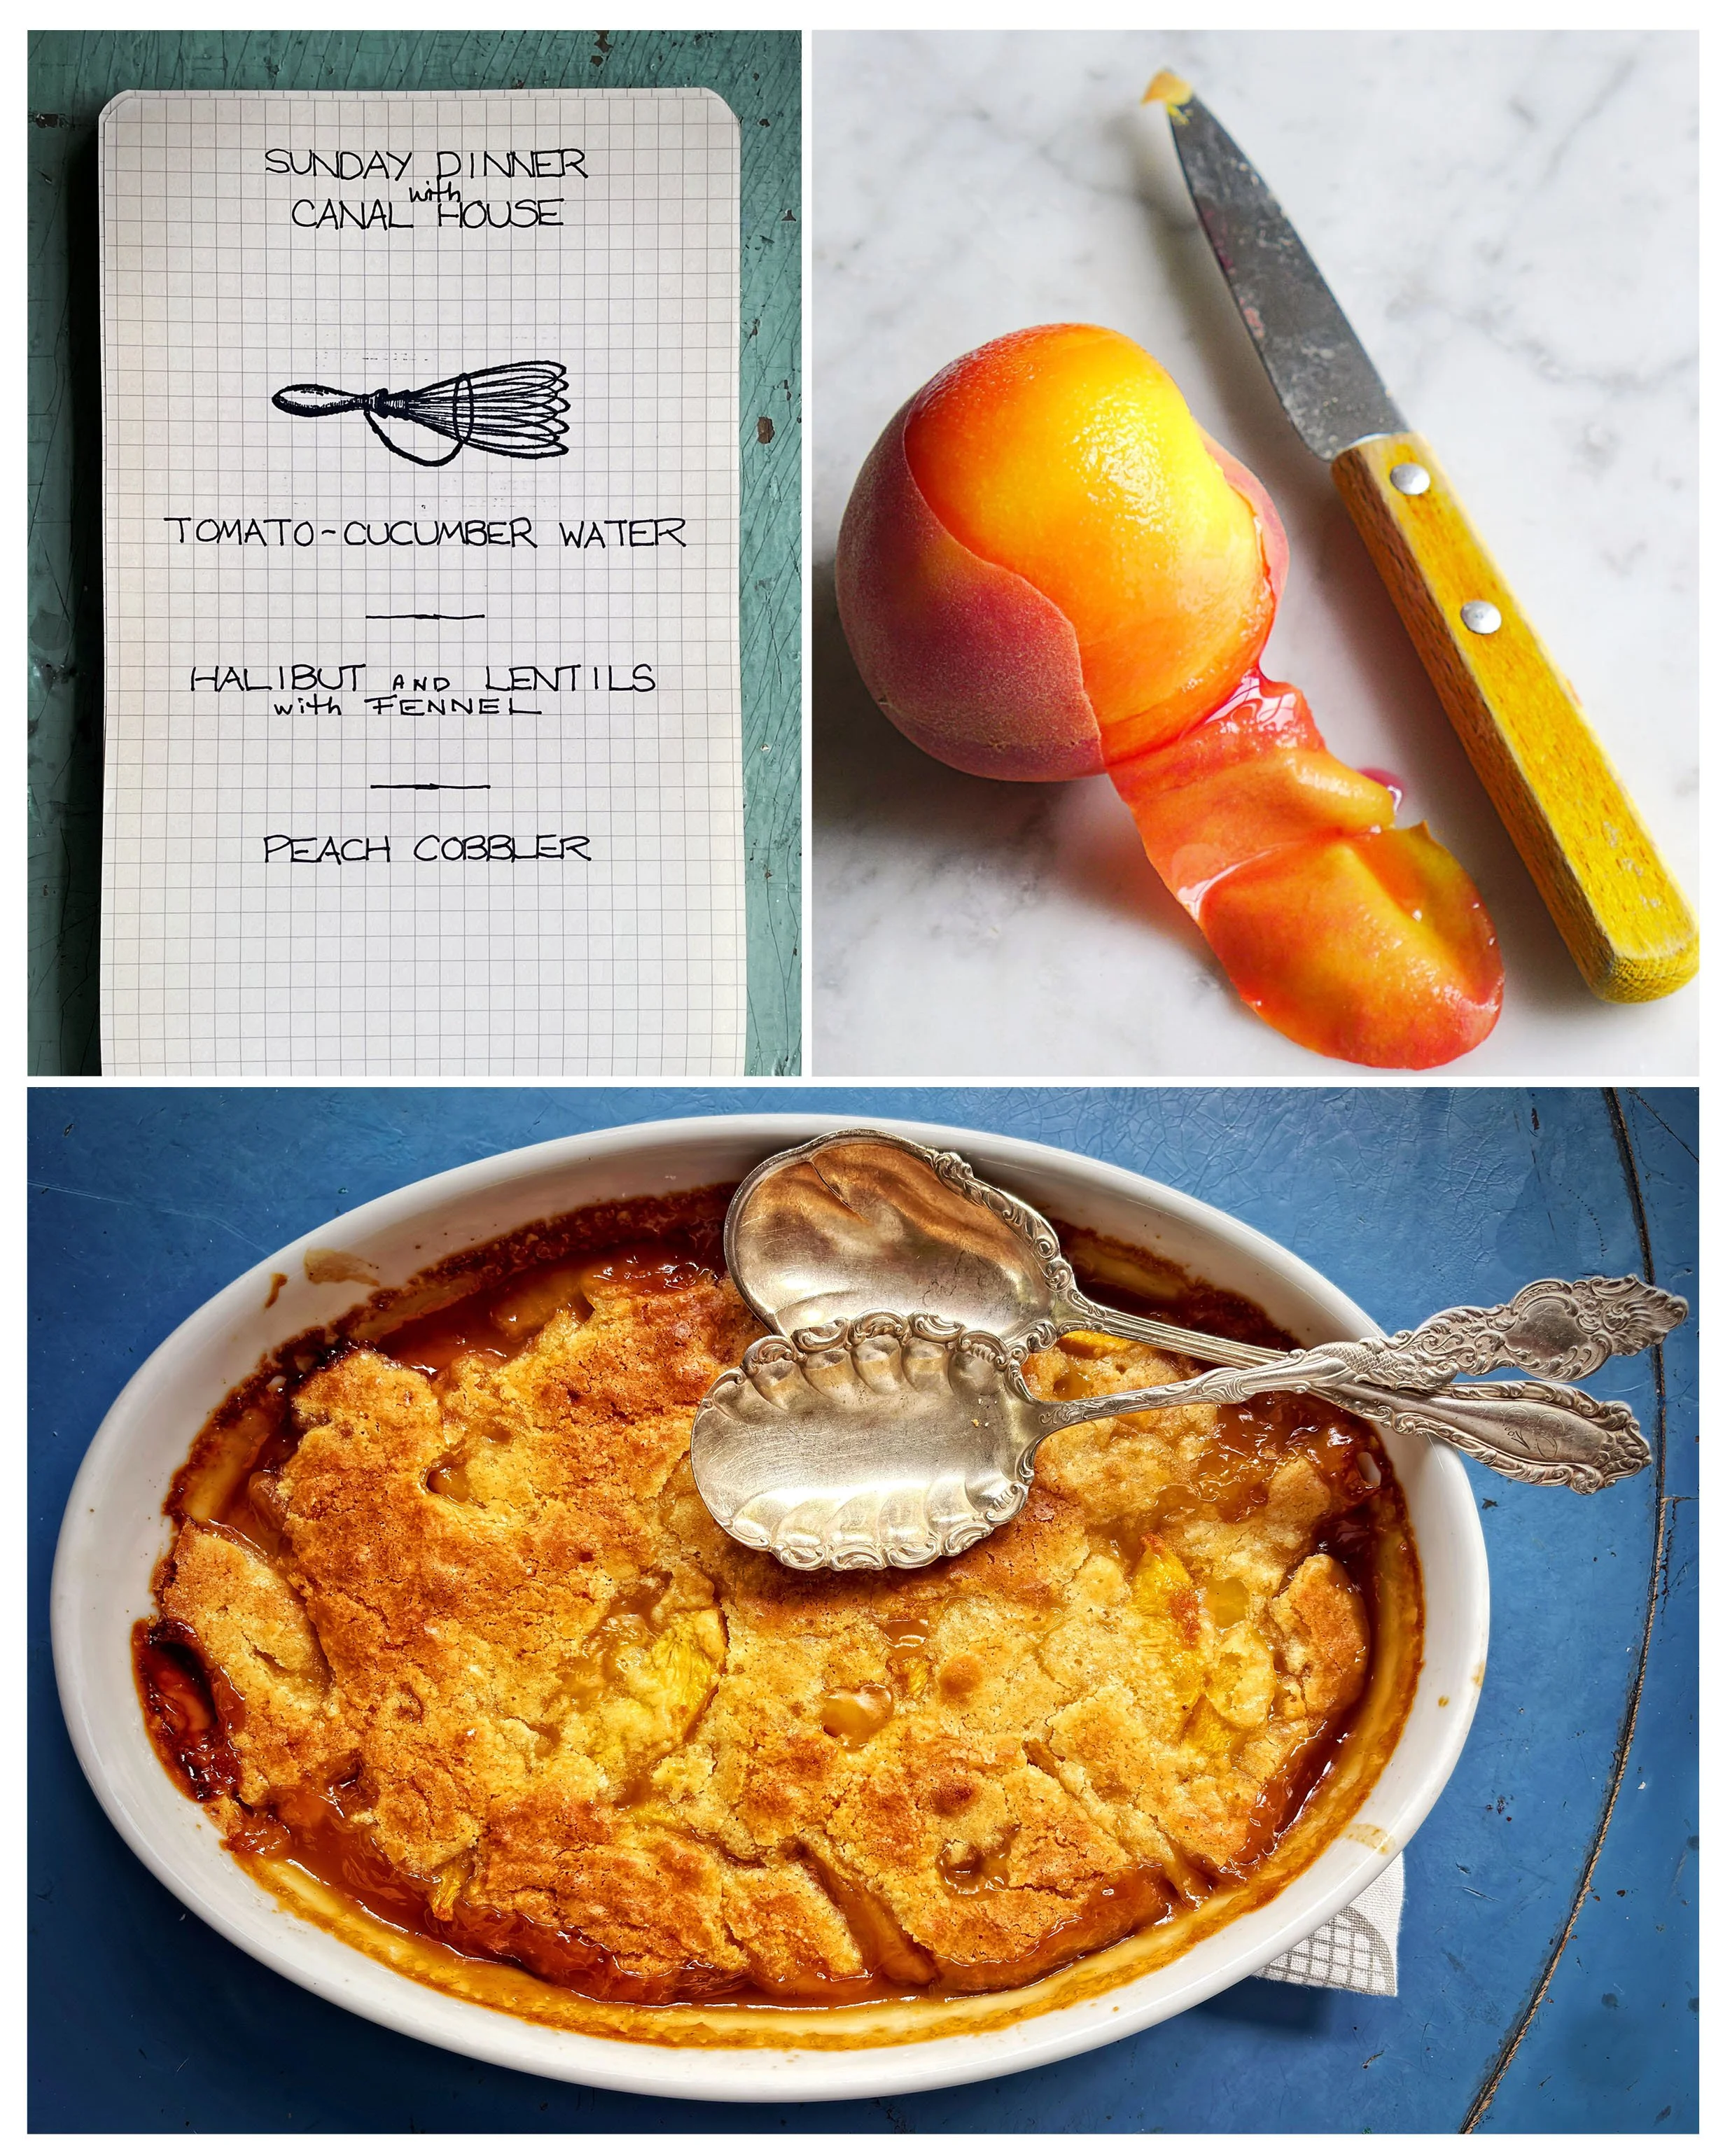
Counterclockwise from top left: Sunday Dinner Menu; Peach Cobbler;
peeling a ripe yellow peach
“An apple is an excellent thing—until you have tried a peach."—George du Maurier
Word on the street was that it would be a peach-less summer. A very warm, early spring tricked the fruit trees into an untimely bloom, then like a “one-two punch”, a hard freeze in April froze the blossoms and wiped out any chance of local stone fruit for us here in the New Jersey/Eastern Pennsylvania neck-of-the-woods. Imagine our delight when we found a table full of Phillips Farms’ yellow and white peaches at their farm market where we shop every day. Of course, we bought a bagful and those that weren’t eaten over the sink, we made into our favorite cobbler. Normally we use berries—raspberries, blackberries, blueberries—but we switched it up with peaches. And besides we aren’t supposed to be eating berries right now because of the dreaded foodborne parasite cyclosporiasis. We hope someone does a comprehensive study on how contaminated water comes in contact with produce. (We are loathe to say what kind of contamination, but it’s the worst!)
We are into full-on summer now: tomatoes, cucumbers, corn, zucchini and their blossoms, herbs galore, and on and on. We are still eating Mike Solomonov’s hummus and now we are topping it with grilled eggplant or zucchini cooked in olive oil, wiping the plate clean with naan. We hope you are cooking, too. It couldn’t be easier—this time of year it’s more slicing than cooking.
CANAL HOUSE PEACH COBBLER—serves 4–6
If you are making this for a crowd just double the recipe.
The Cobbler Dough:
½ cup all-purpose flour
¼ teaspoon baking powder
Pinch of salt
8 tablespoons (1 stick) butter, softened
½ cup sugar
1 egg yolk
¼ teaspoon vanilla extract
The Fruit Filling:
½ cup light brown sugar
1 tablespoon cornstarch
1 teaspoon vanilla extract
Juice of half a lemon
4 cups sliced, peeled peaches
For the Cobbler Dough, mix together the flour, baking powder, and salt in a small bowl and set aside.
Using a wooden spoon, beat the butter and sugar together in a medium mixing bowl until well combined. Beat in the egg yolk and the vanilla. Add the flour mixture and stir until well combined. Refrigerate the dough while preheating the oven to 375°F.
For the Fruit Filling, combine the brown sugar and the cornstarch in a medium bowl. Add the peaches, vanilla, and lemon juice and toss gently to coat.
Put the peaches into an 8-cup baking dish. Drop the dough by heaping tablespoons over the peaches, covering the fruit evenly. Bake until the peaches are bubbling and the topping is a golden brown, about 45 minutes. Let cool slightly before eating.
You can find these recipes for this Sunday Dinner’s menu in our Canal House cookbooks.
TOMATO-CUCUMBER WATER: Canal House Cooking, Volume N°4, page 38
HALIBUT AND LENTILS WITH FENNEL: Canal House Cooking, Volume N°4, page 78
FRUIT COBBLER: Canal House Cooking, Volume N°4, page 108
Hot, Hot, Hot
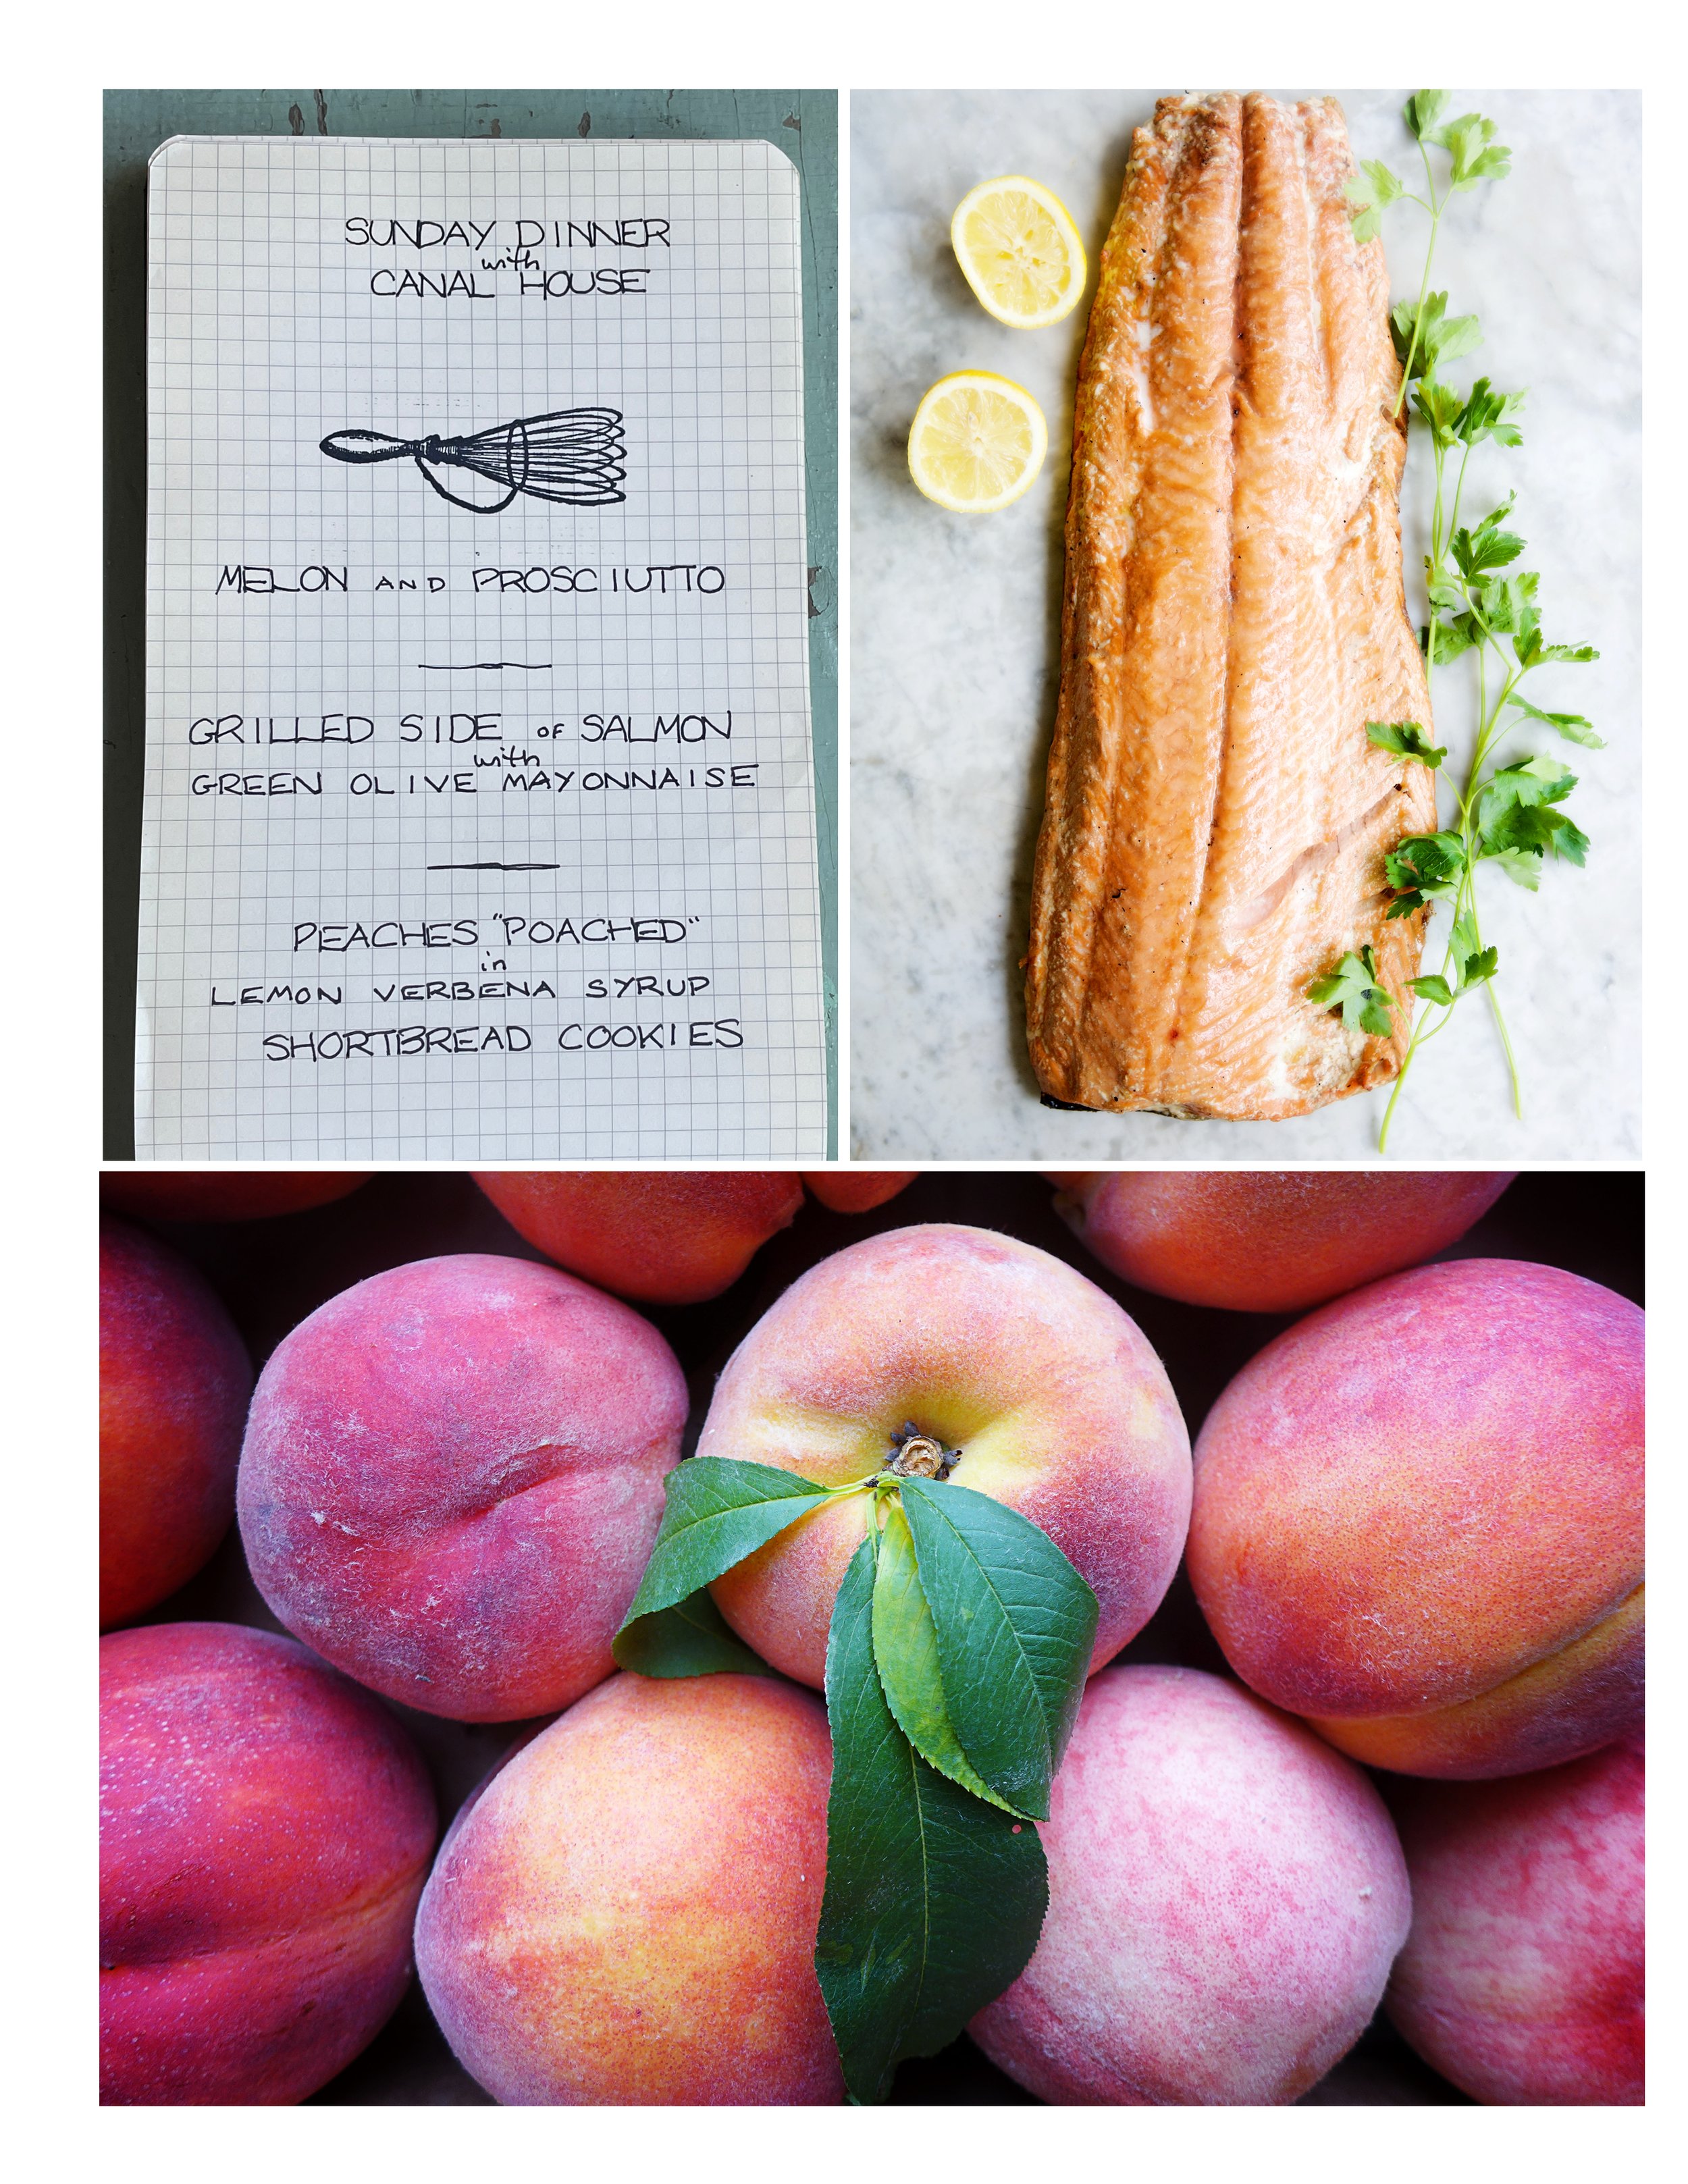
Counterclockwise from top left: Fourth of July Sunday Dinner Menu; peaches for poaching in Lemon Verbena Syrup; Grilled Side of Salmon
Lord have mercy, it’s hot. One of us has air-conditioning, but one of us does not. The one without it is, along with her family and the family dog, languishing on the screened-in porch under the twirling overhead fans. A few have carried chairs and books down to the shady creek where, with their feet in the water, it is at least 15°F cooler. So we are grilling and slicing this holiday weekend and trying to avoid the kitchen. But the menu couldn’t be more delicious and summery.
GRILLED WHOLE SIDE OF SALMON—serves 6–8
Grilling fish can be a challenge. Its fragile flesh doesn’t tolerate much handling. Here we lay a side of salmon on the grill skin-side down, then don’t touch it until it’s done. Then we slide a cookie sheet under the whole fish to ensure it stays in one piece when we take it off the grill.
1 side of salmon, skin on, pin bones removed
Extra-virgin olive oil
Salt and freshly ground black pepper
1 lemon, cut in half
Preheat a grill with a lid. If using a charcoal grill, build a hot fire to one side, and let the coals get white hot. If using a gas grill, fire up the “back burner” to a medium-hot heat.
Meanwhile, rub the flesh side of the salmon with oil and season well with salt and pepper. Lay the fish skin-side down on a cookie sheet with no edges. Slide the fish off the cookie sheet onto the grill away from and off of the “fire”. Cover it with the lid and grill the fish until just cooked through, about 30 minutes.
To test if the fish is cooked through, slip the point of a paring knife into the center of the thickest part of the fish. Remove the knife and quickly (carefully) press it to your lower lip. If it is very warm, the fish is cooked. Slide the cookie sheet under the salmon between the flesh and skin, leaving the skin stuck to the grill. Use a big spatula to scoot the fish onto the cookie sheet.
Carefully slide salmon onto a large serving platter and drizzle with some oil. Garnish with lemons. Serve as is, or with either of the sauces below.
GREEN OLIVE SAUCE
Mix together 1 cup minced pitted green olives, minced rind of 1 small preserved lemon, 1 finely minced shallot, ½ cup finely chopped parsley leaves, 1 minced anchovy filet, and
½ cup extra-virgin olive oil in a bowl. Season with salt and freshly ground black pepper.—makes about 2 cups
GREEN OLIVE MAYONNAISE
Stir together 1 cup mayonnaise, 1 cup minced pitted green olives, 1 finely minced shallot,
½ cup finely chopped parsley leaves, 1 minced anchovy filet, and 1 tablespoon fresh lemon juice in a bowl. Stir in ¼ cup extra-virgin olive oil. Season to taste with salt and freshly ground black pepper. Mayonnaise keeps, refrigerated, for up to 1 week.—makes about 2 cups
You can find these recipes for this Sunday Dinner’s menu in our Canal House cookbooks.
MELON AND PROSCIUTTO: Canal House Cooking, Volume N°1, page 26
GRILLED SIDE OF SALMON with GREEN OLIVE MAYONNAISE: Cook Something: Recipes to Rely On, (Voracious, 2019), page 344
PEACHES “POACHED” IN LEMON VERBENA SYRUP: Cook Something: Recipes to Rely On, (Voracious, 2019), page 386
SHORTBREAD COOKIES: Cook Something: Recipes to Rely On, (Voracious, 2019), page 406
Summer Heat
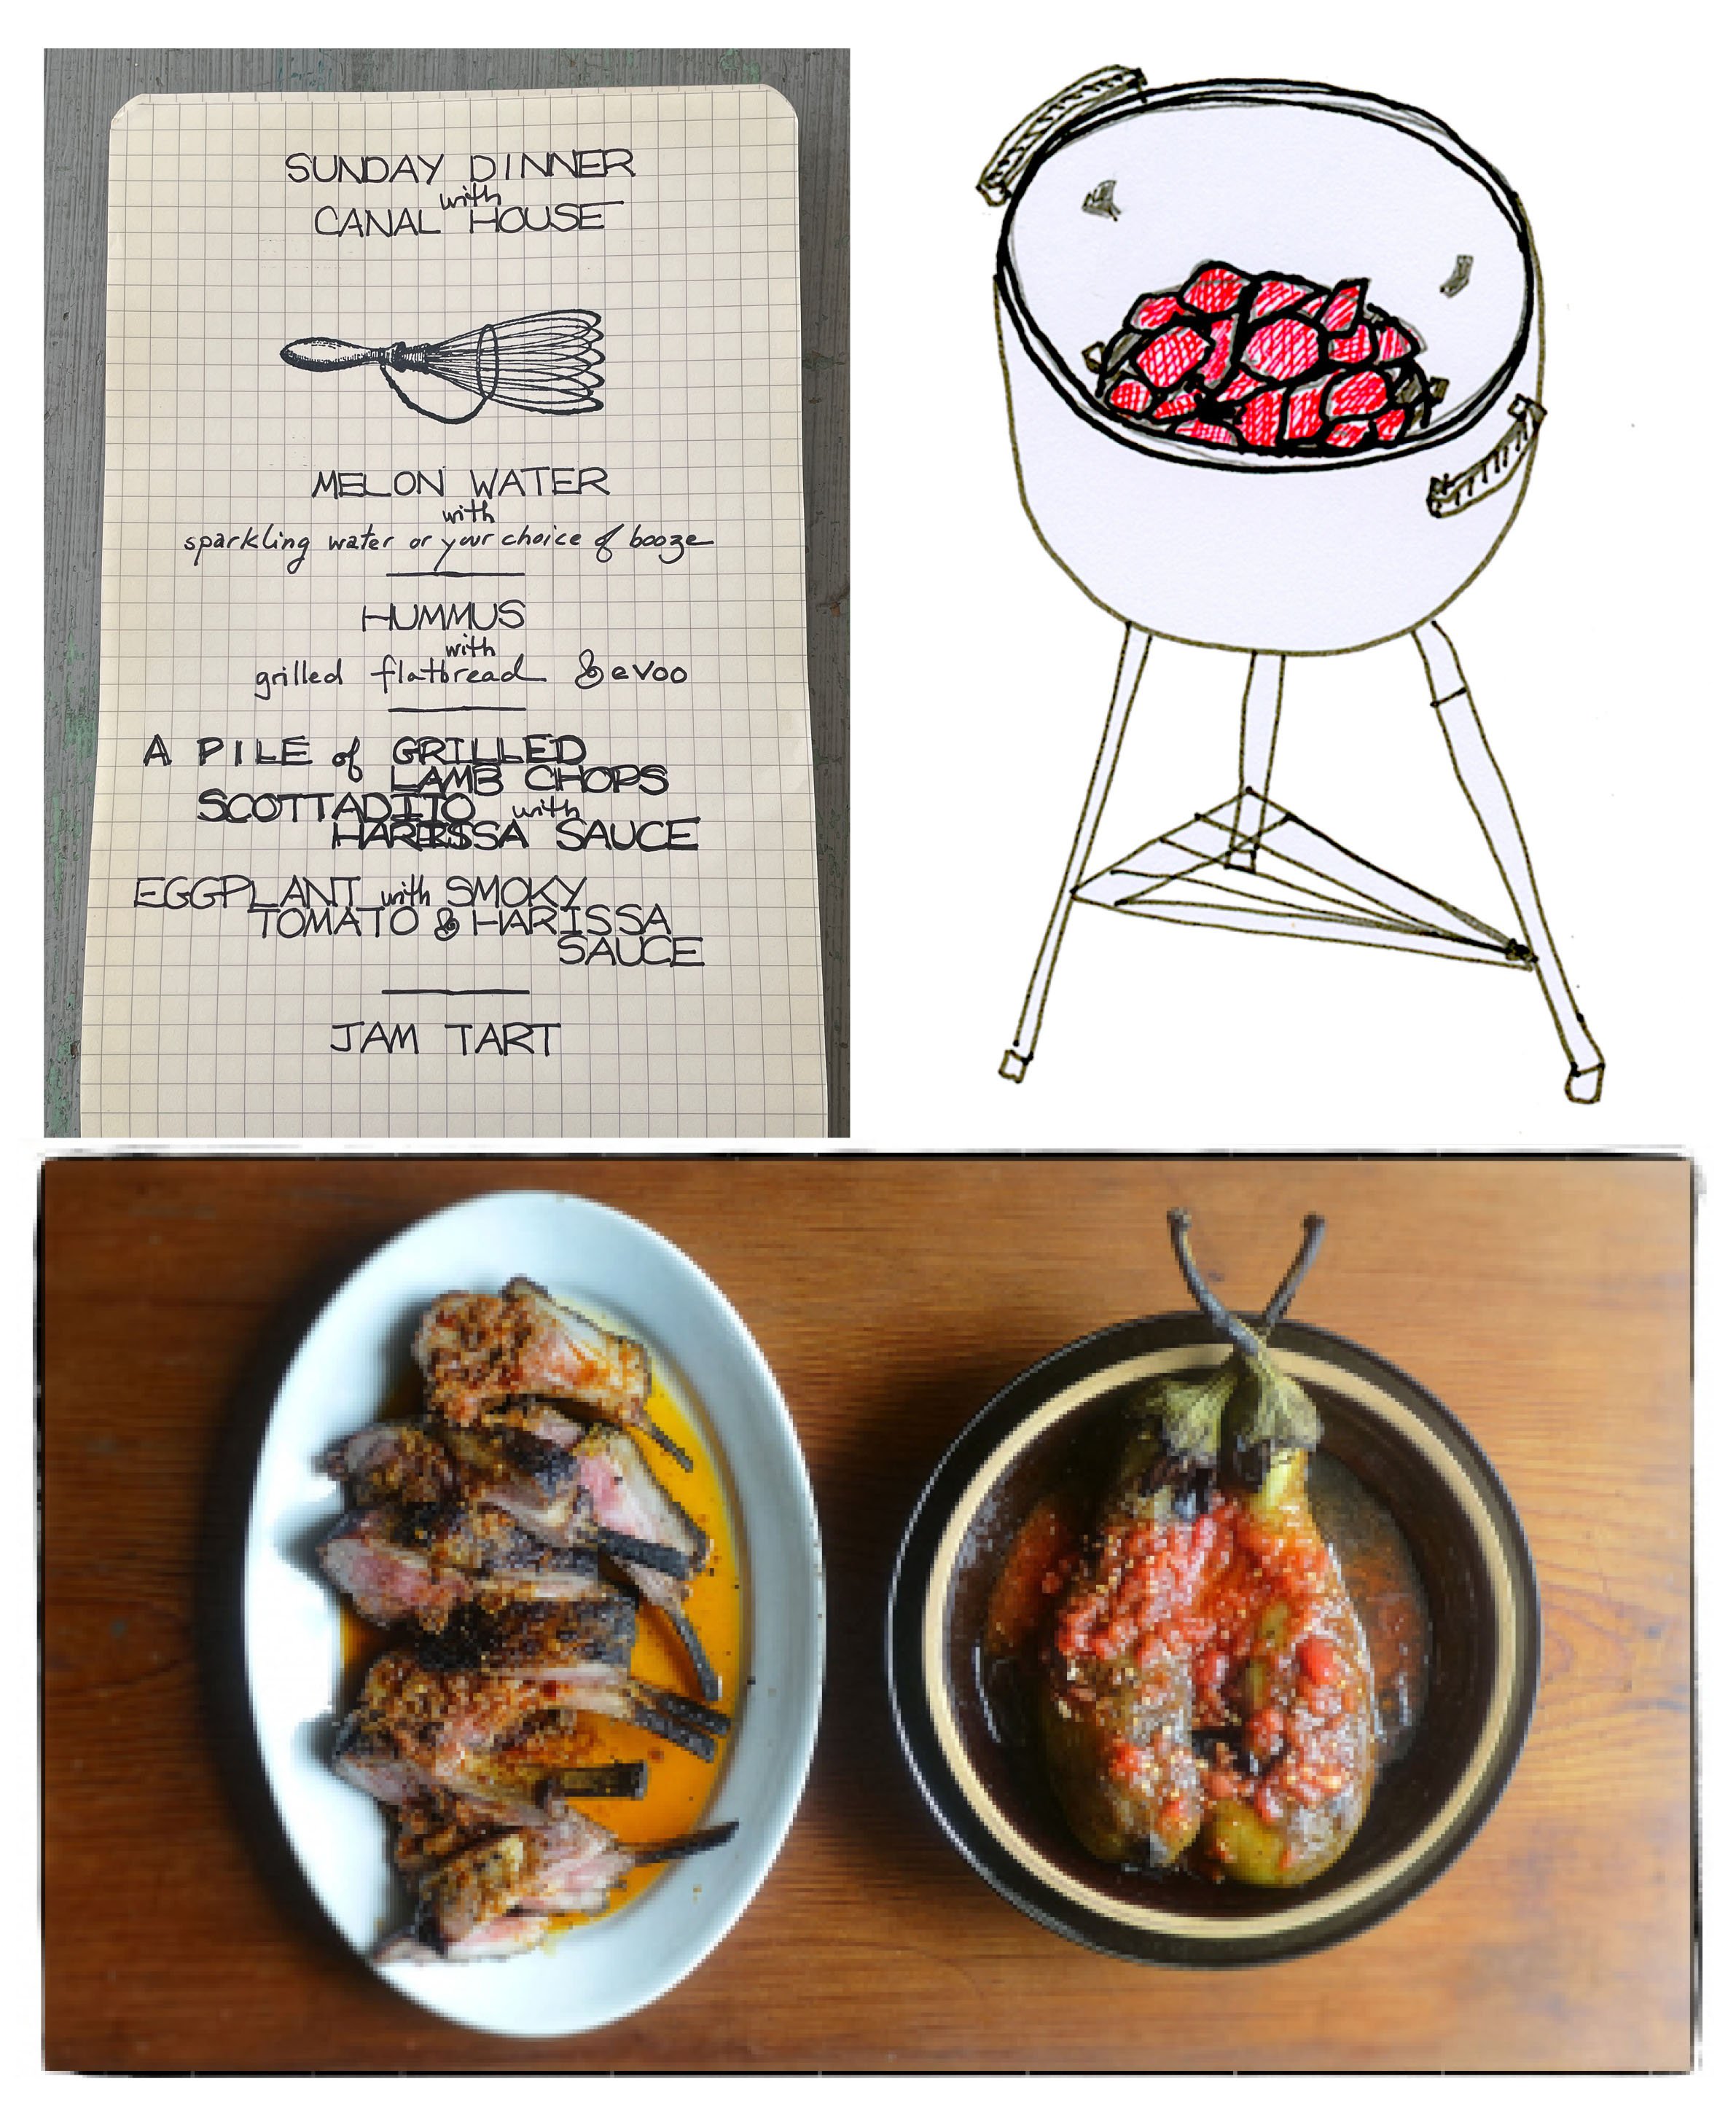
Counterclockwise from top right: The grill full of hot coals; Sunday Dinner menu; Grilled Lamb Chops with Harissa Sauce (left) Eggplant with Smoky Tomato & Harissa Sauce (right)
EGGPLANT COOKED IN THE COALS—serves 4–6
Prepare a hardwood charcoal fire. When the coals are medium hot, put 4 small or 2 medium whole eggplant directly on the coals. Cook the eggplant, turning them as the skin blackens and turns papery, until they begin to collapse and the flesh is soft, 5–15 minutes depending on the size of eggplant and the heat of the coals. Transfer the eggplant to a wire rack on a sheet pan. When they are cool enough to handle, peel off the blackened skin, leaving the flesh whole and the stem end intact. Return the eggplant to the wire rack and let them drain for about 30 minutes before serving.
EGGPLANT WITH SMOKY TOMATO & HARISSA SAUCE—serves 4–6
For the Sauce
2 small ripe tomatoes
3 anchovy filets, minced
1 clove garlic, peeled and minced
1 teaspoon harissa
1 teaspoon red wine vinegar
2 tablespoons extra-virgin olive oil
For the eggplant
4 small or 2 medium eggplant, charred, peeled, and drained (see above)
Extra-virgin olive oil
Salt
1 small handful fresh parsley leaves, chopped
1 lemon, quartered
For the sauce, grill the tomatoes over a hot charcoal fire until the skin blackens and splits, and before the tomatoes collapse, 2–3 minutes. Put the tomatoes in a sieve over a bowl. Press the juice and flesh through; discard the skin. Put ¼ cup of the pulpy tomato juices in a medium bowl. Add the anchovies, garlic, harissa, and vinegar. Stir in the olive oil. Adjust the seasonings.
For the eggplant, spoon half the sauce onto a serving platter. Place the eggplant on top.
Spoon the remaining sauce over the eggplant. Let the flavors meld for a bit. Drizzle with olive oil. Season with salt. Garnish with parsley and lemons and serve with grilled flat bread, if you like.
You can find these recipes for this Sunday Dinner’s menu in our Canal House cookbooks.
MELON WATER: Canal House Cooking, Volume N°1, page 10
A PILE OF GRILLED LAMB CHOPS SCOTTADITO WITH HARISSA SAUCE: Cook Something: Recipes to Rely On, (Voracious, 2019), page 340 and
A PILE OF GRILLED LAMB CHOPS SCOTTADITO: Canal House Cooking, Volume N°8, page 76
EGGPLANT WITH SMOKY TOMATO & HARISSA SAUCE: Canal House Cooking, Volume N°8, page 96
JAM TART: Canal House Cooking, Volume N°7, page 112
Let’s Cook for Dad!
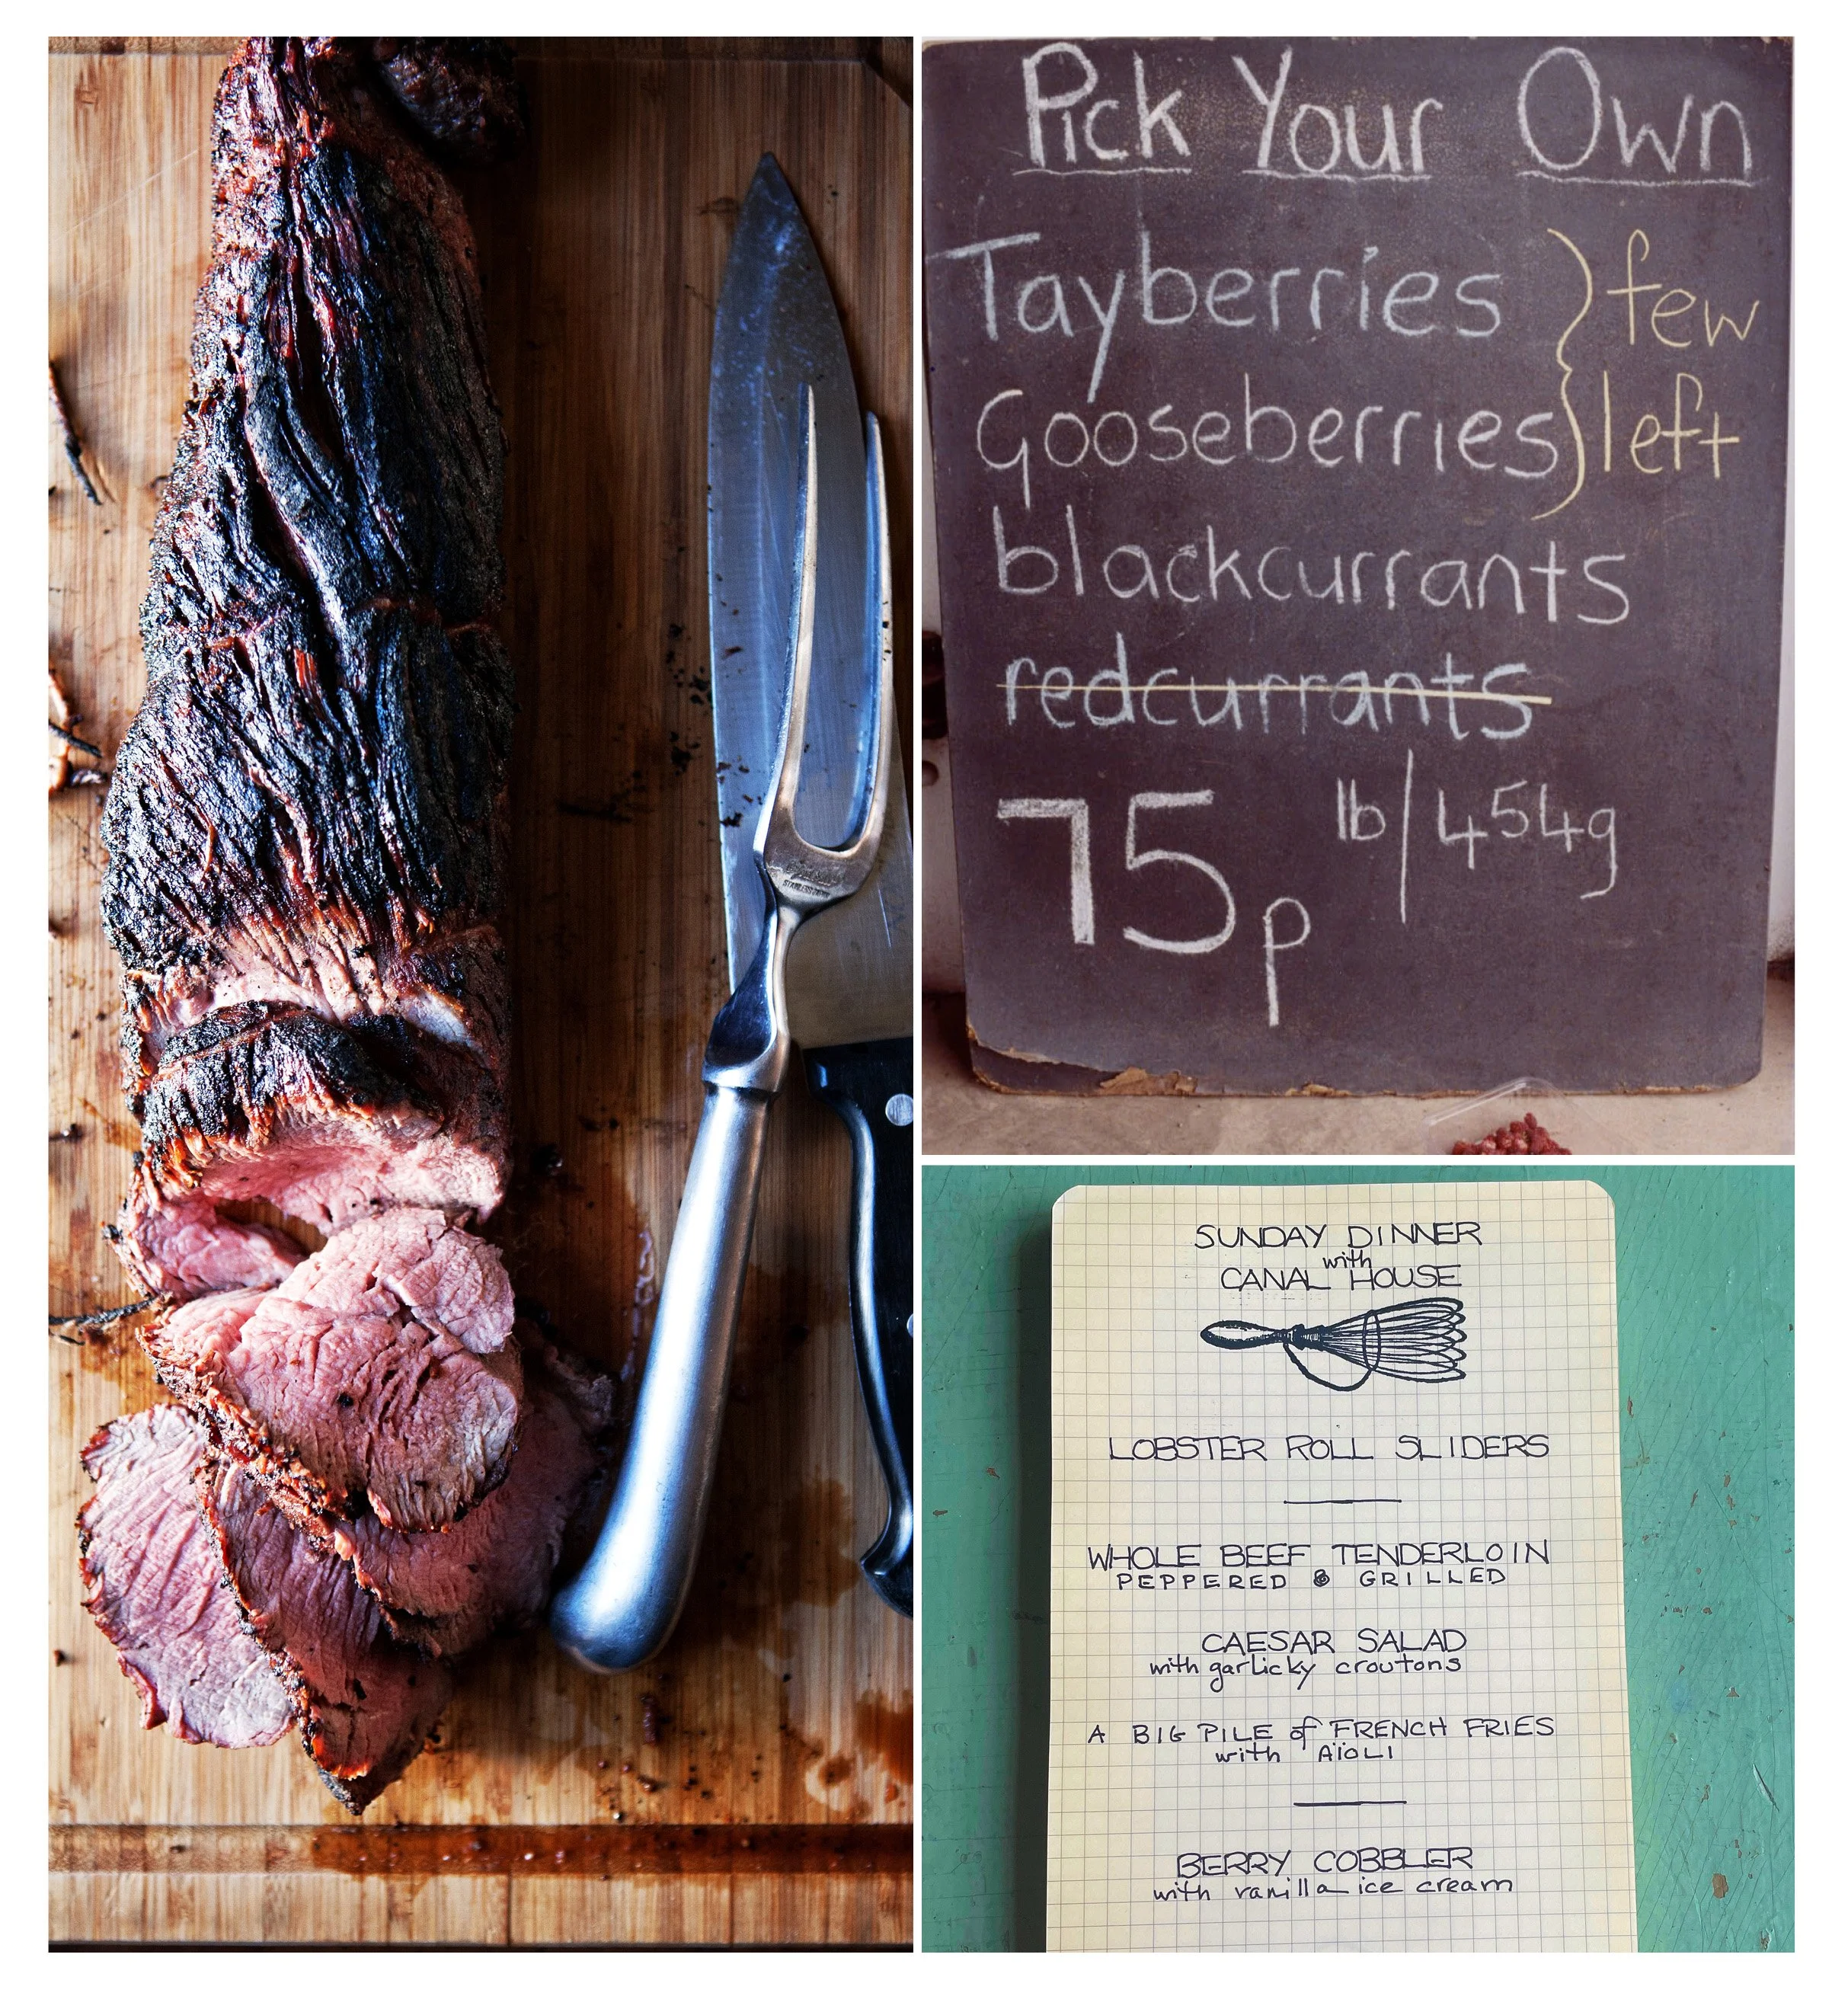
Counterclockwise from bottom right: Father’s Day Sunday Dinner menu; a blackboard sign with the day’s ‘pick’ in Dundee, Scotland—known for their berries; Grilled Peppered Beef Tenderloin
Alas, both of our fathers have been ‘taken by the angels’, so we won’t get to cook them a Father’s Day Sunday Dinner. But we will be thinking of them, as always. Though they never met, they had a lot in common food-wise. Both were catholic in their tastes—high and low, ethnic and all-American, spicy and plain. One father was never happier than when he was tucking into a fiery Goan curry, so hot that tears streamed down his face; but equally content to be sipping a pink gin while a slightly overdone standing rib and Yorkshire pudding waited at the table. The other father loved the theatrical, idiosyncratic NYC restaurant Café des Artistes for the fun and glamour of it; but was just as happy at a picnic enjoying baked beans and a good old American hot dog with all the fixins’. They were always up for an exciting culinary experience which encouraged our love of food and dining. We both thank our fathers and hope that maybe they have met in the great beyond and have shared a drink and a meal or two. Bon appétit, boys.
BERRY COBBLER—serves 4–6
Our friend Pam Anderson, the cookbook author and food columnist, can really nail a recipe. This cookie dough–topped cobbler recipe comes from her award-winning first cookbook
The Perfect Recipe (Houghton Mifflin, 1998). As she writes in the introduction to the recipe, “This makes one of the best cobblers you’ll probably ever eat.” We couldn’t agree with her more.
½ cup all-purpose flour
¼ teaspoon baking powder
Pinch of salt
8 tablespoons (1 stick) unsalted butter, softened
1 cup sugar
1 egg yolk
1¼ teaspoons vanilla extract
1 tablespoon cornstarch
2 pints fresh raspberries or a combination of your favorite berries
Mix together the flour, baking powder, and salt in a small bowl and set aside.
Using a wooden spoon, beat the butter and ½ cup of the sugar together in a medium mixing bowl until well combined. Beat in the egg yolk and ¼ teaspoon of the vanilla. Add the flour mixture and stir until well combined. Refrigerate the dough while preheating the oven to 375°F.
Combine the remaining ½ cup sugar and the cornstarch in a medium bowl. Add the berries and the remaining 1 teaspoon vanilla and toss gently to coat.
Put the berries into an 8-inch square (or 8-cup) baking dish. Drop the dough by heaping tablespoons over the berries, covering the fruit evenly. Bake until the berries are bubbling and the topping is golden brown, about 45 minutes. Let cool 15–30 minutes before serving.
You can find these recipes for this Sunday Dinner’s menu in our Canal House cookbooks.
LOBSTER SALAD: Cook Something: Recipes to Rely On, (Voracious, 2019), page 147
THE WHOLE BEEF TENDERLOIN, PEPPERED AND GRILLED: Canal House Cooking, Volume N°4, page 102 and
GRILLED WHOLE BEEF TENDERLOIN: Cook Something: Recipes to Rely On, (Voracious, 2019), page 336
CAESAR SALAD with garlicky croutons: Canal House Cooking, Volume N°3, page 35
BERRY COBBLER: Canal House Cooking, Volume N°4, page 108
Lobsterfest
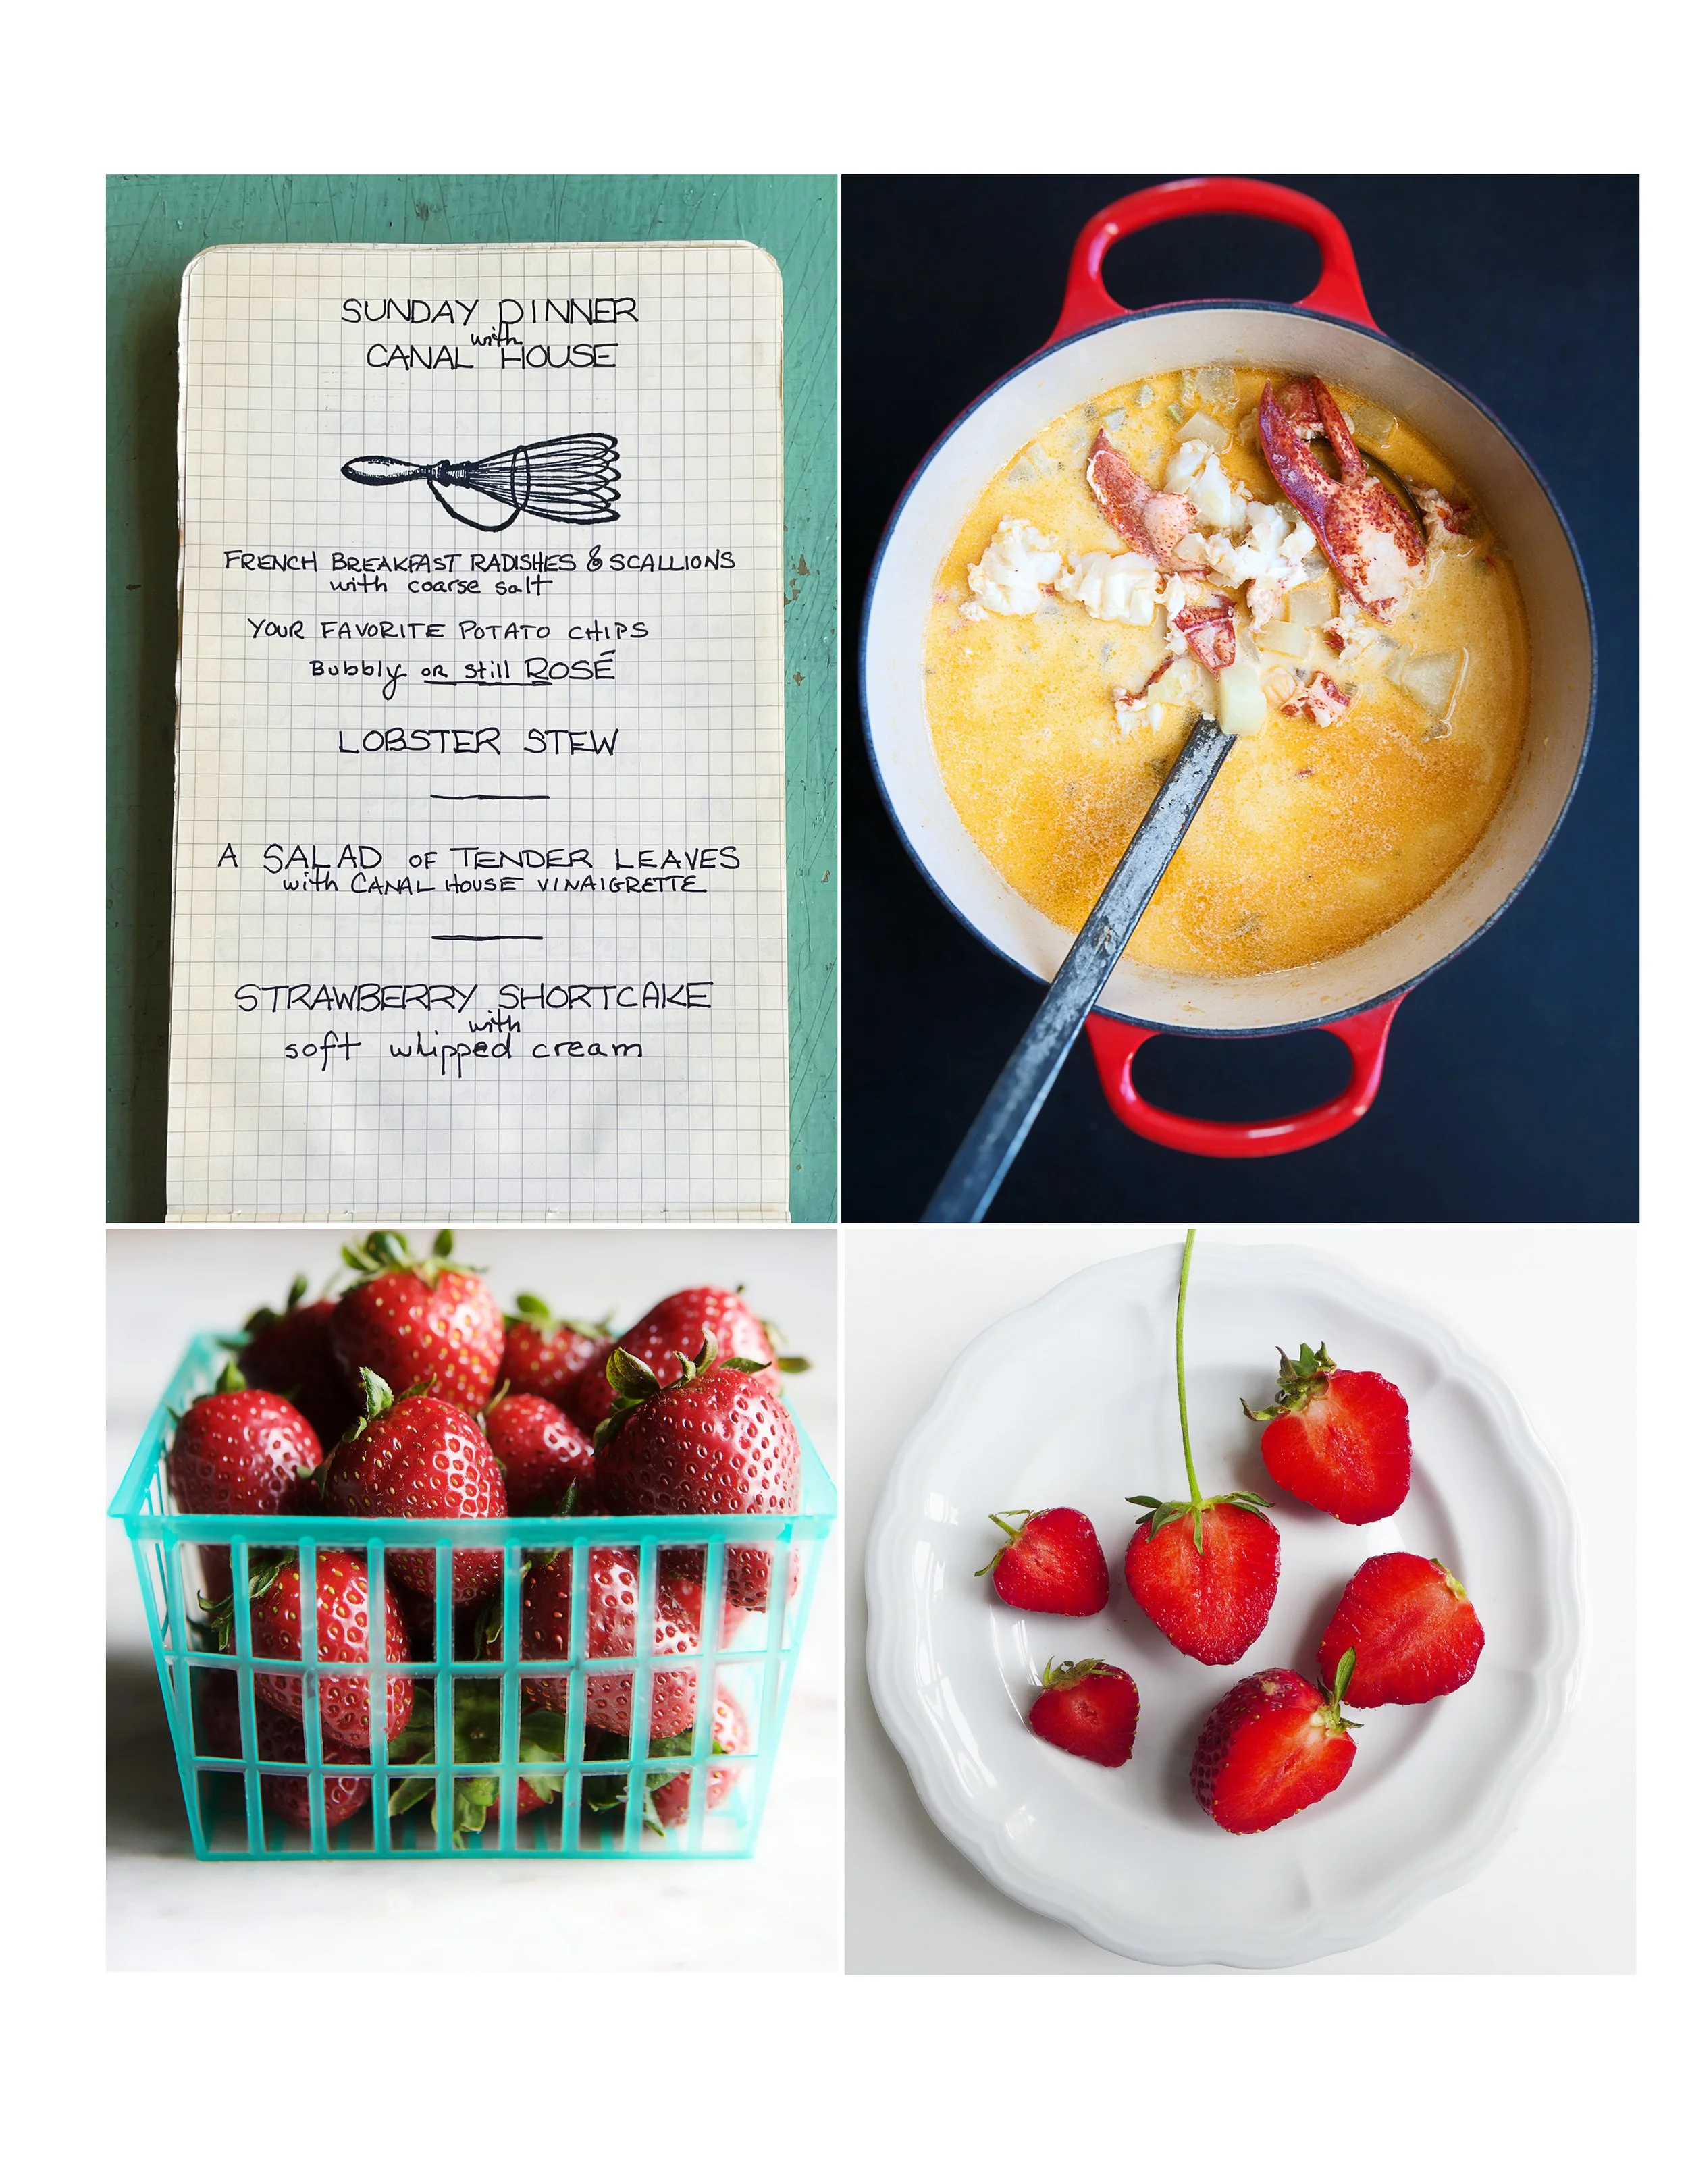
Counterclockwise from top left: Lobsterfest Sunday Dinner menu; a basket of Phillips Farms’ ripe, local strawberries; what ripe strawberries should look like; Canal House Lobster Stew
If you are squeamish about killing lobsters (who wouldn’t be?), you can ask your fishmonger to steam and crack the lobsters for you. Let them know you want the lobsters a bit undercooked (or steamed just long enough to release the meat easily from the shell) and that you want to keep the juices (to add more flavor to the stew). To make life even easier, you can also pick up fish stock, though it probably won’t match the flavor of the one you took the time and care to make yourself. Either way, this stew is luxuriously delicious.
LOBSTER STEW—serves 4
Salt
Two 1½-pound lobsters
4 tablespoons butter, plus more for garnish
1 yellow onion, peeled and finely chopped
1 celery stalk, diced
2 sprigs fresh tarragon
Freshly ground black pepper
2 russet potatoes, peeled and diced
1 cup white wine
1 cup fish stock
1 cup heavy cream
Chopped chives for garnish
Bring a large pot of water to a boil over high heat and season it with a 2 tablespoons of salt. Plunge the tip of a large sharp knife into the head of each lobster just behind the eyes. Drop the lobsters head first into the boiling water and cook for about 8 minutes. Transfer the lobsters to a large bowl and set aside until they are cool enough to handle.
Working over the bowl to catch any juices, crack the lobster shells with a pair of lobster crackers, pliers, a hammer, or cut them open with sturdy kitchen scissors. Remove the meat from the lobster, reserving the large pieces of shell and any juices. Cut the lobster meat into large bite-size pieces, leaving the claw meat whole, and set aside.
Melt the butter in a large heavy pot over medium-low heat. Add the onions, celery, and tarragon. Season with salt and pepper to taste. Add the reserved lobster shells along with any juices and cook, stirring occasionally, for 10 minutes. Add the potatoes, wine, and fish stock. Cover the pot and gently simmer until the vegetables are just soft, about 15 minutes. Remove and discard the tarragon and lobster shells.
Add the cream and the reserved lobster meat to the pot and simmer until the lobster is just heated through, about 5 minutes. Adjust the seasonings. Ladle the stew into bowls and garnish each serving with a knob of butter and some chives.
You can find these recipes for this Sunday Dinner’s menu in our Canal House cookbook.
LOBSTER STEW: Cook Something: Recipes to Rely On, (Voracious, 2019), page 108
CANAL HOUSE CLASSIC VINAIGRETTE: Cook Something: Recipes to Rely On, (Voracious, 2019), page 128
SHORTCAKE BISCUITS: Cook Something: Recipes to Rely On, (Voracious, 2019), page 402
¡A comer!
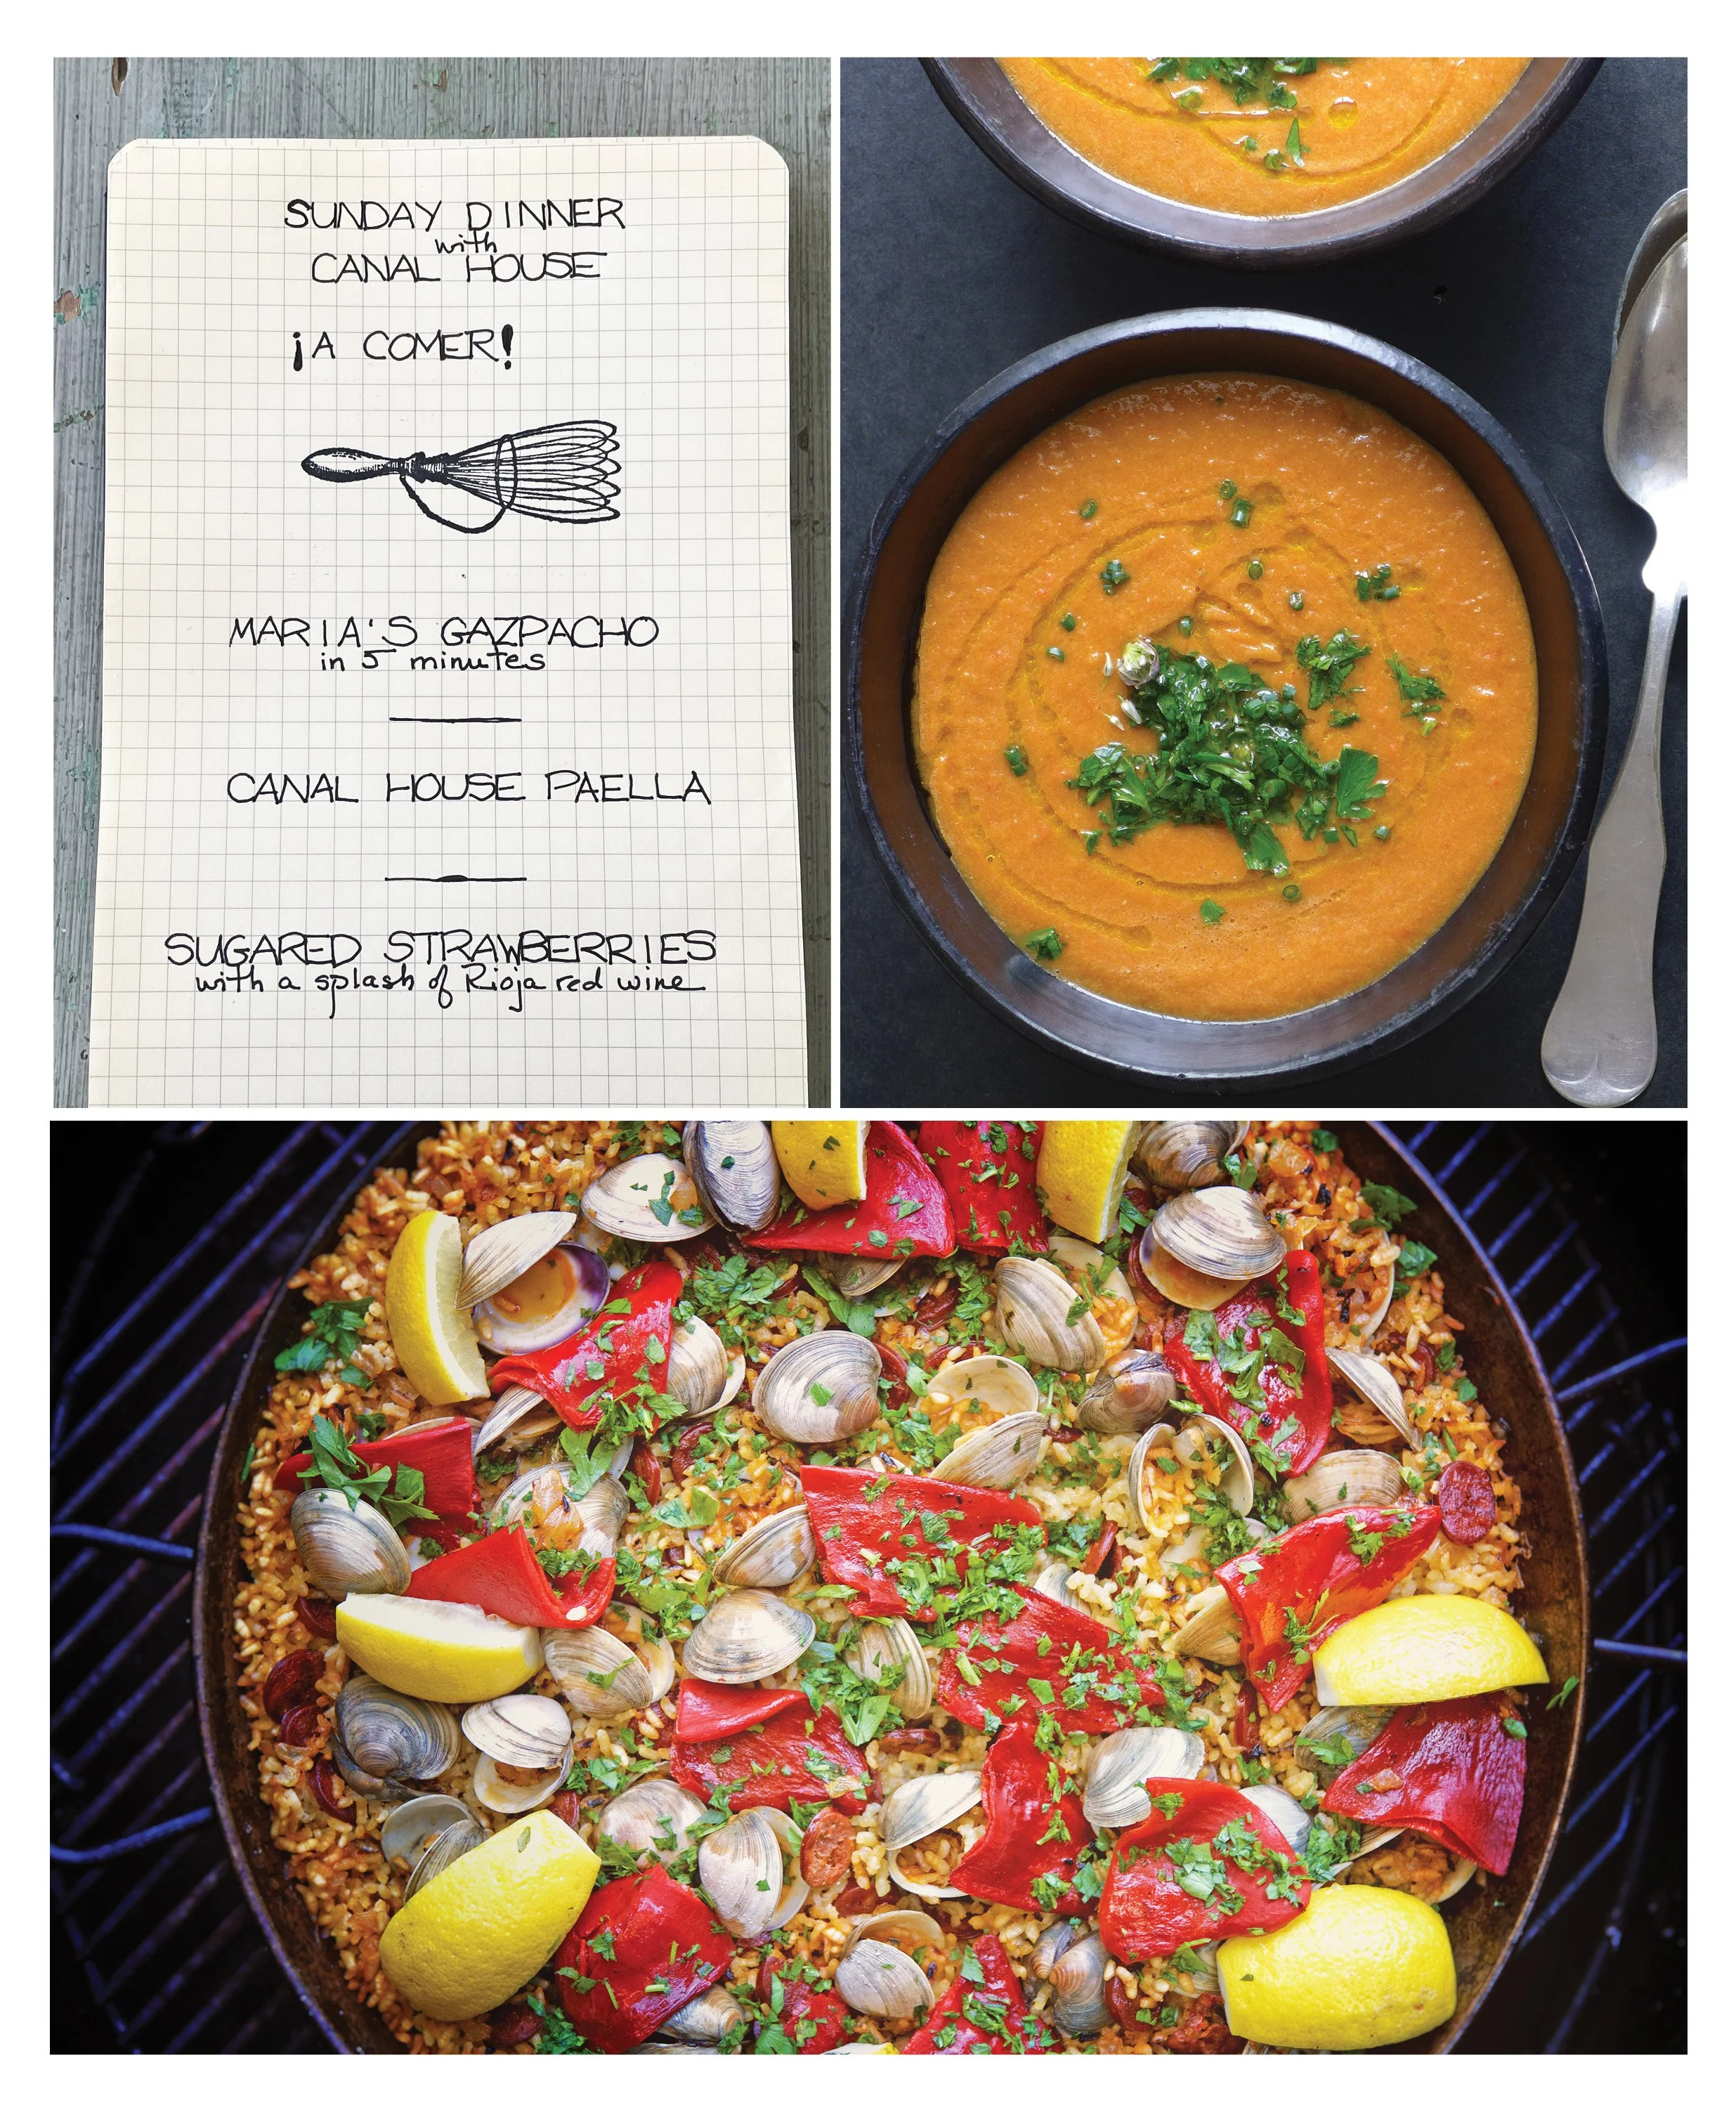
Counterclockwise from top left: our Spanish Style Sunday Dinner menu; a great big Paella for a crowd; Maria’s Gazpacho
I know we are jumping the gun with tomatoes, but it will be a long time until we see any local varieties here in the Northeast and we are longing for bowls of gazpacho. Even with less than perfectly ripe, peak-of-summer vegetables, this soup is delicious. Many years ago, we worked at Saveur Magazine with our very dear friend Maria Millán. She and her artist husband, Prudencio, were from Andalucia and San Sebastian in Spain. Every day she made gazpacho for dinner, then the next day Pruden would set down his brushes and make a lunch out of the leftover soup. When we were writing our first Canal House Cooking book— Volume n° 1—we asked Maria for her recipe. When it arrived, we loved how it was written, it sounded just like she was talking to us. So, we decided to add it to the book exactly as it was. Since we published our series ourselves, there was no one telling us what we could or couldn’t do except, of course, our wonderful, impeccable copy editor Valerie Saint-Rossy and she was charmed also! In rereading that book as we were looking for recipes, we noticed all the rules we broke. But that little series has a lot of voice and personality. So, in that spirit let’s make gazpacho even if it is a little out of season—just ‘cause we want to.
MARIA’S GAZPACHO IN 5 MINUTES—serves 4
When our friend Maria Millán moved back home to Spain, we asked her if she’d leave us with her recipe for gazpacho. It’s the simplest of versions, with just tomatoes, peppers, and bread pureéd together. We think of it as a working woman’s special because it’s so quick to make. Here is the recipe just as she wrote it to us:
I use a glass blender. The point is to fill it with tomatoes. 4 or 5 fist-size ripe and peeled tomatoes.* Cut them in thick slices, or however you want, it’s just so they fit better in the blender.
One medium-size green pepper (those that you call Italian). It should not be spicy.
Seed it and cut it, and add to the blender.
2 cloves of garlic (if you like it garlicky you can put 3, for the kids I stay with 2).
One slice of bread previously soaked in 1 cup of water. Pour the bread with the remaining water into the blender. (I use about 2 inches of baguette, or Italian style, but you can put your regular slice, if it is old, or hard bread better.)
About 2 tablespoons of red wine vinegar, (sherry vinegar, it’s fine too, NOT WHITE VINEGAR, PLEASE. Modena [balsamic vinegar] it’s OK).
About 3 tablespoons of extra-virgin olive oil.
Salt to taste, about 2 teaspoons (normal salt).
Hit the button, and blend until it is all liquefied. Serve cold. The result should not be too thick/paste-like.**
And that’s your gazpacho.
NOTE: If it needs more salt or vinegar, or even garlic, it can be added after it has been blended. It is trickier to add oil.
PS*: I don’t always peel them because I don’t have a fuzzy [fussy] family. Some of my friends peel them and then after it’s blended they put it through the “pasapuré” [foodmill] ( I forget how you call that in English, it’s an object that has holes on the bottom and a little handle that you turn around several times until the food goes though the holes, so that way the seeds or peel stays behind) I don’t think it’s at all needed, and it’s a new thing with all the delicate people in this modern world.
PPS**: If you put more bread, like double of what I suggested you may get a thicker paste and that is called SALMOREJO, which is also delicious and you serve it sprinkled with very small thin pieces of jamón serrano or jabugo (Half the size of a chocolate chip) and slices of hard-boiled eggs. Serve cold. You can garnish it with cucumber cut in small cubes (I usually have a bowl and people add if they want it). My grandparents used to put green grapes floating in it, and it was delicious, the contrast is great.
It makes a nice meal with the tortilla de patata, or some chicken/ham, or whatever croquetas or empanadillas, or just plain grilled chicken breast.
One blender could be enough for 4 servings . . . However I usually make 2 blenders because the servings are not dainty when it comes to gazpacho around here.
You can find these recipes for this Sunday Dinner’s menu in our Canal House cookbook. Don’t have our cookbooks? Click the links below to place an order.
MARIA’S GAZPACHO IN 5 MINUTES: Canal House Cooking Vol. N°1, page 34
CANAL HOUSE PAELLA: Canal House Cooking Vol. N°1, page 88
Ready, Set, Start Grilling

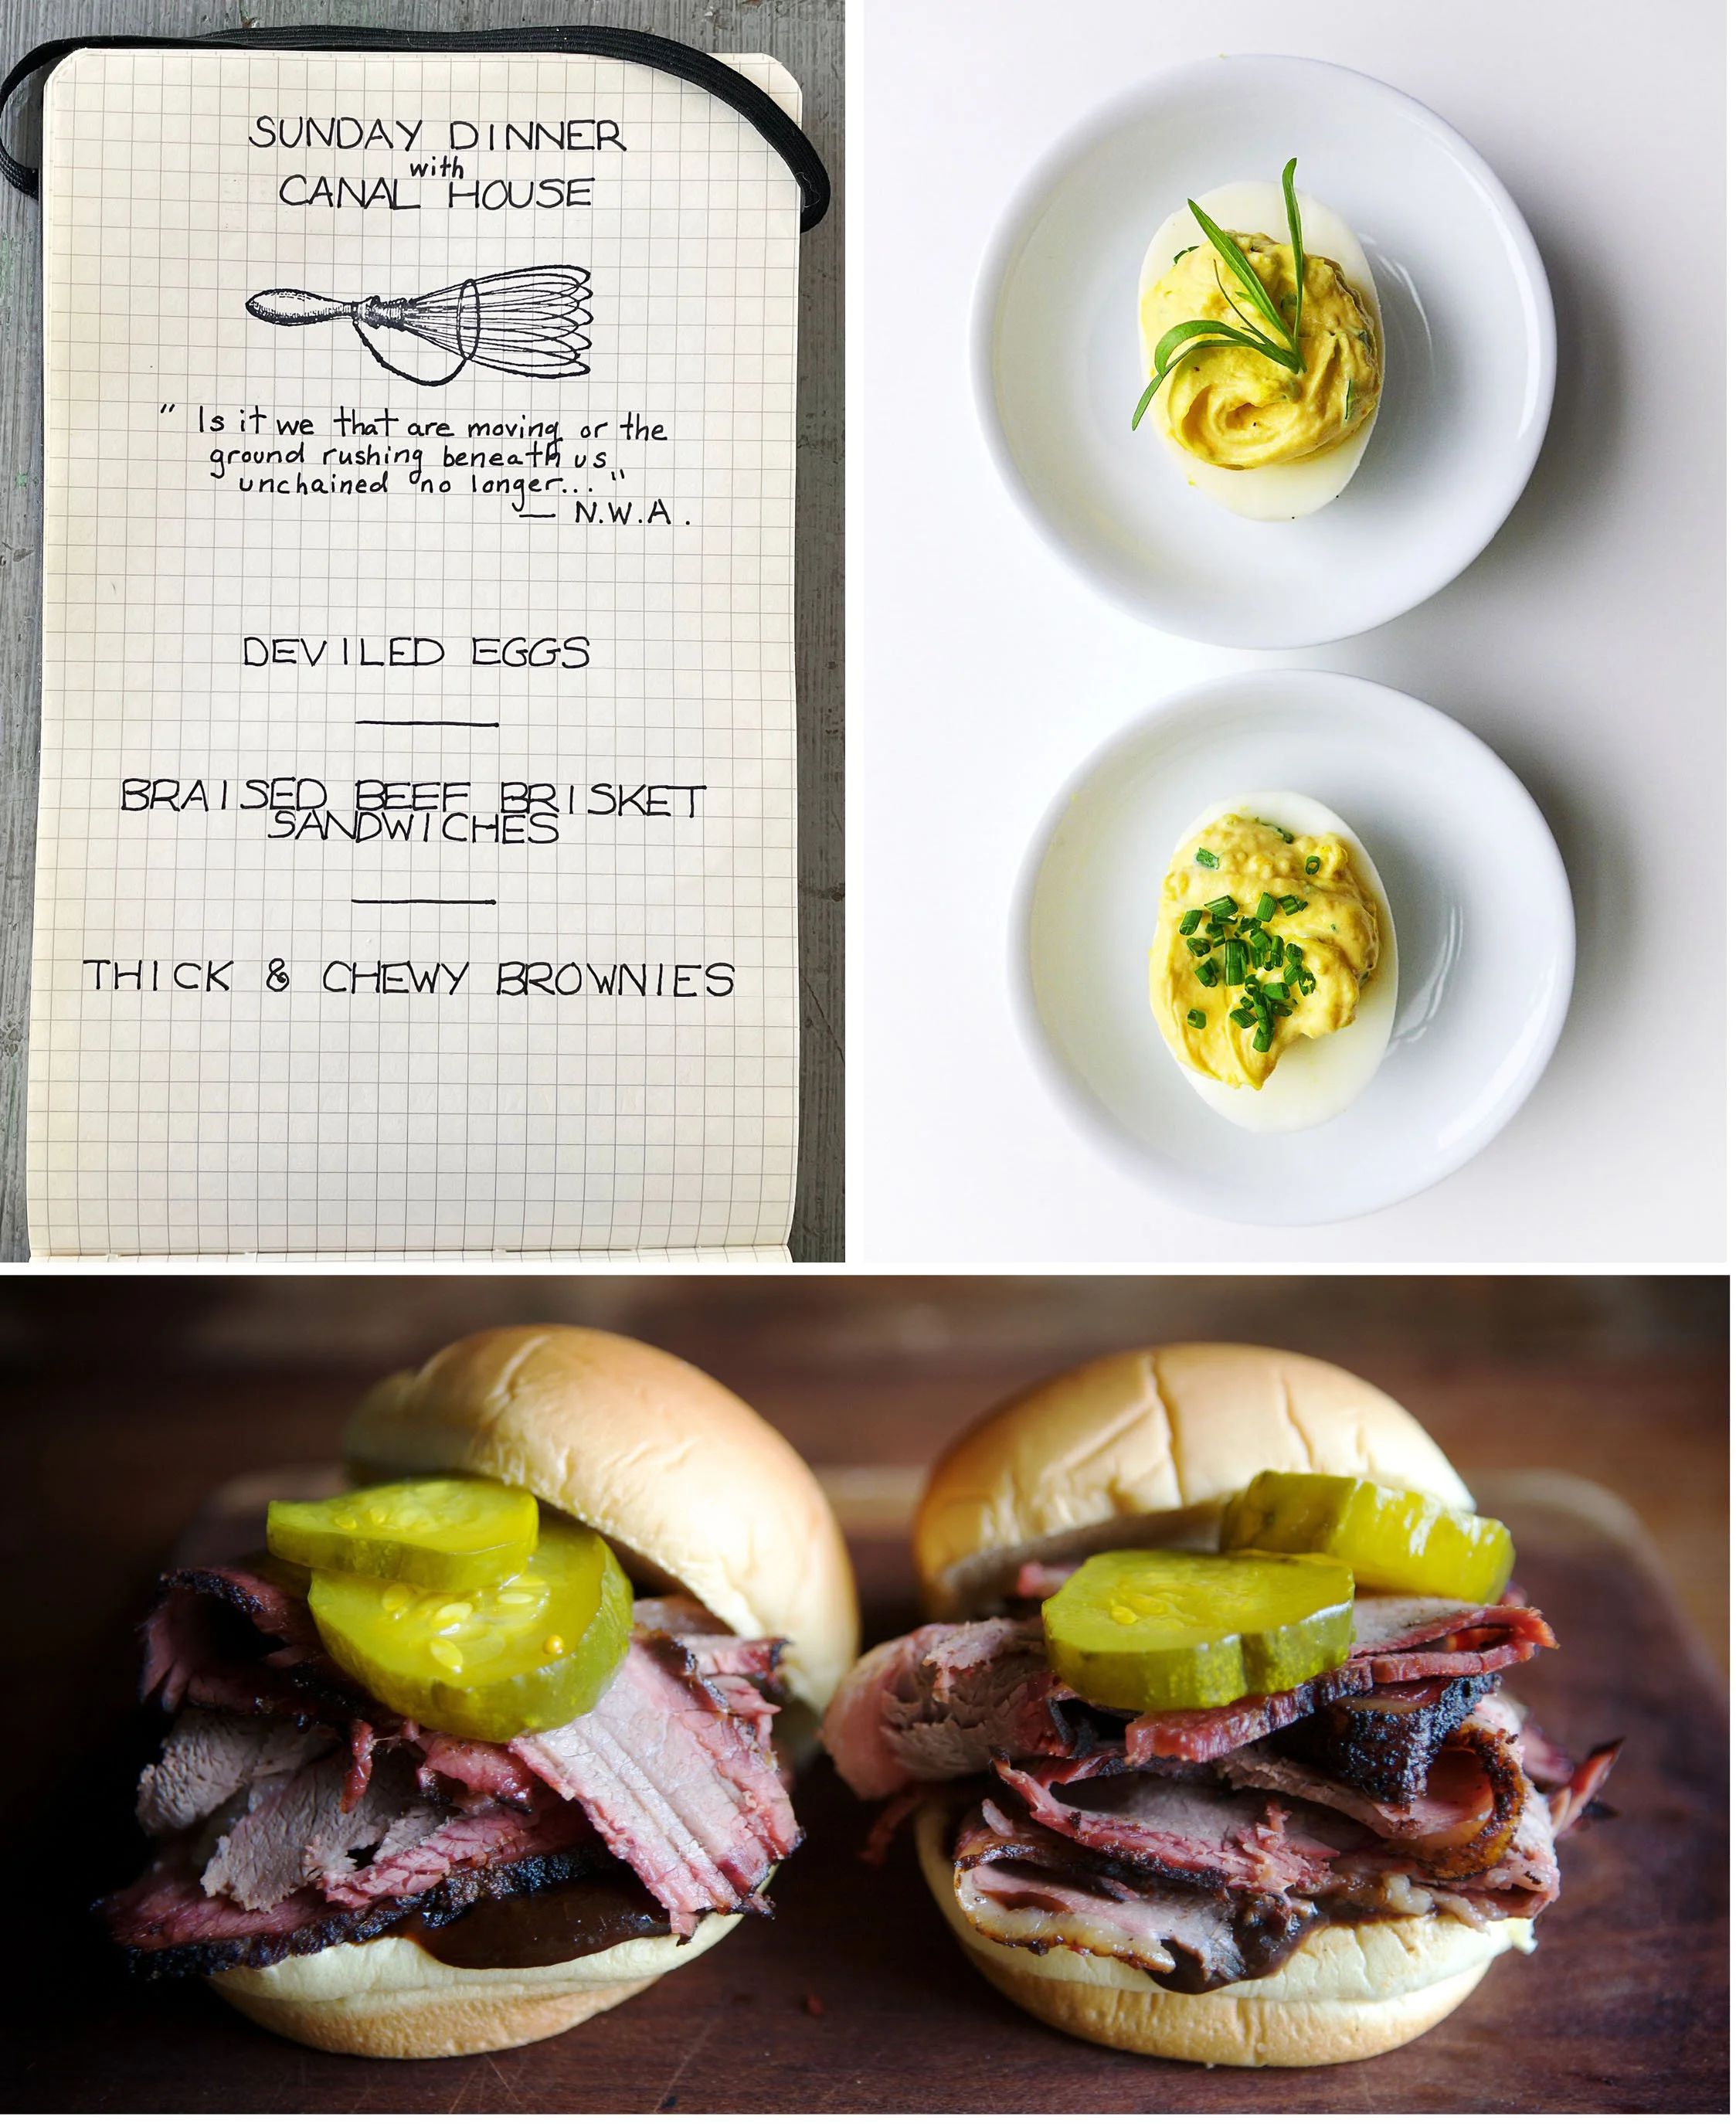
Counterclockwise from top left: our Memorial Day Sunday Dinner menu; Grilled Spare Ribs with ‘Hoisinful’ Sauce; Deviled Eggs with: chives & parsley, salmon roe & chives, bacon & chives, asparagus & preserved lemon
If you can’t babysit the ribs on the grill, then cook them in the oven and finish them on the grill to add a little smoky perfume. Even though baby back and country-style ribs look meatier, we prefer spare ribs (better yet St. Louis-style—spare ribs trimmed into a neat uniform rack) for succulent pork that is finger-lickin’, lip-smackin’ good. Our basting sauce is a mix of thick sweet hoisin sauce, smoky bourbon, and fresh garlic. We only baste in the last half hour to keep the sugars in the sauce from burning.
HOI-SINFUL SPARE RIBS serves 4
For the ‘Hoisinful’ Sauce
2 cups hoisin sauce
¾ cup bourbon
2 cloves garlic, smashed
For the Ribs
6 pounds pork spareribs, preferably St. Louis-style
Salt and pepper
For the hoi-sinful sauce, mix the hoisin sauce, bourbon, and garlic together in a bowl. Set aside and allow the garlic to flavor the sauce for about 1 hour. Fish out the garlic cloves and discard.
For the ribs, pat the ribs dry with paper towels. Remove the membrane on the underside of the ribs by loosening it first with a knife on one edge then by pulling it off diagonally with a pair of pliers. It may come off in pieces, that’s fine. (Your butcher may be willing to do this for you.) Rub the ribs with lots of salt and pepper.
Preheat the oven to 275°F. Put the ribs in a single layer on a large foil-lined baking sheet. Cook them in the oven until the meat is tender when pierced with a knife, and the ribs bend and “flop” when you pick them up with tongs, 2–3 hours.
To finish the ribs in the oven, during the last half hour of cooking, brush the ribs with Hoisinful Sauce every 5 minutes. The ribs will have a “lacquered” glaze.
To finish the ribs on the grill, preheat a grill with a lid. If using a charcoal grill, build a small charcoal fire to one side. If using a gas grill, fire up the “back burner” to a medium heat. Add a handful of soaked wood chips to the metal smoker box.This makes heat and smoke but not direct flame that can cause the sugary glaze on the ribs to burn. Put the ribs on the grill away from and off of the “fire”. Cover with the lid. Brush the ribs with the sauce every 10 minutes. Cook for 30 minutes.
Remove from the oven or grill and let the ribs rest on a cutting board for 15 minutes. Cut the slabs into ribs and serve.
You can find these recipes for this Sunday Dinner’s menu in our Canal House cookbooks. Don’t have our cookbooks? Click the links below to place an order.
DEVILED EGGS & BUTTERED EGGS: Cook Something: Recipes to Rely On, (Voracious, 2019), page 12
GRILLED SPARE RIBS & HOISINFUL SAUCE: Cook Something: Recipes to Rely On, (Voracious, 2019), page 339
LEMON-MAYO POTATO SALAD: Cook Something: Recipes to Rely On, (Voracious, 2019), page 148
THICK & CHEWY BROWNIES: Cook Something: Recipes to Rely On, (Voracious, 2019), page 408 and
Canal House Cooking Vol. N°6, page 115
Strawberries, Finally!
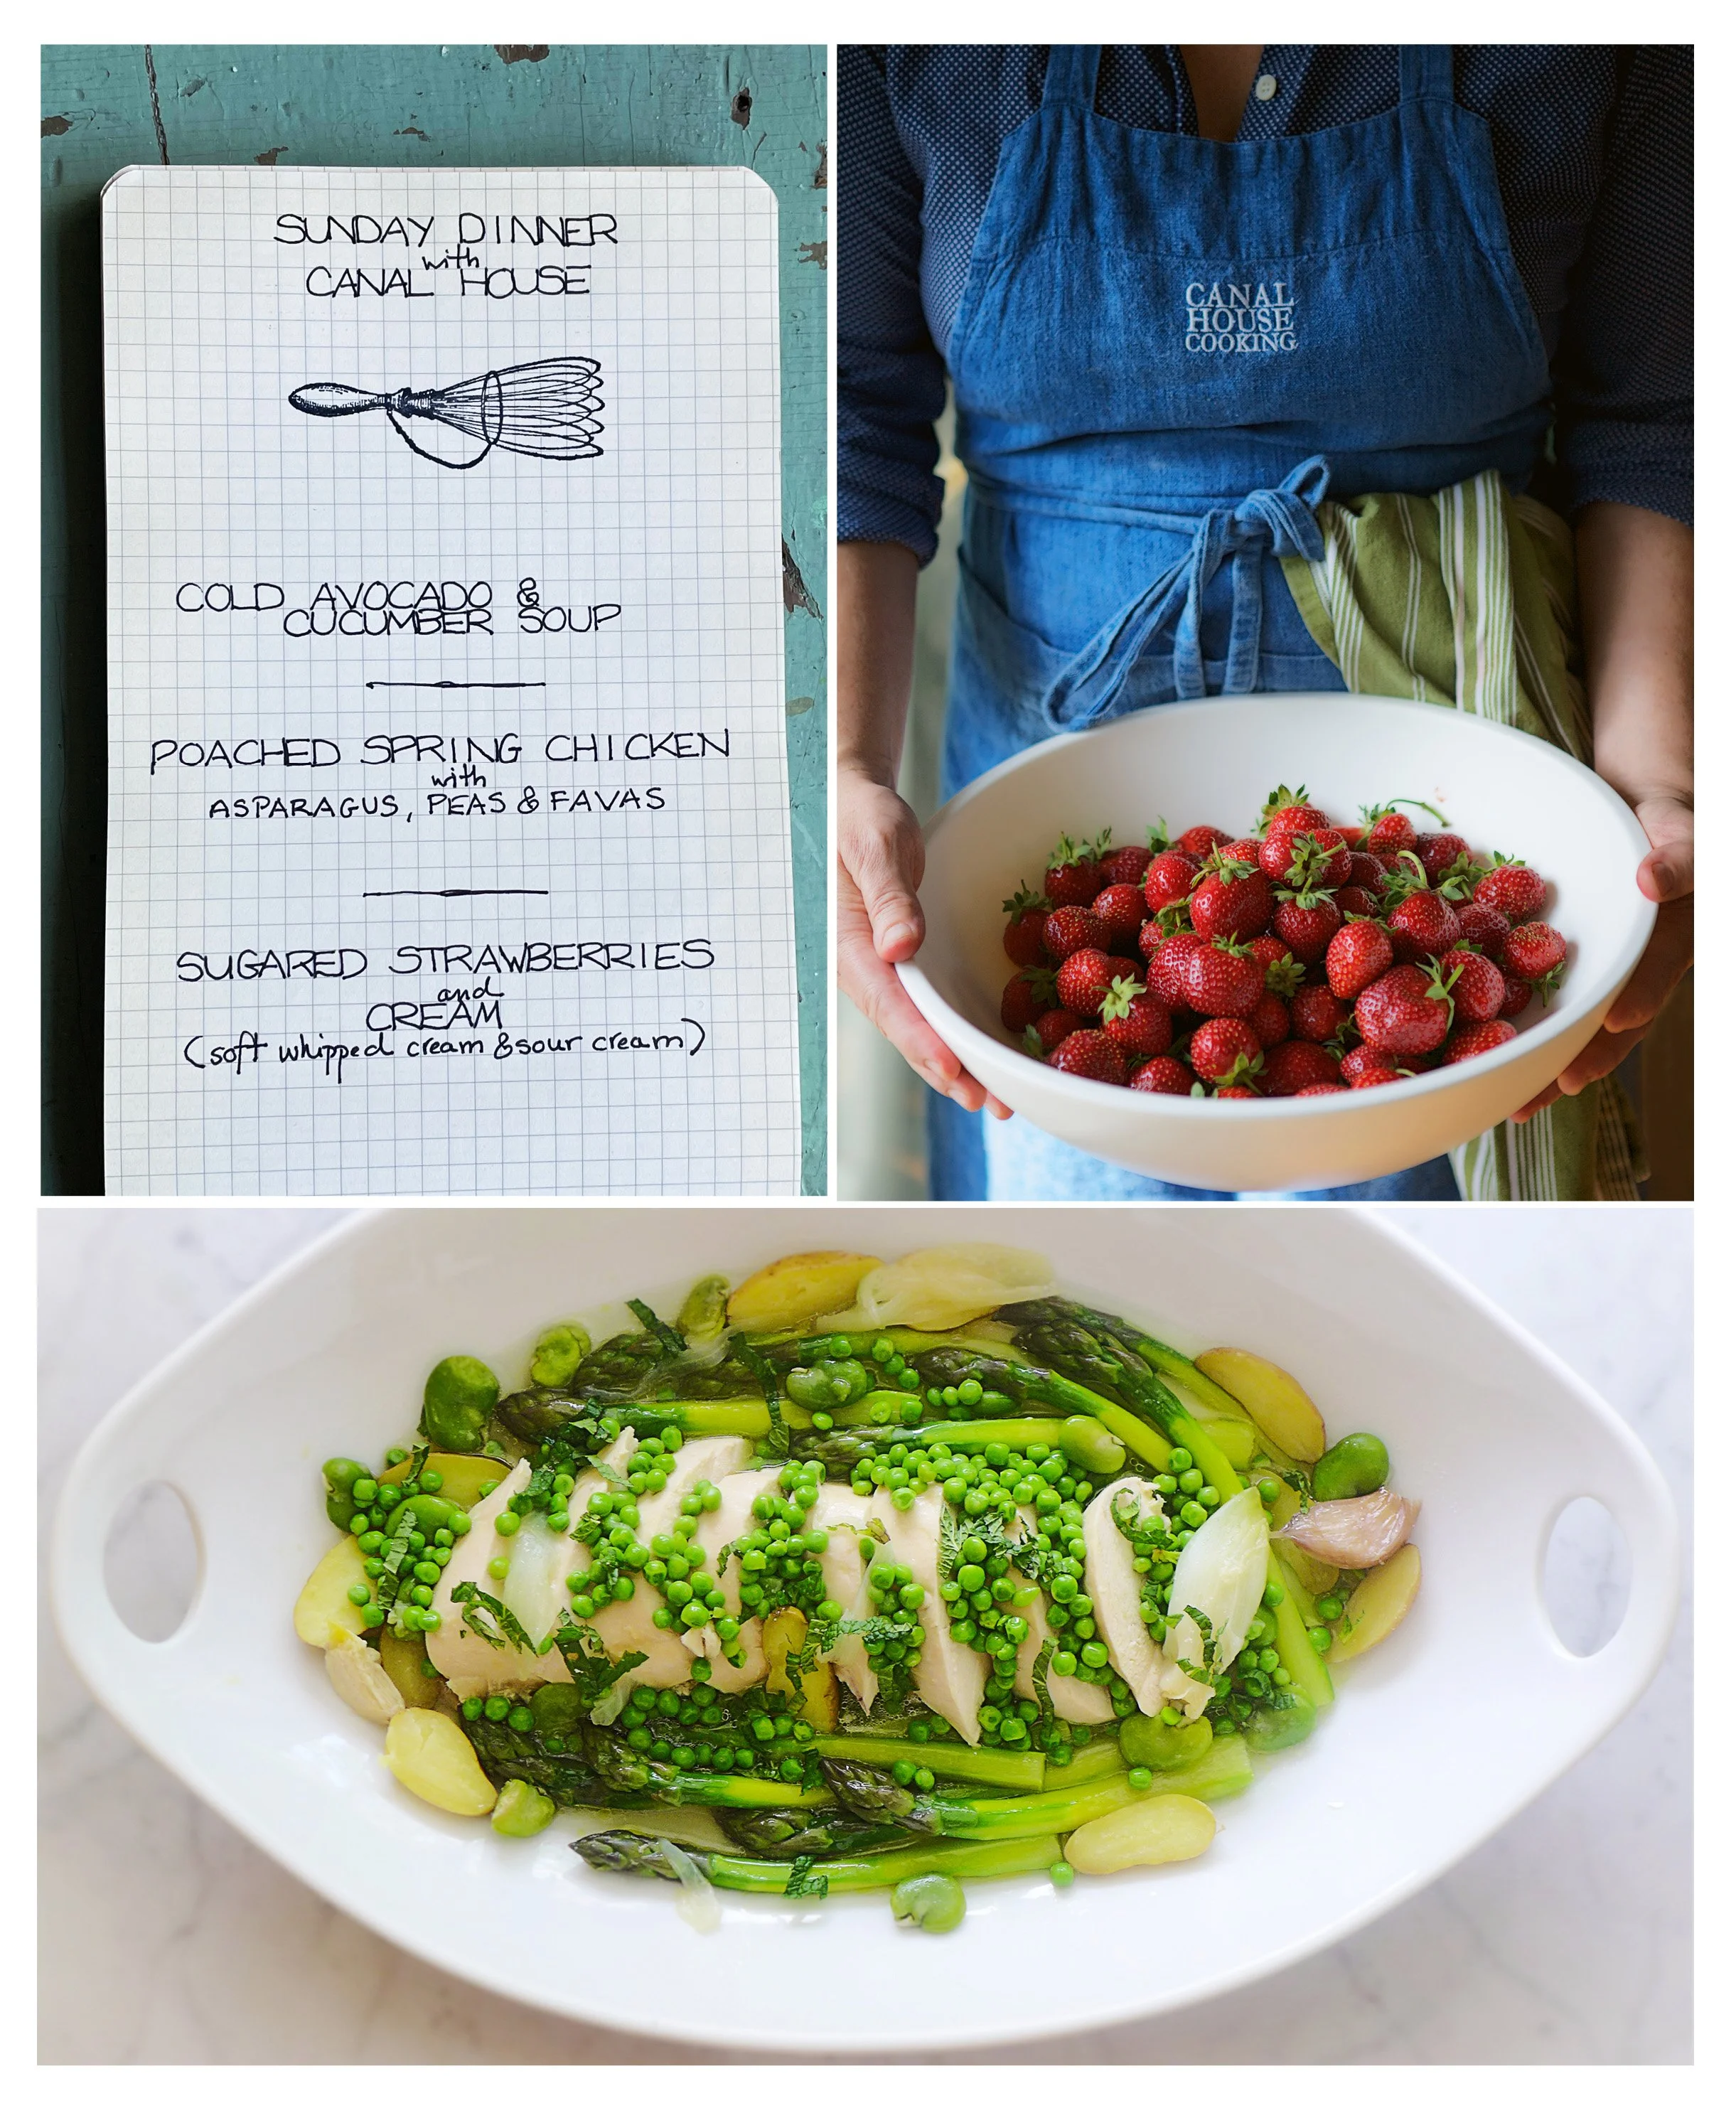
Counterclockwise from top left: our mid-May Sunday Dinner menu; Poached Spring Chicken with Asparagus, Peas & Favas; Sugared Strawberries and Cream
We always hope for Mother’s Day berries but it has been downright chilly here in the Northeast, so everything is late. It’s almost Memorial Day. But our local berries have finally arrived. This weekend we have spring’s full bounty—asparagus, peas, and strawberries—so let’s honor these gifts with a beautiful Sunday Dinner menu. We’ll tie on our aprons and get started: peeling the asparagus, shelling the peas, and washing and hulling the ‘strawbs’. We have been looking forward to this delicious work for months now.
POACHED SPRING CHICKEN serves 4–6
4 skin-on, split chicken breasts with ribs
1 onion, peeled and quartered
1 celery stalk, quartered
1 bay leaf
Salt
2 large handfuls of tiny fingerling potatoes
4 unpeeled garlic cloves
2 bunches trimmed, peeled fat asparagus
2 cups shelled peas
2 cups shelled favas (optional)
Extra-virgin olive oil
Some sliced fresh mint leaves
Put the chicken into a wide medium pot. Add the onions, celery, bay leaf, and a big pinch of salt. Add enough cold water to cover the chicken by at least 1 inch. Bring to a simmer over medium heat. Reduce the heat to low. Cover and poach the chicken until the juices run clear when pierced (the internal temperature should register 150°F–165°F on an instant-read thermometer), 20–30 minutes. Transfer the chicken to a plate to cool. Remove the skin and bones. (Return the skin and bones to the pot and continue to simmer the stock until it is rich and flavorful; strain the stock and save for another use.)
While the chicken is poaching, put the potatoes and garlic into another pot, cover them with cold water, add a generous pinch of salt, and gently boil them until the potatoes are fork-tender and the garlic is soft.
In another pot of salted boiling water, add the asparagus. Just before the asparagus finish poaching (about 4 minutes) add the peas and favas to the simmering water for 1 minute, then drain the vegetables.
Thickly slice the poached chicken breasts and arrange in a deep platter. Cut the potatoes in half and arrange them around the chicken along with the asparagus, peas, favas, and garlic (slipped out of their skins). Spoon some of the flavorful chicken poaching broth over all. Season with a sprinkle of salt, a drizzle of olive oil, and the mint leaves.
You can find these recipes for this Sunday Dinner’s menu in our Canal House cookbooks. Don’t have our cookbooks? Click the links below to place an order.
COLD AVOCADO & CUCUMBER SOUP: Canal House Cooking Vol. N°4, page 26
POACHED SPRING CHICKEN with asparagus, peas, & favas: Cook Something: Recipes to Rely On, (Voracious, 2019), page 237
STRAWBERRIES ROMANOFF: Canal House Cooks Every Day, (Andrews McMeel, 2012), page 62
How about pizza for our beloved Mama Mia?
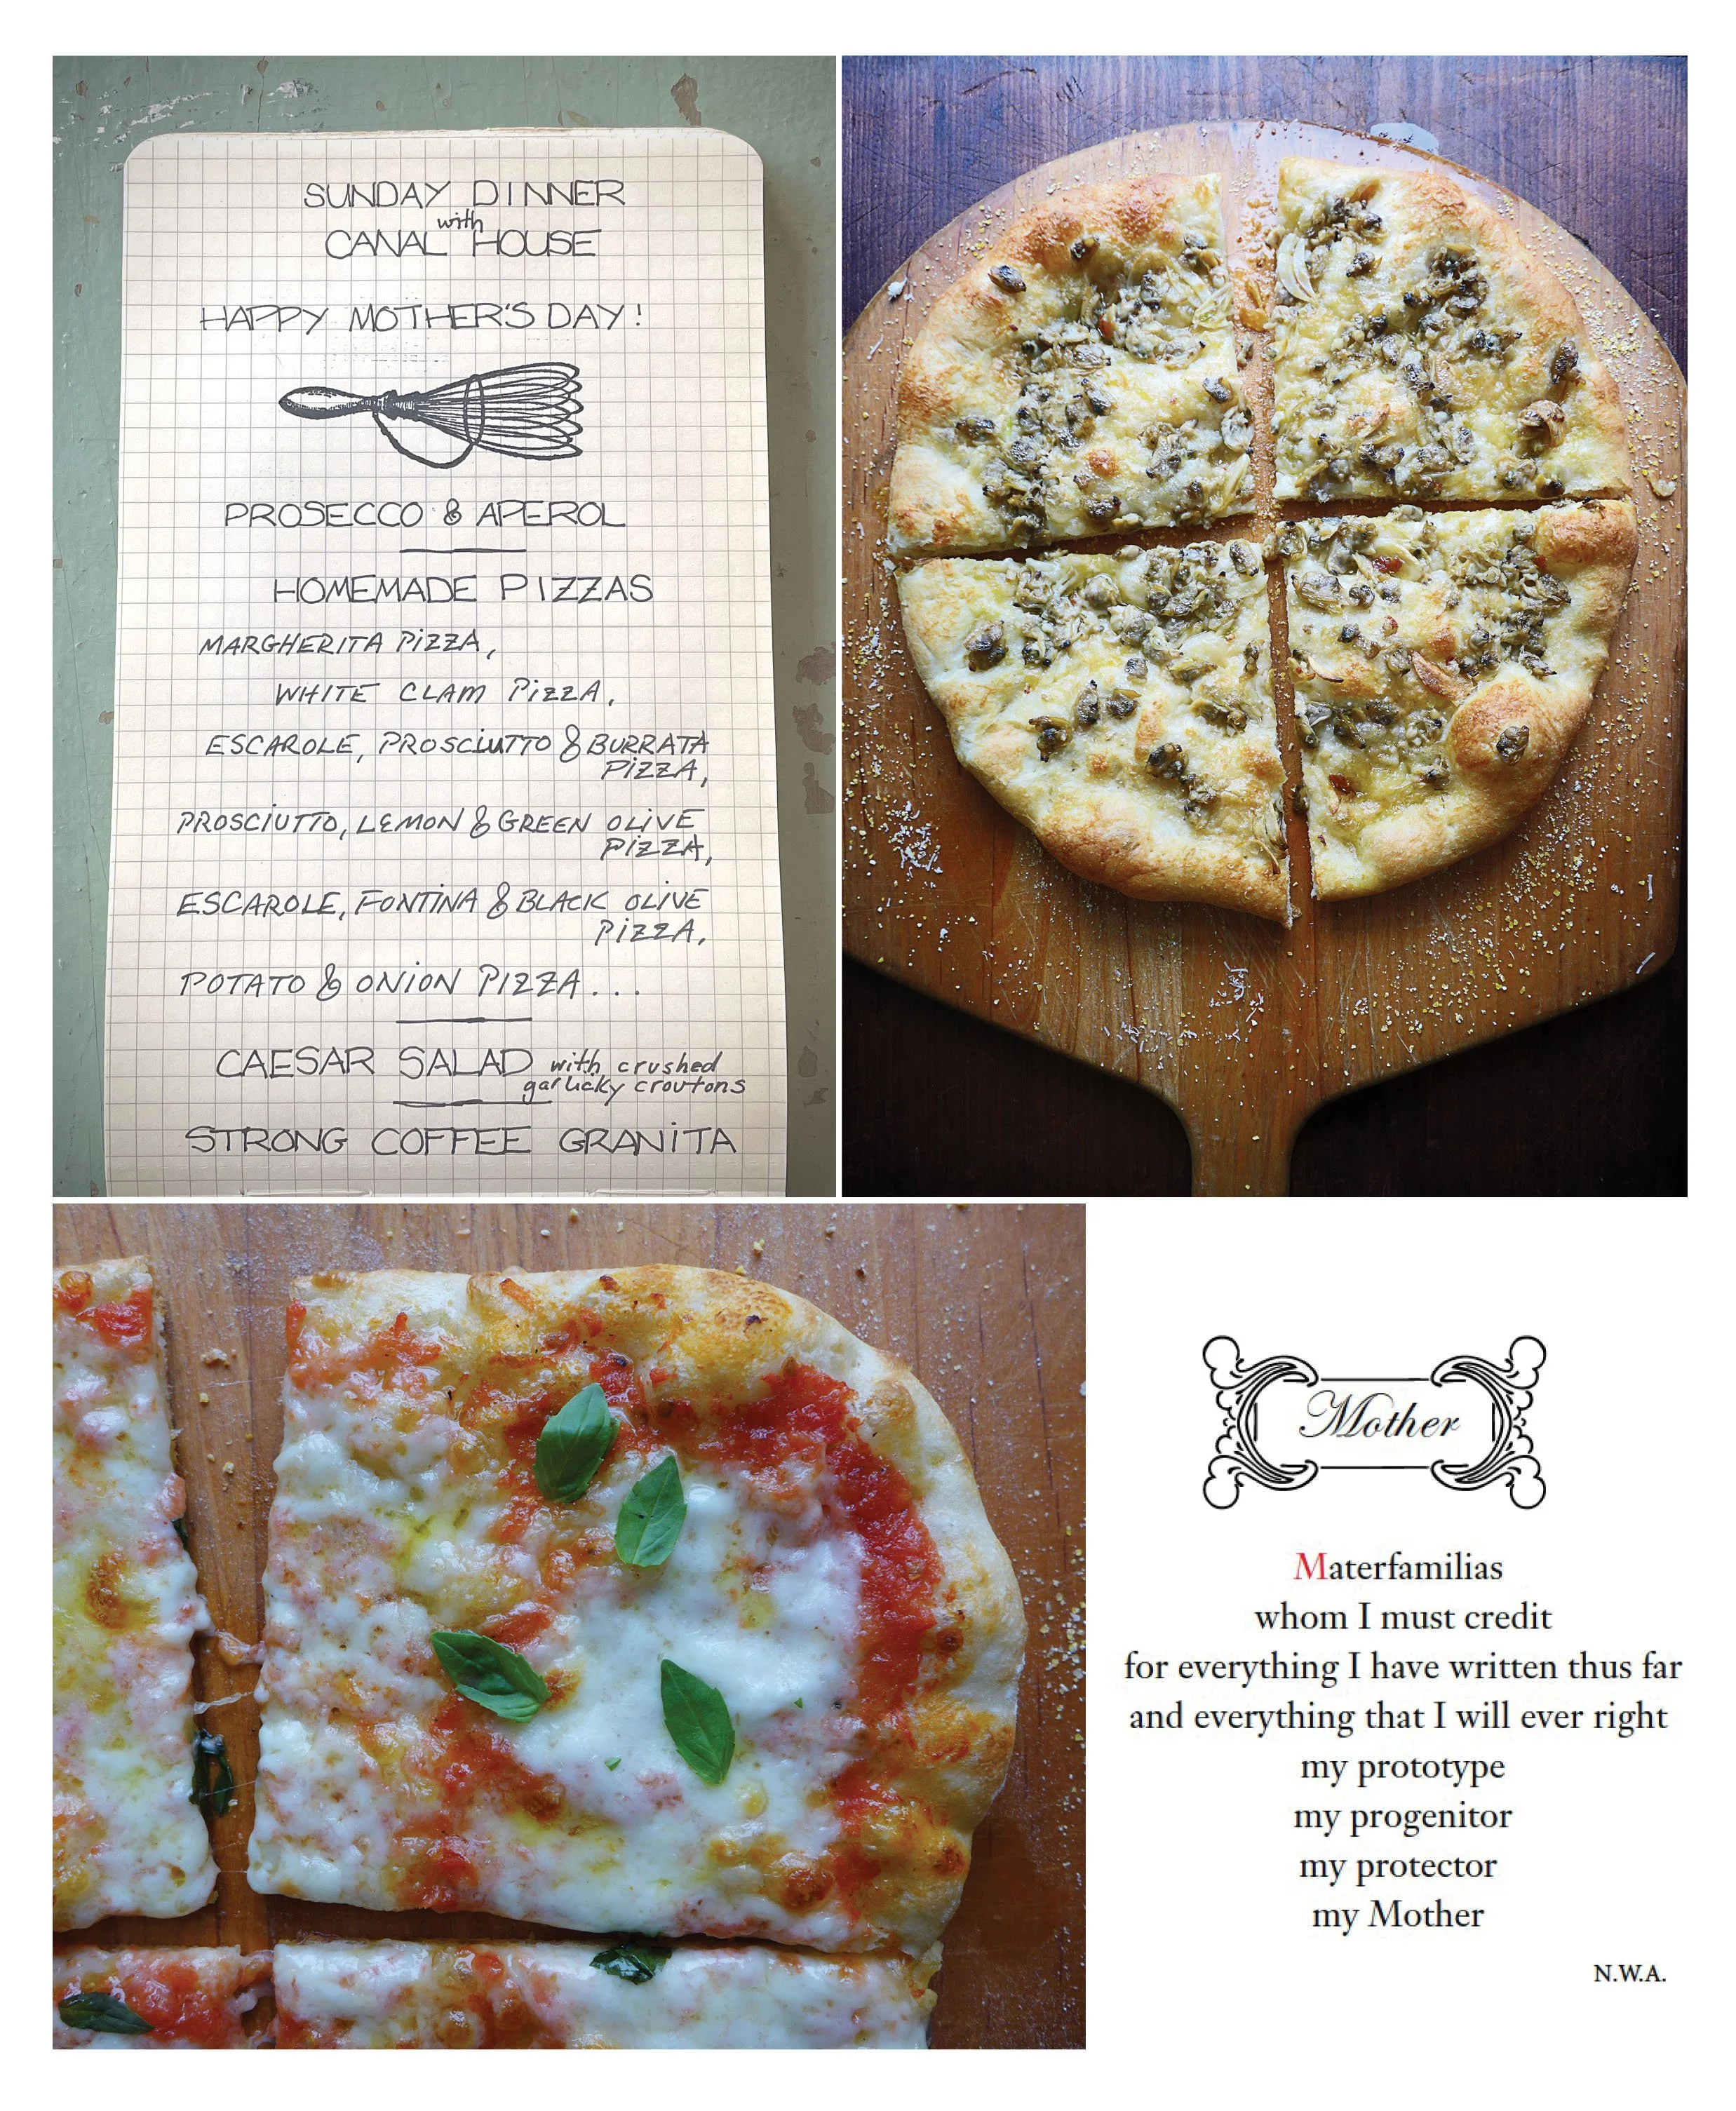
Counterclockwise from top left: the Mother’s Day Sunday Dinner menu; Margherita Pizza; Mother’s Day Poem by Nash West Anderson; White Clam Pizza
Let’s make Mother’s Day a fun day. Lord knows we could all use some good cheer these days. And one of the best ways we know to make a little merriment is to gather your friends and family together and twirl up a whole bunch of pizze! If you make the simple sauces, grate the cheeses, chop up anything that needs chopping ahead of time, this is a very easy meal. Heck, if you like, you can buy the prepared pizza dough from your local Italian deli, pizza parlor, or supermarket. And don’t stress if the “pies” don’t turn out perfectly round—they are individuals just like your friends and family! Bon Appetito.
PIZZA DOUGH makes enough to make four 10-inch pizzas
This pizza dough can be made early in the day and left to slowly rise in the refrigerator until the evening; you can even leave it overnight. Use this dough with your own pizza toppings.
One ¼-ounce envelope active dry yeast (2¼ tsps.)
3 tbsps. really good extra-virgin olive oil, plus more for the crust
4 cups bread flour, plus more for kneading
2 tsps. salt, plus more for the crust
Cornmeal
For the dough, dissolve the yeast in ½ cup warm water in a small bowl or in a large liquid measuring cup with a pour spout. Stir in 1¼ cups water and 2 tablespoons of the oil.
Pulse the flour and salt together in a food processor. Pour the yeast mixture through the feed hole in the lid while the processor is running and process until the dough comes together and forms a sticky ball, about 1 minute. Turn the dough out on a floured work surface and briefly knead into a smooth ball. Put the remaining 1 tablespoon oil in a large bowl. Roll the dough around in the bowl until coated all over with oil. Cover the bowl with plastic wrap and let the dough rise in a warm spot until it has doubled in size, about 2 hours.
To make pizzas, divide the dough into 4 equal pieces on a lightly floured surface and shape each into a ball. Place the balls at least 5 inches apart, loosely cover them with a clean, damp kitchen towel, and let them rise until nearly doubled in size, 30–60 minutes.
Place a pizza stone on the upper rack in the oven and preheat the oven to 500°F. Working with one ball at a time, stretch the dough into a 10-inch round on a floured surface, letting it rest and relax if resistant. Lay the dough out on a cornmeal-dusted pizza peel or a rimless cookie sheet. Prick the surface with a fork, brush with some oil, and sprinkle with salt. Arrange the pizza toppings of your choosing on the dough. Slide the pizza off the peel onto the hot pizza stone in the oven. Bake until the crust is puffed and golden around the edges and the topping is bubbling hot, 6–8 minutes. Use tongs or a spatula and the peel to remove the pizza from the oven.
SIMPLE TOMATO SAUCE makes about 2 cups
Put one 28-ounce can crushed tomatoes into a medium saucepan. Rinse the can with a little water to get the remaining tomatoes out and pour this into the pan. Add 1 peeled, halved medium yellow onion, 1 peeled, crushed garlic clove, and 4–6 tablespoons butter and season with salt and pepper. Simmer over medium-low heat, stirring occasionally, until the sauce thickens, about 60 minutes. Adjust the seasonings and add more butter for a softer, rounder flavor, if you like. Discard the onions and garlic before using.
MARGHERITA PIZZA makes one 10-inch pizza
Follow the directions for Pizza Dough. For one pizza, spoon a thin film (¼–½ cup) of Simple Tomato Sauce over the prepared pizza dough, leaving about a ½-inch border. Cover with 6–8 slices fresh mozzarella and drizzle with some extra-virgin olive oil. Bake the pizza, then scatter a handful of small fresh basil leaves on top when it comes out of the oven. Cut the pizza into wedges.
WHITE CLAM PIZZA makes one 10-inch pizza (and enough sauce for 4 pizzas)
Heat ¼ cup extra-virgin olive oil, 4–5 thinly sliced, peeled garlic cloves, and 1 or 2 generous pinches of crushed red pepper flakes in a small skillet over medium heat until everything begins to sizzle, 2–3 minutes. Stir in 1 cup (or more if you like) drained, canned baby clams and 1 or 2 splashes of the juice from the can, and season with salt to taste. Set aside. Follow the directions for Pizza Dough. For one pizza, finely grate some parmigiano-reggiano over the prepared pizza dough, then spoon a quarter of the seasoned clams evenly over the top. Brush the edges of the dough with more olive oil. Bake the pizza, then drizzle with a little more olive oil when it comes out of the oven. Cut the pizza into wedges.
These recipes can be found in our following cookbooks. Don't have our cookbooks? Click the links to place an order.
PROSECCO & APEROL: Canal House Cooking Vol. N°8, page 17
HOMEMADE PIZZAS: Cook Something: Recipes to Rely On, (Voracious, 2019), pages 172 and 188–191 and Canal House Cooking Vol. N°8, pages 104–108
CAESAR SALAD with crushed garlicky croutons: Canal House Cooking Vol. N°3, page 35
STRONG COFFEE GRANITA: Canal House Cooking Vol. N°4, page 113
Spring’s first darlings—asparagus & rhubarb
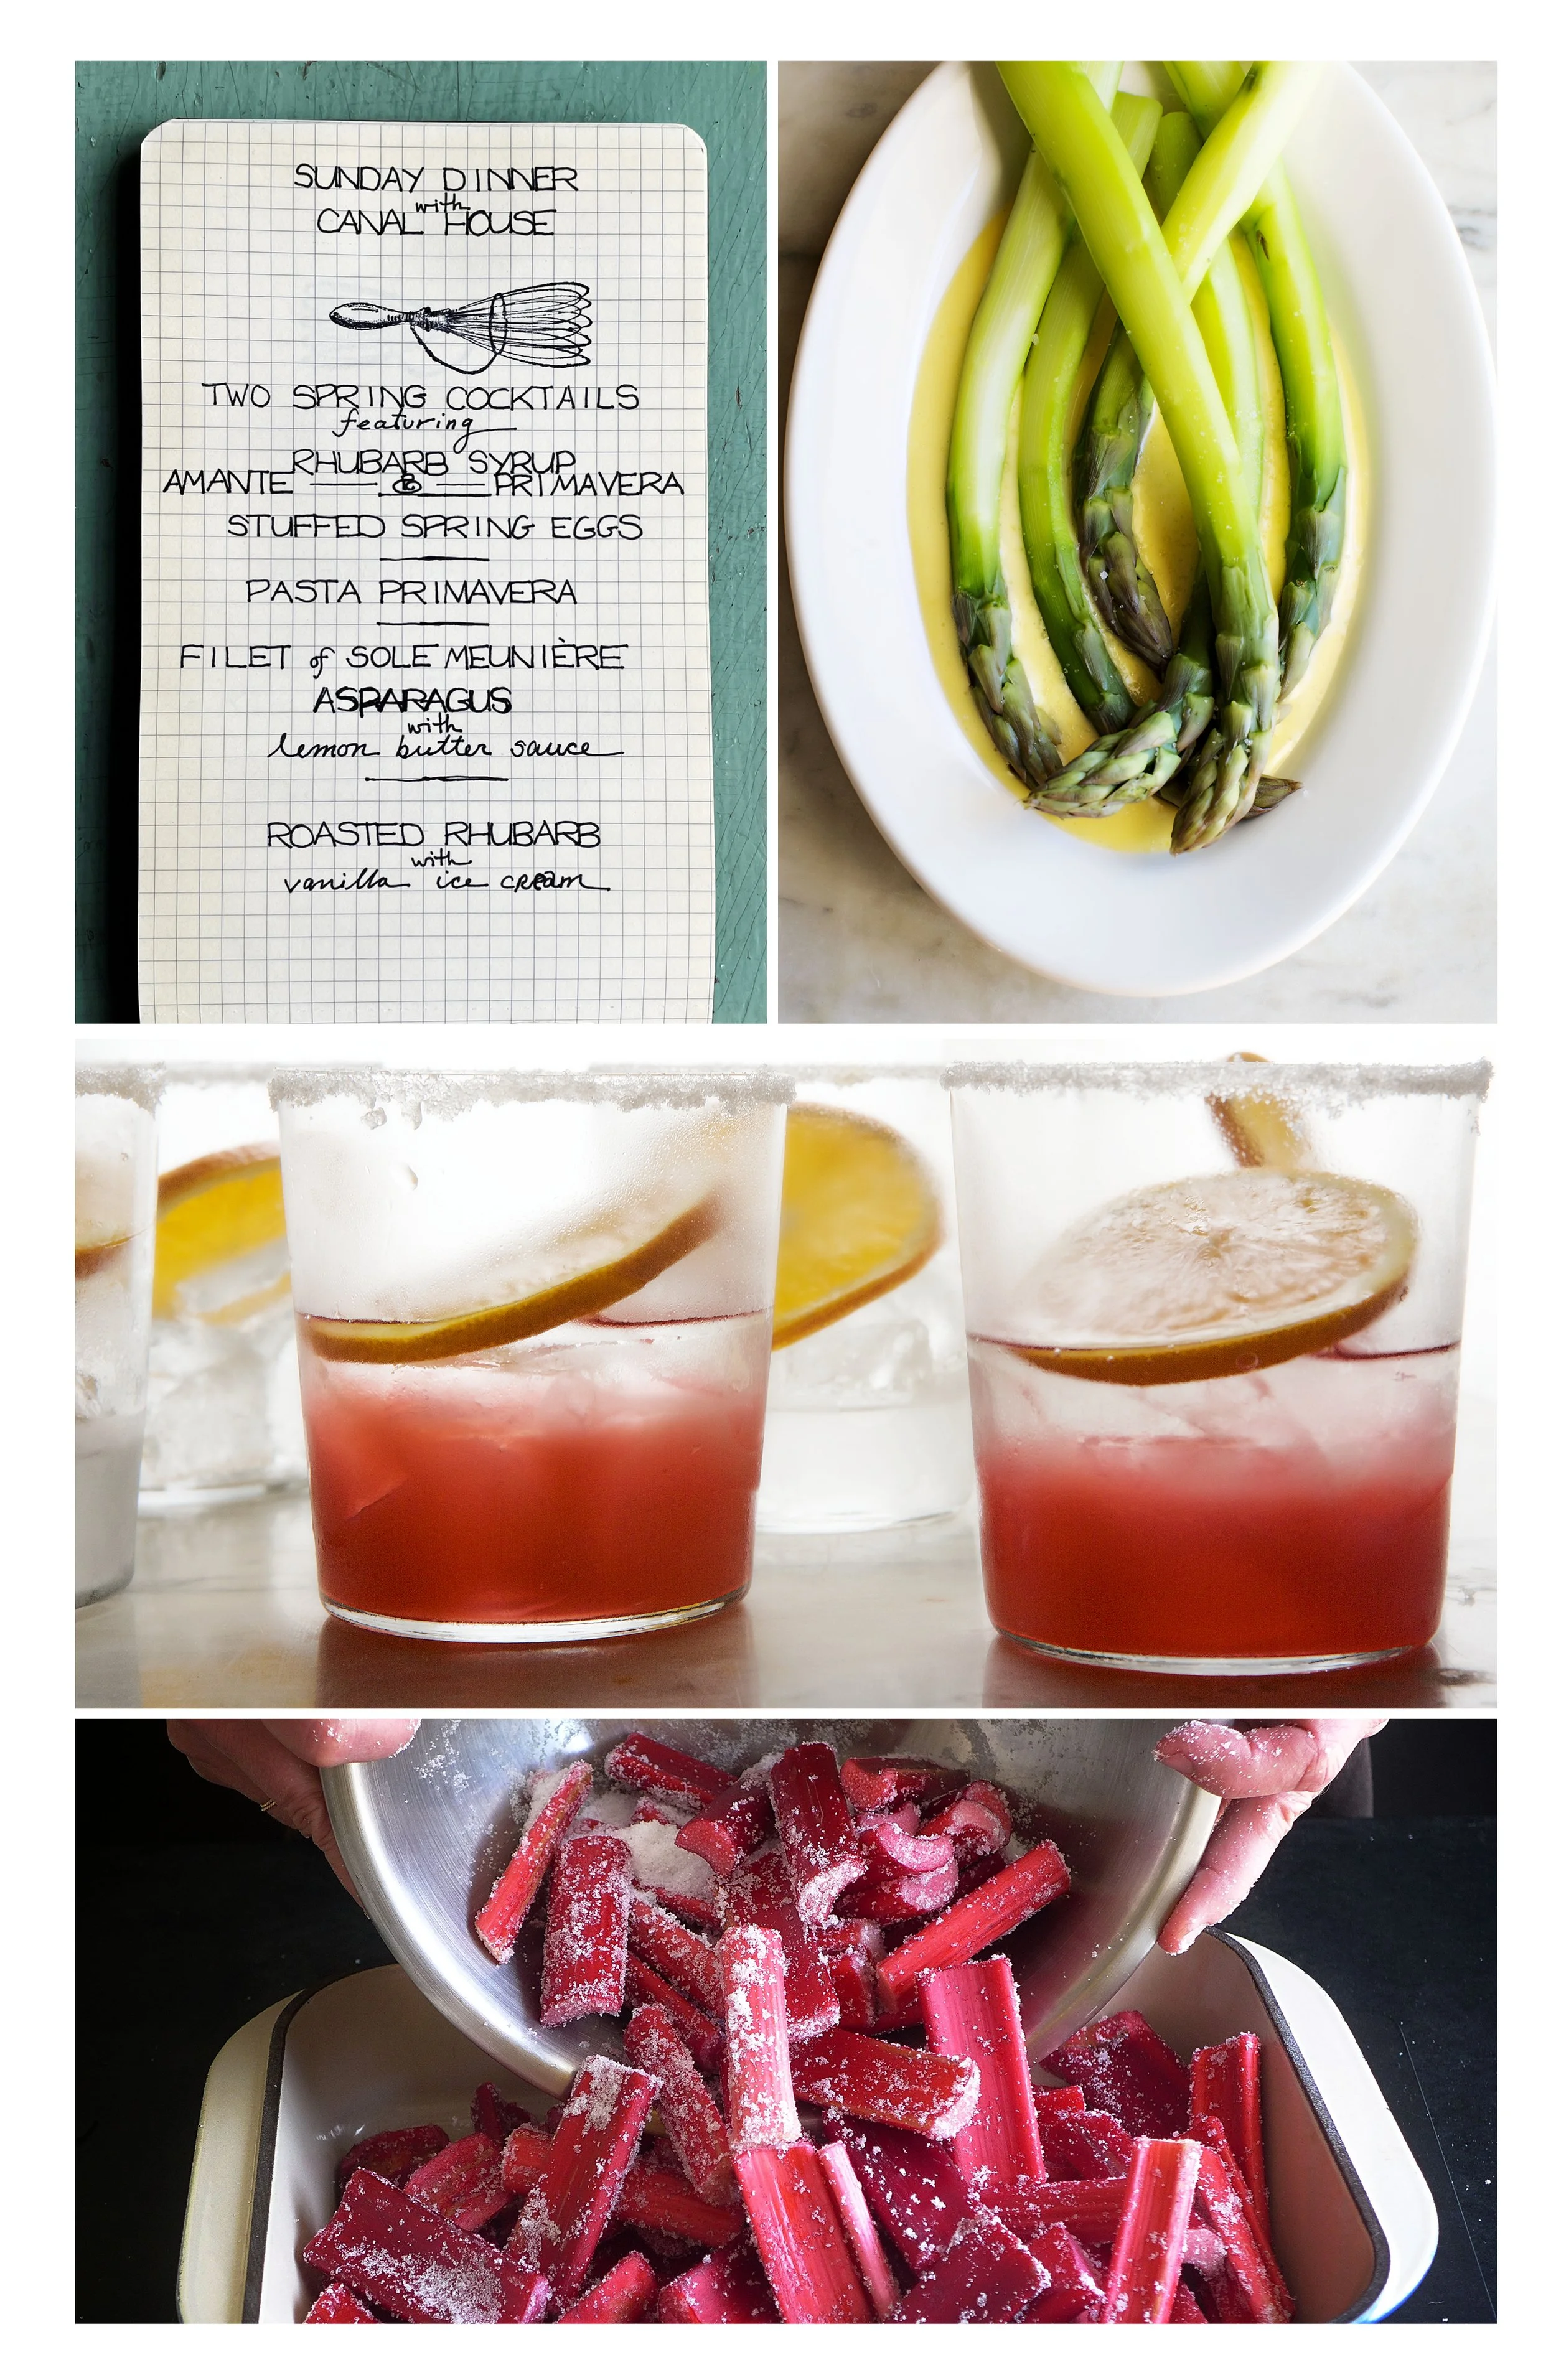
Counterclockwise from top left: the first May Sunday Dinner menu; Amante cocktails; sugared rhubarb before cooking; Asparagus with Lemon-Butter Sauce
When local asparagus arrive here in the Northeast, it’s a spring sensation, and we feast on the fat gnarly spears until they dwindle out, sometime toward the beginning of July. We can afford to be choosy when they’re in season, so we buy only spears with tightly closed tips and moist ends. Simultaneously, long succulent bright red or green stalks of rhubarb start showing up. So yesterday, with great excitement, we headed to one of our favorite markets anticipating piles of fat green and purple asparagus and bins of rhubarb. Alas, only a few lonely spears lay on a large empty table with a sign saying, “Our Own Asparagus—Picked Today”. Upon inquiry, we learned that though the field was full of the green beauties, they had no workers to pick them. It took every bit of restraint not to roll up our sleeves and head into the field to help them (and ourselves) out. Hmm, we have a little time on our hands right now, maybe we should sign up—good honest work in the great outdoors.
RHUBARB SYRUP makes about 4 cups
4 pounds fresh rhubarb, cut into pieces, or 4 pounds frozen rhubarb
1½ cups superfine sugar
2 cups (10 blood oranges) fresh blood orange or orange juice
Put the rhubarb and sugar into a pot and bring to a boil over medium heat. Reduce the heat to low and simmer for 50 minutes. Add the orange juice and cook for 10 minutes. Use a fine sieve to strain the juice into a bowl. Return the juice to the pot, bring to a gentle boil, and cook for about 20 minutes, until it has reduced to a light syrup. Measure the syrup and, if necessary, continue to cook over medium heat until it reduces to about 4 cups. Store in a covered container in the refrigerator for up to 1 month.
THE AMANTE for 1 cocktail
For each drink we mix together 3 ounces Rhubarb Syrup, and 2 ounces tequila, then pour it into sugar-rimmed glasses filled with lots of ice. We garnish the drink with a slice of orange. Or if you prefer your drink “up”, sugar the rim of a stemmed glass and put it in the freezer until it is frosty, then pour in the cocktail.
PRIMAVERA for 1 cocktail
Spring, with all its glories—its lightness, its frothiness—deserves to have a drink created in its honor. Normally we don’t like to mess with, or muck up wine—how can you improve on a vintner’s miracle? But in the spirit of the season we add (give or take) 2 ounces Rhubarb Syrup to a Champagne flute, then pour in about 4 ounces ice-cold Prosecco. Spring has sprung! For a nonalcoholic drink, pour 3 ounces Rhubarb Syrup into a stemmed glass. Add cold bubbly water. Serve over ice, if you like.
ASPARAGUS with LEMON BUTTER SAUCE serves 2–4
For the Asparagus:
Soak 1 pound fat asparagus in a few changes of cold water to help rid them of any sandy grit. Lay the spears on a cutting board to keep them from snapping, and peel off their skins up to the tips, using a sharp swivel-blade vegetable peeler. Trim off the woody ends with a sharp knife. Bring a deep skillet of water to a boil over high heat and generously season with salt. Cook the asparagus in the boiling water until tender, 4–5 minutes. Lift the asparagus out of the water with a slotted spatula and drain on a clean dish cloth. Serve the asparagus hot with Blender Lemon-Butter Sauce.
For Blender Lemon-Butter Sauce:
Put 4 large egg yolks, ¼ cup fresh lemon juice, a big pinch of salt, and pepper to taste into the jar of an electric blender. Cover and blend for 1 minute. With the motor still running, gradually add 8 tablespoons warm melted butter in a slow steady stream through the hole in the blender lid, leaving any milky solids behind. Adjust seasonings. Serve with asparagus. makes 1 cup
The Chicken & the Garden Giveth . . .
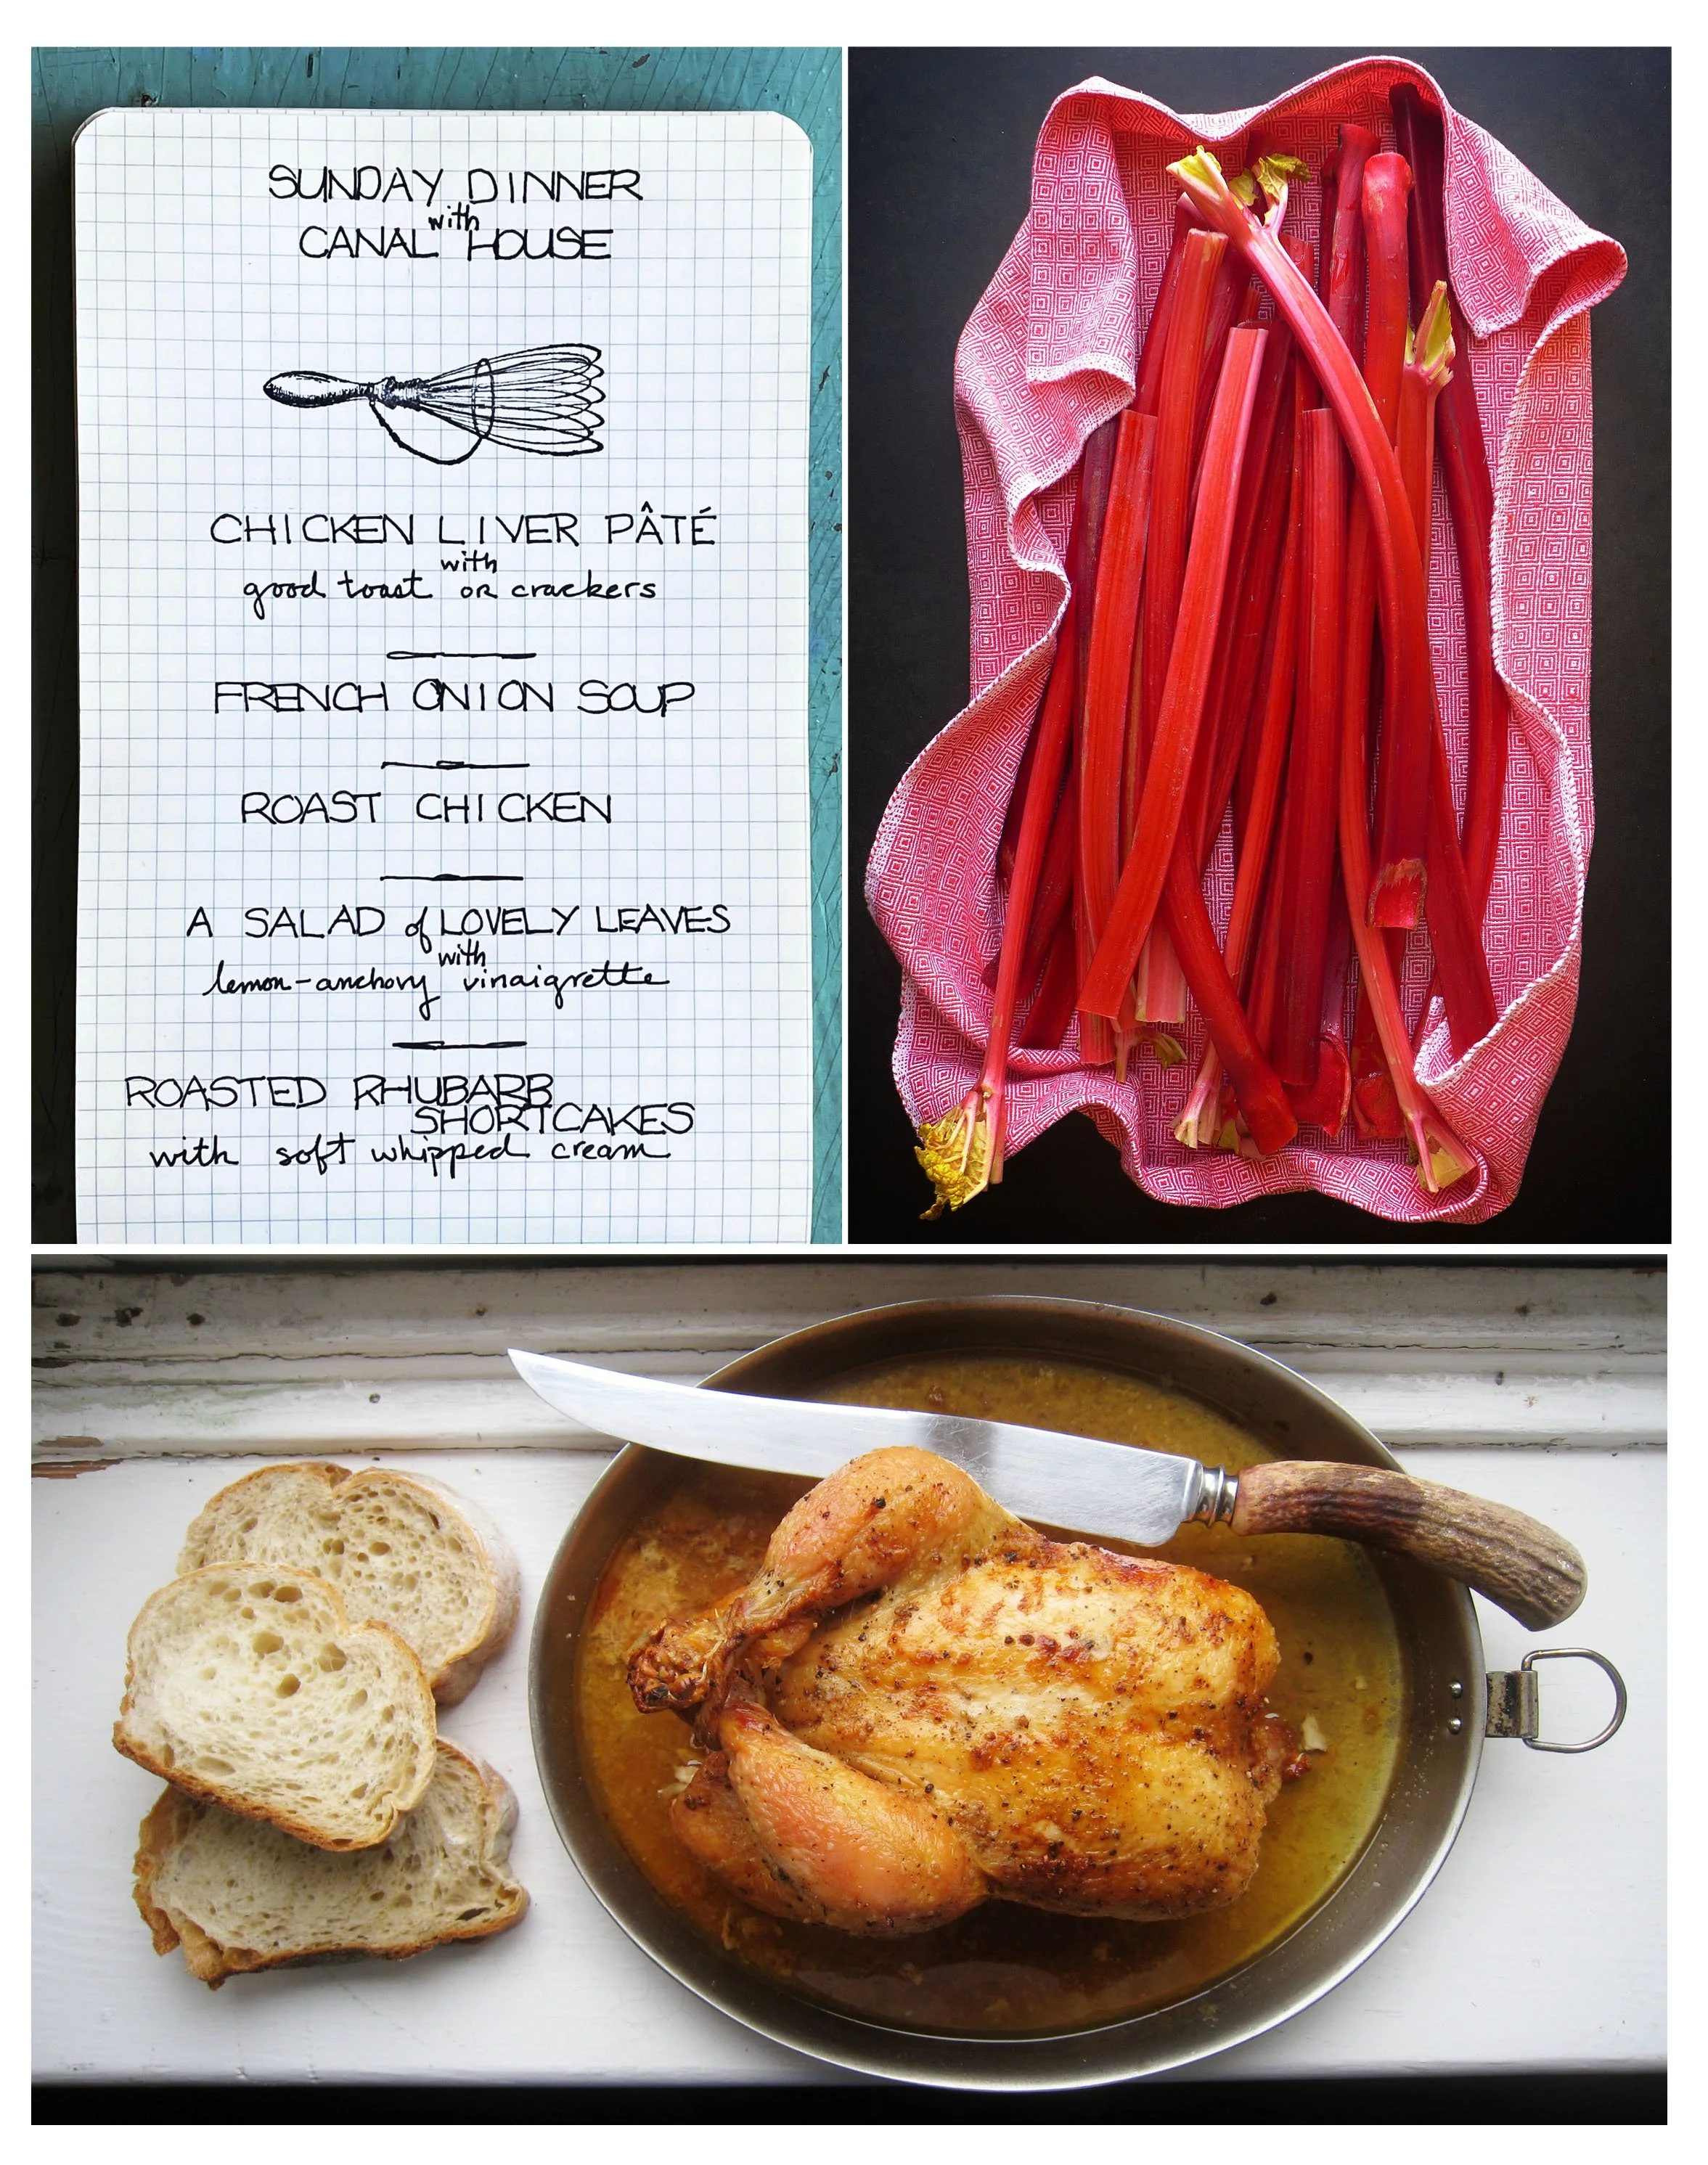
Counterclockwise from top left: Sunday Dinner menu; Roast Chicken; long stalks of spring rhubarb
Spring is knocking itself out these days—warm days, cold nights, rain squalls. Though we are eager for the garden to giveth, not much can withstand spring’s temperamental weather. But rhubarb can. In previous times you’d find a patch of rhubarb planted outside every back door in rural America. It is one of the first plants to poke its head through the early spring soil. Botanically a vegetable, it is most often prepared like a fruit.
We’ve both cooked a lot of rhubarb over the years and together we have decided roasting is our favorite way to prepare it. The stems release lots of juice as they cook, so we add only a little red wine for flavor and hold back on the sugar too—just enough to tame the tangy taste.
ROAST CHICKEN Serves 4–6
For flavorful, juicy meat, we dry-brine the chicken. To keep the skin taught and crisp, roast the bird in two phases: first at a high temperature, then at a lower one after a brief rest out of the oven.
One 3–5 lb. chicken, rinsed and patted dry
1 tbsp. kosher salt
1½ tsps. sugar
2 tbsps. butter, melted
Put the chicken, breast-side up in a wide dish. Combine the salt and sugar, and gently rub it all over the outside of the bird. Refrigerate, uncovered, for at least 1 hour, but up to 12 hours is preferable.
Preheat the oven to 475°F with a rack set in the middle of the oven. Brush off any of the salt mixture and pat the chicken dry with paper towels (don’t rinse the bird). Put it breast-side up on a roasting rack set in a roasting pan. Tie the legs together with kitchen string. Tuck the wing tips under the back. Brush the chicken all over with some of the melted butter. Add 2–3 cups water to the pan.
Roast the chicken until the skin is golden and taut, 20–30 minutes, brushing it with butter halfway through. Remove the bird from the oven. Brush it with the remaining butter. Let it rest for 15 minutes.
Reduce the oven temperature to 350°F. Return the chicken to the oven and finish roasting it until the skin is deep golden brown and the thigh juices run clear when pierced, about 30 minutes, depending on the size of the bird. (The internal temperature of the thigh meat should register 165°F on an instant-read thermometer.) Remove the chicken from the oven and let it rest for 10–15 minutes before carving. Serve the chicken with the pan drippings.
ROASTED RHUBARB SHORTCAKES Serves 8
Remember the color of the stalks, which can range from green to deep red, will affect the color of the filling but not rhubarb’s vibrant tart flavor, which is unaffected by hue.
For the rhubarb:
2 lbs. rhubarb, trimmed and cut into 1-inch thick pieces
1 cup granulated sugar
½ cup red wine
1 vanilla bean, split lengthwise
For the biscuits:
1 cup (120 g.) cake flour
1 cup (120 g.) all-purpose flour, plus more for the work surface
4 tsps. baking powder
1 tsp. granulated sugar
1½ tsp. salt
3 cups cold heavy cream
4 tbsps. salted butter, melted
For the rhubarb, preheat the oven to 350°F. Combine the rhubarb, sugar, and wine in a medium baking dish. Scrape in the seeds from the vanilla bean, and stir to combine. Roast the rhubarb until very tender and the juices are syrupy, 30–40 minutes, depending on thickness of stalks. Let cool.
For the biscuits, preheat the oven to 375°F with a rack set in the middle of the oven. Whisk the cake flour, all-purpose flour, baking powder, sugar, and salt in a medium bowl to combine. Add 1½ cups of the cream and gently mix just until the dough holds together.
Transfer the dough to a lightly floured surface and form into a 9 X 6-inch rectangle about 1-inch thick. Cut the dough in half lengthwise, then cut crosswise three times to form 8 rectangular biscuits.
Arrange the biscuits on a parchment paper lined baking sheet, spacing them about 1 inch apart. Brush the tops and sides of the biscuits with some of the melted butter. Bake the biscuits until golden brown, 18–20 minutes. Transfer to a wire rack to cool (biscuits can be served warm or at room temperature).
Beat the remaining 1½ cups cream in a medium bowl until soft peaks form. Split the biscuits and brush the cut sides with the remaining melted butter. Fill the biscuits with roasted rhubarb and serve with the whipped cream.
hippity hop
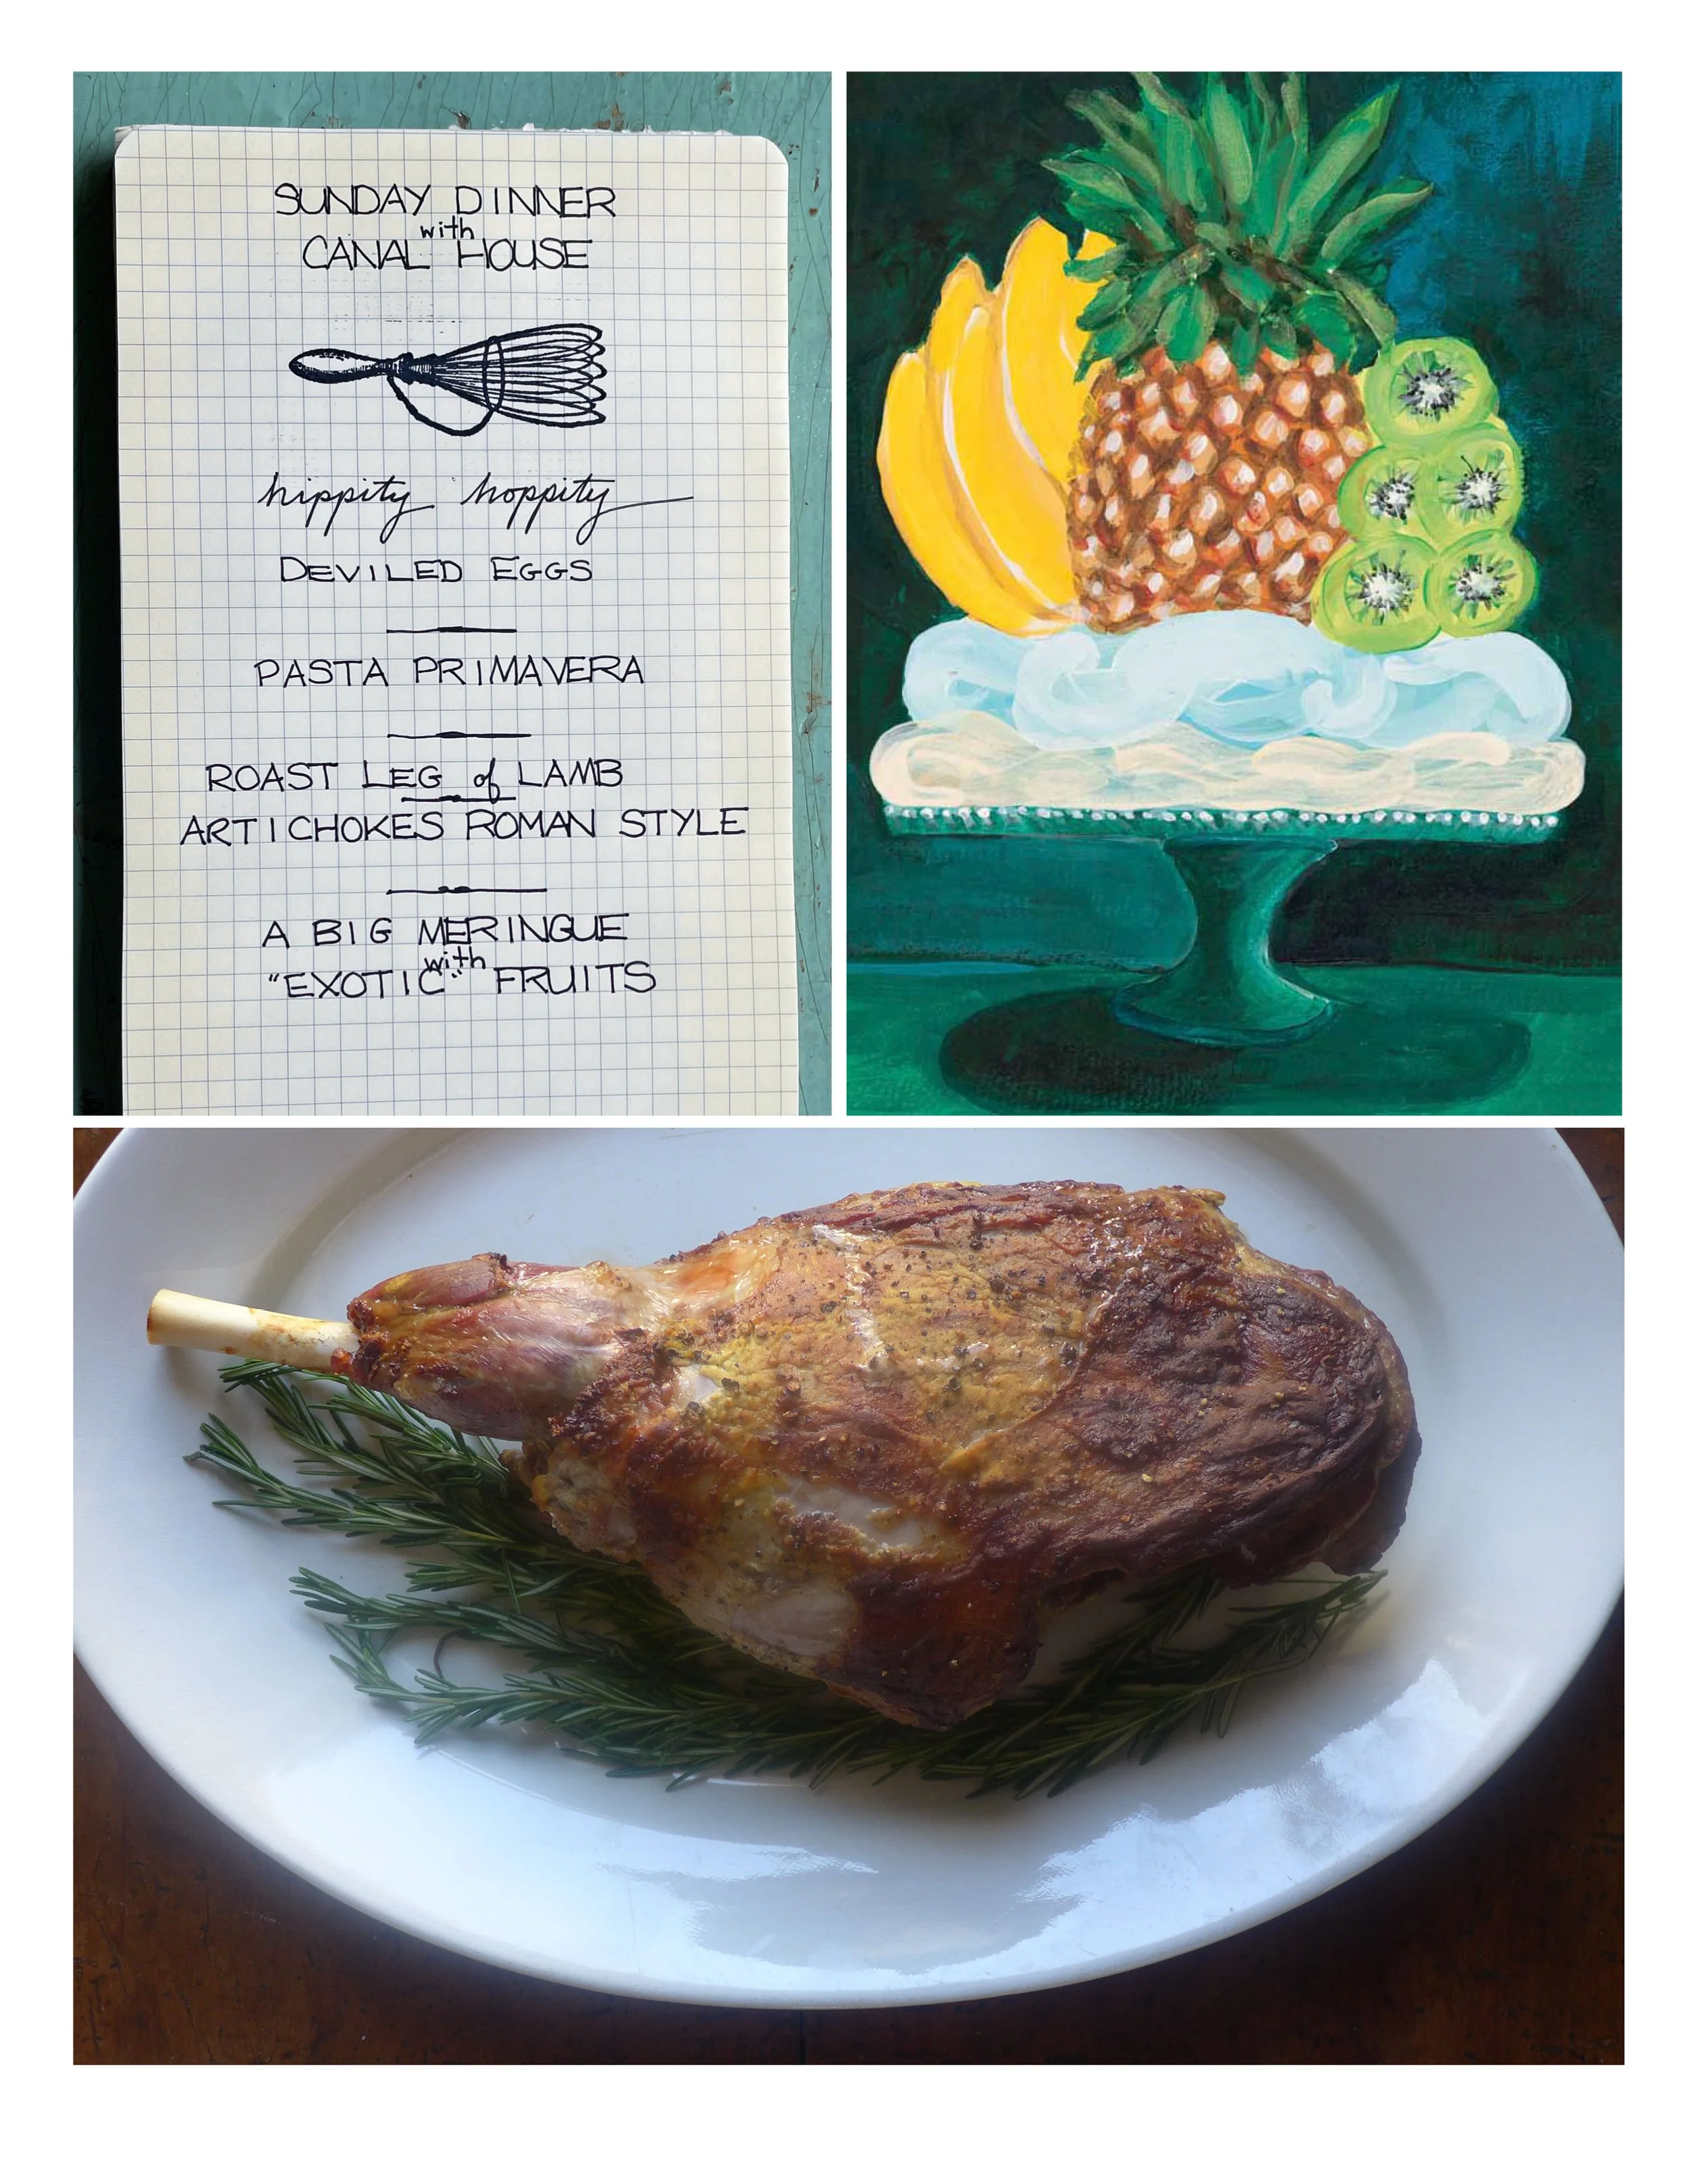
Counterclockwise from top left: Easter Sunday Dinner menu; Roast Leg of Lamb; A Big Meringue with “Exotic” Fruits
ROAST LEG OF LAMB Serves 8
The rosy pan juices from this roast leg of lamb are perfectly flavorful au naturel, but for a rich brown gravy we add black coffee to the roasting pan to flavor the pan juices.
1 leg of lamb, 4–5 pounds, tail, pelvic, and thigh bones removed, shank bone and heel left attached, at room temperature
Salt and pepper
3 cloves garlic, chopped
3 anchovy filets
Large handful of fresh parsley leaves
2 cups black coffee
2 tablespoons flour
2 cups chicken stock, or more
Preheat the oven to 350°F. Season the lamb with salt and pepper. Make a pile with the garlic, anchovies, parsley, and a pinch of salt and pepper on a cutting board and chop it together to make a fine paste. Using the tip of a paring knife, make several 1-inch-deep slits all over the meaty parts of the lamb. Push the paste into the slits with your finger. Some of the paste will smear on the surface of the lamb, but that’s fine.
Put the lamb on a roasting rack in a roasting pan. Pour the coffee into the pan. Roast the lamb until it is nicely browned on the outside, rosy pink on the inside, and the internal temperature reaches 130° for medium-rare, about 1½ hours. Add a splash of water to the pan as the lamb roasts if the pan juices begin to dry out. Transfer the lamb to a warm serving platter or cutting board, loosely tent it with foil, and let the roast rest for 15–20 minutes before carving.
To make the pan gravy, put the roasting pan with the drippings on top of the stove and heat over medium heat. Add the flour and cook, whisking constantly to prevent it from getting lumpy, until the flavor is toasty rather than raw, 3–4 minutes. Whisk in the stock and cook, whisking constantly, until the gravy is smooth and thickened, about 5 minutes. Season with salt and pepper. Thin the gravy with a little more stock if it’s too thick. Strain the gravy through a sieve into a gravy boat and serve with the carved roast.
A BIG MERINGUE WITH “EXOTIC” FRU ITS Serves 8–12
Easter dessert. You want to serve something as pretty and showy as an Easter bonnet. The holiday usually comes too early in the spring for any of the delicious local fruits, so we like to serve this big meringue piled high with billowy whipped cream, decorated with sweet, tart “exotic” fruits or fresh strawberries if they are in season in your neck of the woods.
4 large egg whites, at room temperature
Pinch of cream of tartar
1 cup superfine sugar
1 teaspoon white vinegar
½ teaspoon vanilla extract
1½ cups heavy cream
Exotic fruits: 1 ripe pineapple, peeled, cored, and cut into chunks; 2–3 bananas, peeled and sliced; 4 kiwi, peeled, quartered, and sliced; pulp of 2 passion fruits
Preheat the oven to 275°F. Line a cookie sheet with parchment paper and set aside. Put the egg whites and cream of tartar into a large mixing bowl. Beat the whites on medium speed until they are very foamy, then increase the speed to medium-high and beat until they hold medium-stiff peaks. Continue beating on medium-high speed and gradually add the sugar, beating in 1 tablespoon at a time. Increase the speed to high and beat the whites until they are thick, stiff, and glossy. The total beating time depends on the freshness of the egg whites and the power of your electric mixer and we’ve found it can take about 5 minutes and sometimes up to 10 minutes. Fold the vinegar and vanilla into the whites. Pile the meringue into the center of the parchment paper and gently smooth it out to form a thick 9-inch circle. Put the meringue into the oven and bake for 1 hour.
Turn off the oven and leave the meringue inside to dry out and cool completely, 2–3 hours. The longer the meringue dries out the chewier and crunchier it becomes so leaving it in the turned-off oven as long as overnight is fine, too. The meringue will have cracks around the center and sides. Peel off the parchment paper and put the meringue on a cake plate.
Just before serving, whip the cream in a mixing bowl until big soft peaks form, then pile it on top of the meringue. Arrange the fruit on top of the whipped cream and spoon the passion fruit pulp over the fruit.
getting a jump on
spring . . .
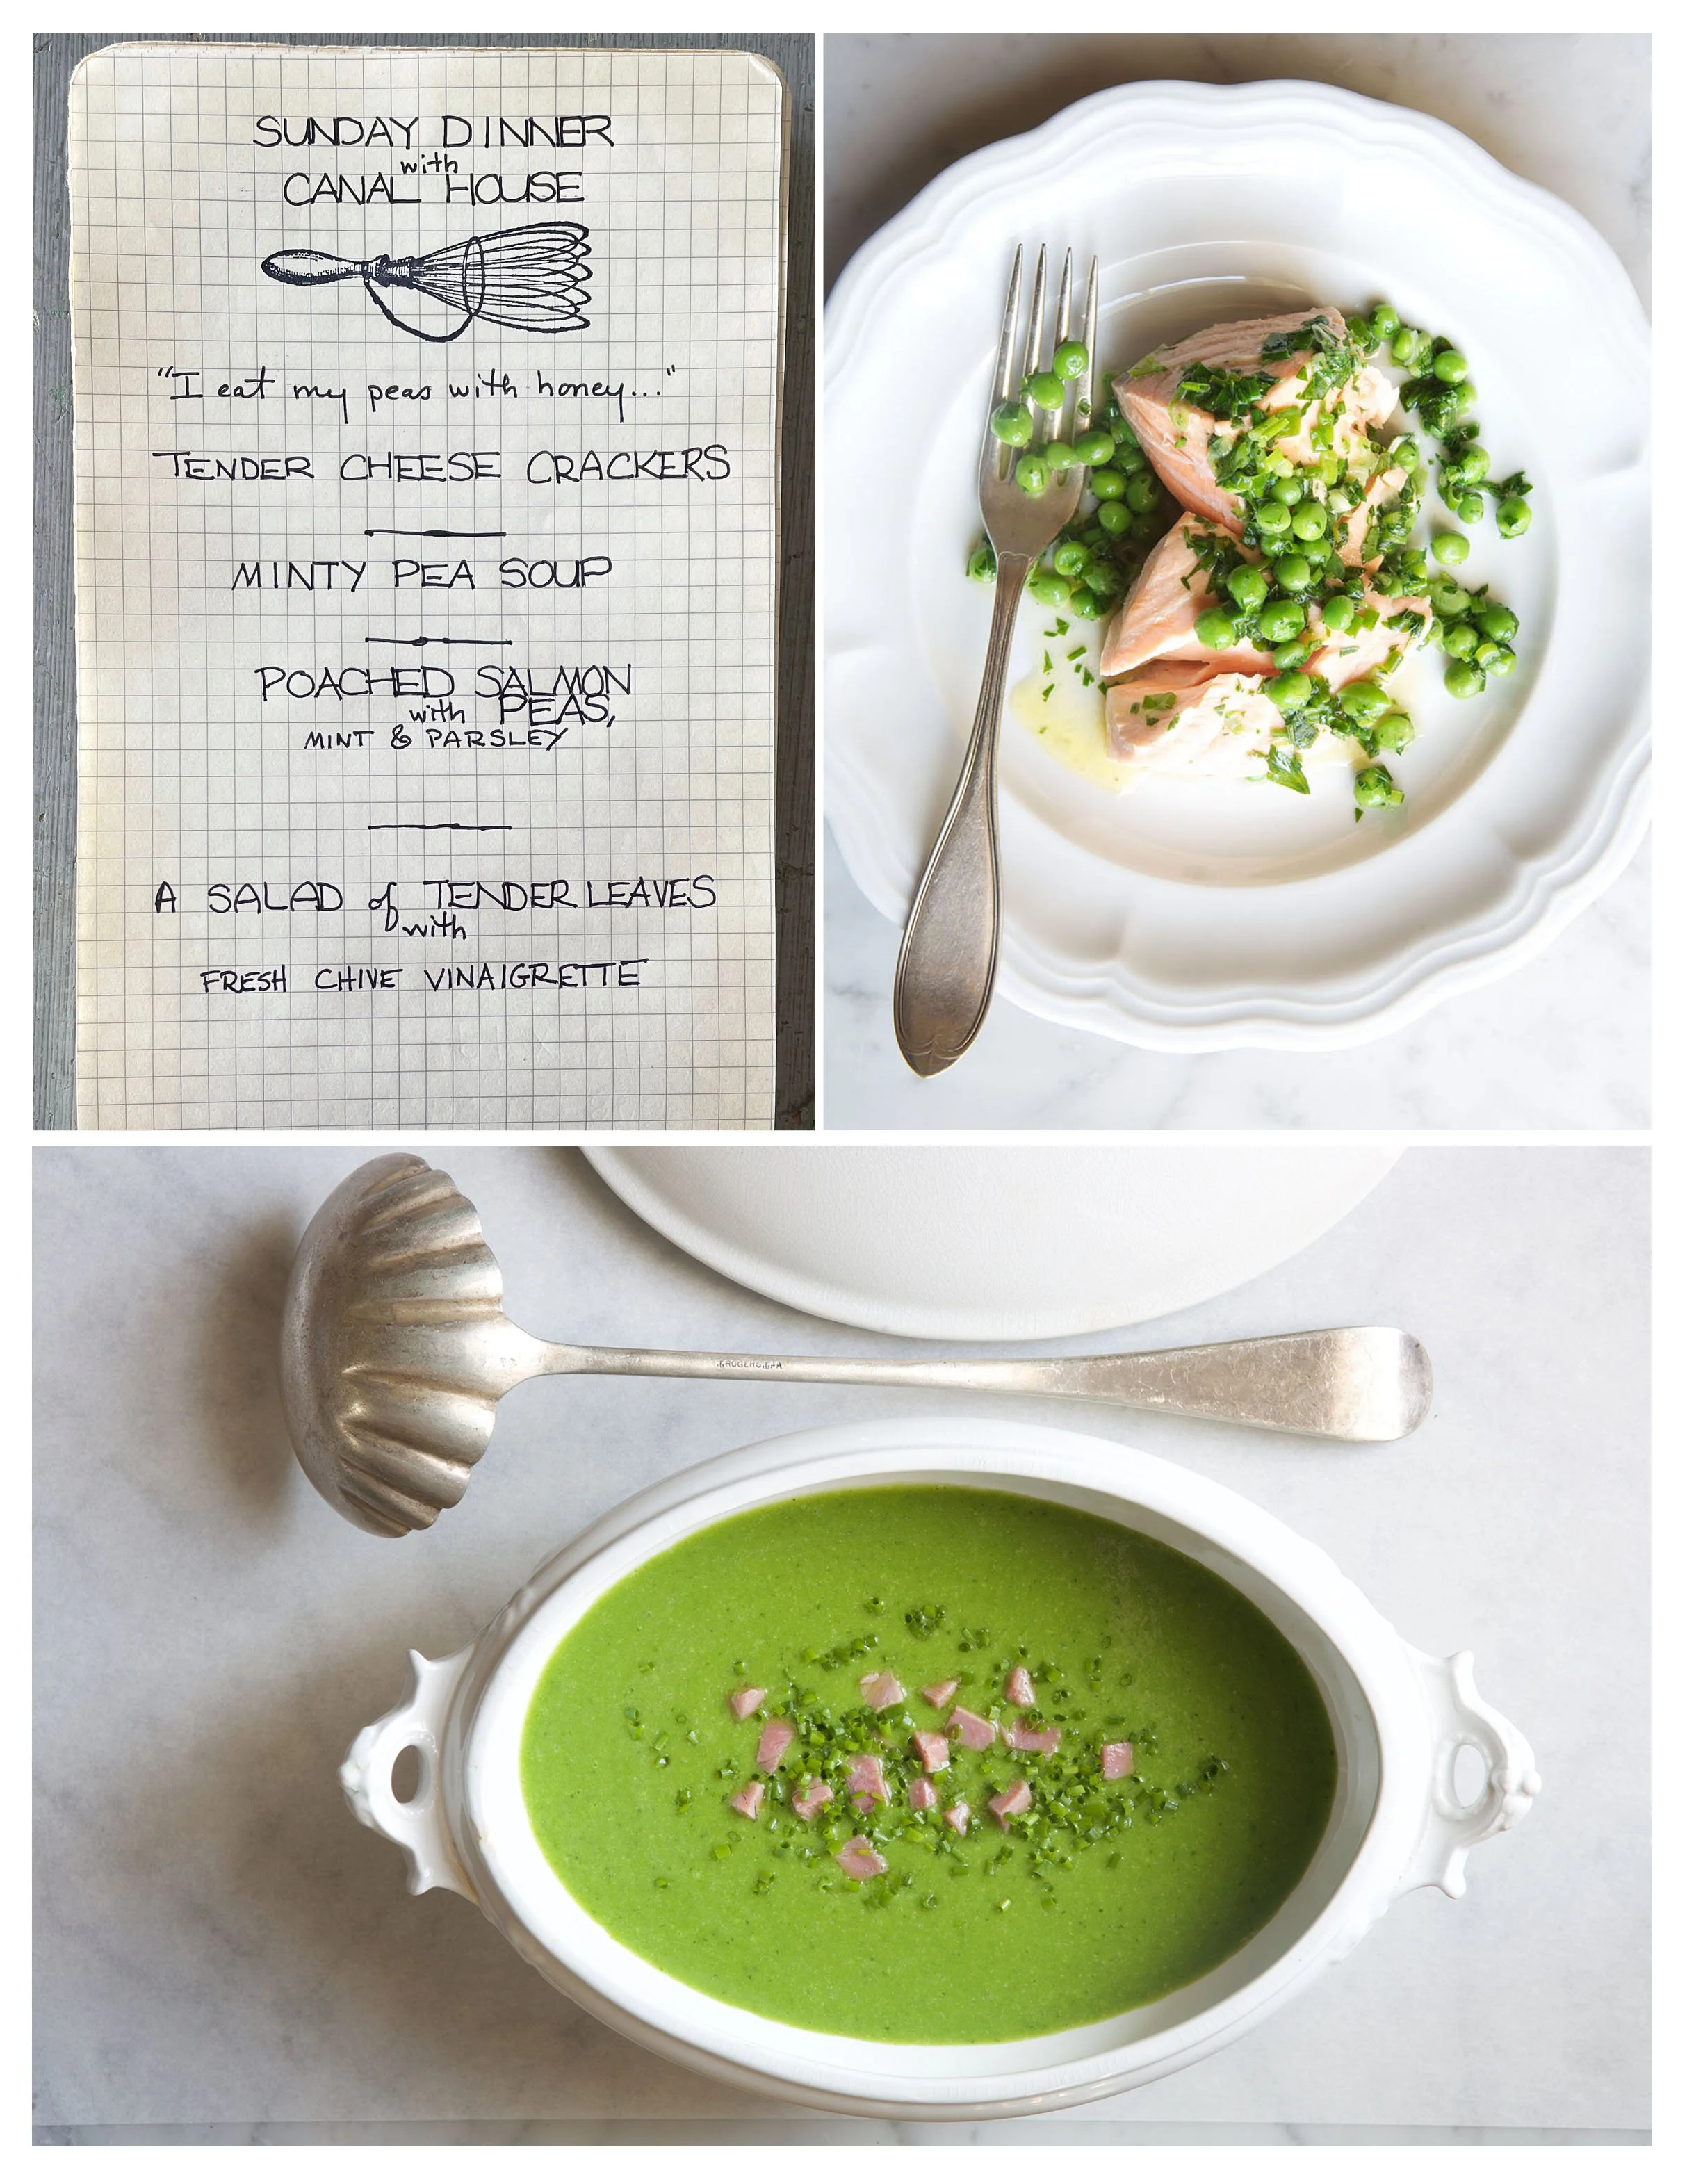
This time of year we are ready to jump start spring. The garden is still sleeping, so frozen peas are a great way to go. Why? Peas' sugars turn into starch as soon as they are picked. After 24 hours, those sweet little green gems can be grainy and dull-tasting. Frozen peas, on the other hand, are picked and frozen at the peak of ripeness, halting the process of sugars turning to starch, so it's a better bet that frozen peas will have the sweet taste you're looking for. Plus, you don't have to do any shucking! Look for frozen peas with no added sauces, salt or sugar.
MINTY PEA SOUP
Melt 3 tablespoons butter in a large heavy pot over medium heat. Add 1 chopped, peeled yellow onion and cook until soft, about 10 minutes. Season with salt and freshly ground black pepper. Add 4 cups rich chicken stock and bring to a simmer. Add 6 cups shelled English peas (from about 6 pounds of pods) or thawed frozen peas, and cook until tender, about 5 minutes for fresh peas, about 2 minutes for frozen. Remove the pot from the heat. Add ¼ cup each fresh parsley and fresh mint leaves to the pot. Purée the soup in a blender, thinning it with a little water if it is too thick. Adjust seasonings to taste. Serve the soup hot or cold, garnished with a swirl of sour cream, ½ –1 cup finely diced ham, and lots of chopped fresh chives.—serves 4–6
POACHED SALMON WITH PEAS, PARSLEY & MINT Serves 4
1 cup dry white wine
Flaky sea salt, we like Maldon
Four 6–8-oz. center-cut salmon filets
4 tbsps. unsalted butter
2 cups shelled English peas, or frozen peas
A handful of mint leaves, finely chopped
A handful of parsley leaves, finely chopped
½ cup heavy cream
Freshly ground black pepper
1 bunch of chives, finely chopped
In a wide pan, add water to a depth of a couple of inches and bring to a gentle simmer. Add the wine and a generous pinch of salt. Lower the fish, skin side down, into the poaching liquid and reduce the heat to medium-low. Gently poach the fish until it is just cooked through or is barely opaque in the center, 8–12 minutes. You can check the doneness of the salmon by inserting a thin paring knife into the thickest part of the filet. If the knife blade is slightly warm to the touch, remove the filets from the poaching liquid with a fish spatula. Carefully peel off and discard the skin.
While the salmon is poaching, melt the butter in a medium skillet over medium heat. Add the peas and toss to coat in the butter. Add ½ cup of the salmon poaching liquid, and simmer until the peas begin to soften and the liquid evaporates, 3–4 minutes. Add the mint, parsley, and cream, season to taste with pepper, and simmer the sauce until slightly thickened, about 2 minutes.
Serve the salmon with the peas and cream spooned on top. Garnish with the chives.
Spring Chickens
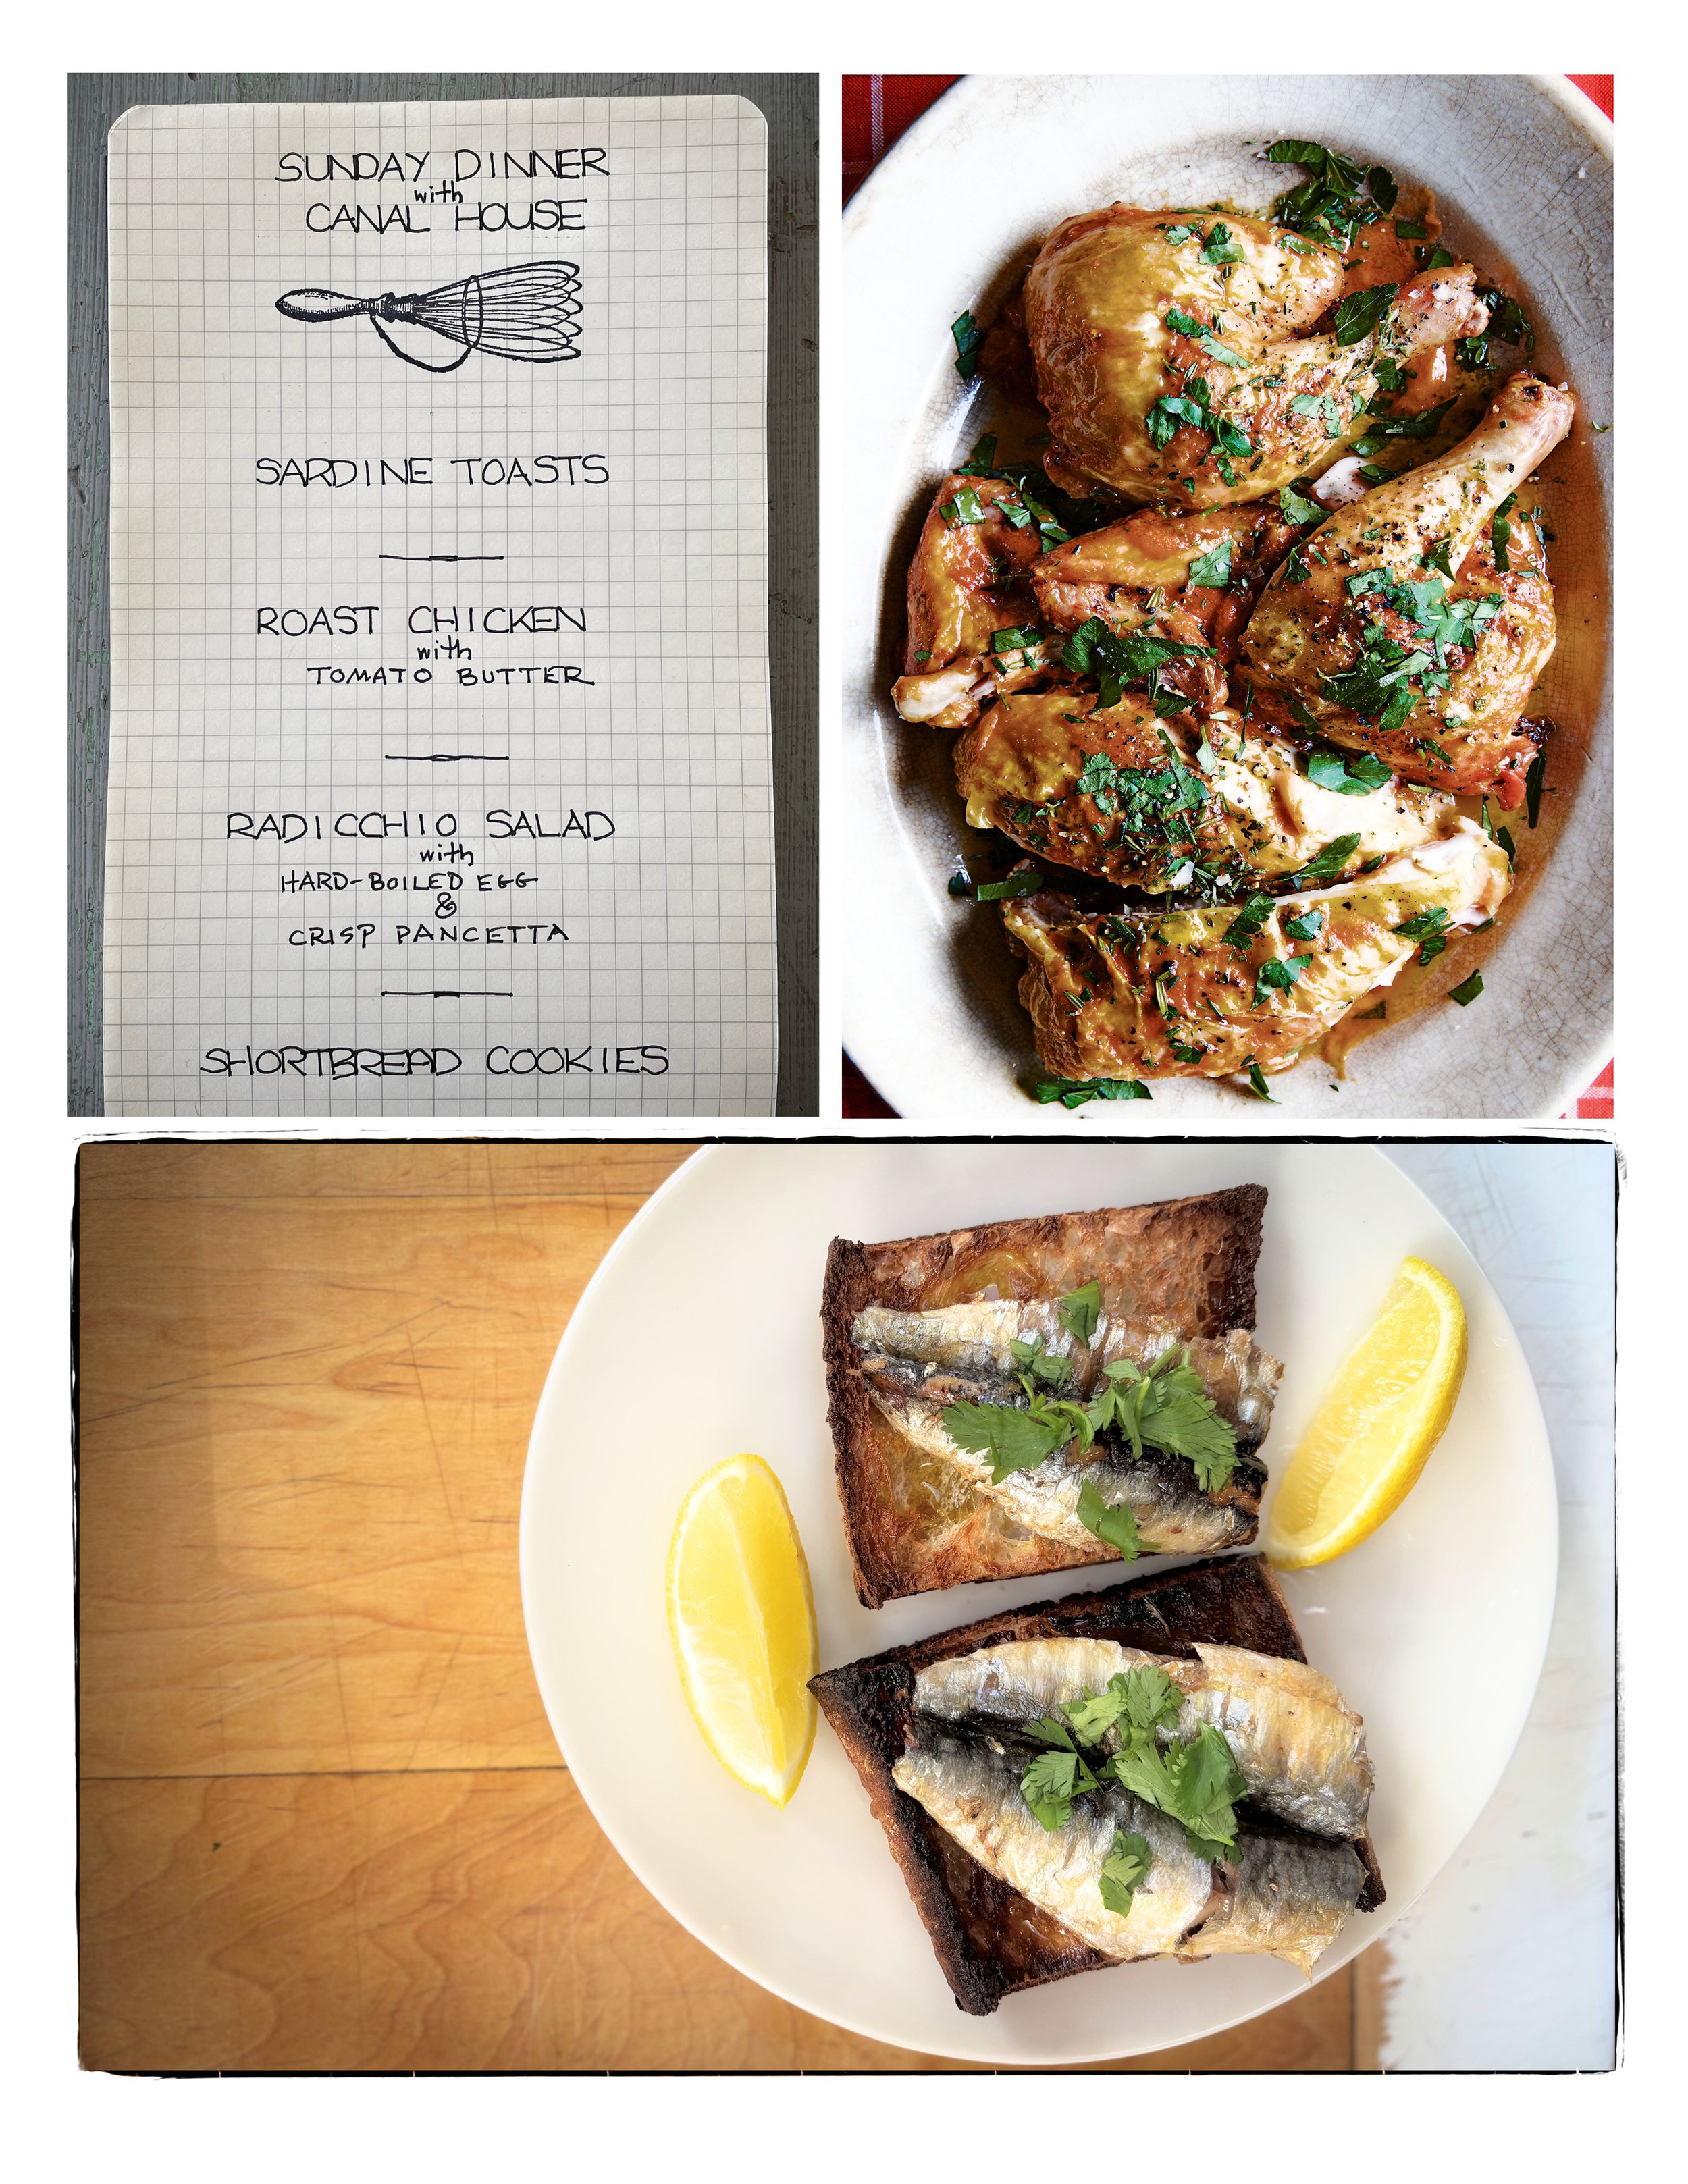
Counterclockwise from top left: First Spring Sunday Dinner menu; sardine toasts; Roast Chicken with Tomato Butter
SPATCHCOCKING
Traditionally, a spatchcocked chicken or small bird is grilled. The bird is butterflied, or split open so it lays flat, like an open book. It makes the bird easier to handle and carve, and helps it cook more evenly. It gives more surface area for basting or slathering on compound butter. And it allows more room for stuffing seasonings under the skin. Why stop at grilling? We spatchcock chicken for roasting and broiling, as well.
The process is simple, but we take precautions. To split a whole chicken or small bird open, use a pair of sturdy kitchen or poultry shears. A heavy, sharp knife or cleaver work, too, but neither offers quite the control that shears do. Place the chicken breast-side down on a cutting board. Use the shears to cut out the backbone. Open up the chicken like a book and press on it to flatten it. Save the backbone for making stock.
ROAST CHICKEN WITH TOMATO BUTTER Serves 4–6
This savory emulsified-butter sauce can be made ahead and refrigerated. When you are ready to use it, don’t warm it up, just slather it on the roasted chicken and let it melt.
FOR THE CHICKEN
One 3–5 lb. chicken, spatchcocked, rinsed, and patted dry
Salt and freshly ground black pepper
1 handful chopped fresh parsley leaves for garnish
2 sprigs fresh rosemary, leaves chopped for garnish
FOR THE TOMATO BUTTER
2 anchovy filets
6 sprigs fresh thyme
1 cup dry sherry
2 big tbsps. tomato paste
8 tbsp. (1 stick) cold butter, cut into 8 pieces
For the chicken, preheat the oven to 400°F. Set the chicken skin-side up on a wire rack set in a roasting pan and rub all over with salt and pepper. Add 1–2 cups water to the pan.
Roast the chicken until golden brown and the thigh juices run clear when pierced, 45–60 minutes. (The internal temperature of the thigh meat should register 165°F on an instant-read thermometer.)
Meanwhile, for the tomato butter, put the anchovies, thyme, and sherry in a heavy medium saucepan. Bring to a simmer over medium heat and simmer for 10 minutes. Strain the sherry through a fine-mesh sieve into a bowl: discard the solids. Return the sherry to the pan. Boil over medium-high heat until the sherry has reduced to about ¼ cup.
Reduce the heat to medium. Whisk in the tomato paste, and add the butter one piece at a time, whisking until it has melted before adding the next piece. Whisk until all the butter is melted and the sauce is smooth. Remove the pan from the heat and cover to keep the tomato butter warm.
Remove the chicken from the oven and let is rest for 10–15 minutes. Cut the chicken into pieces, arrange on a platter, and spoon the tomato butter all over. Garnish with the chopped parsley and rosemary.
. . . the pipes are calling . . .
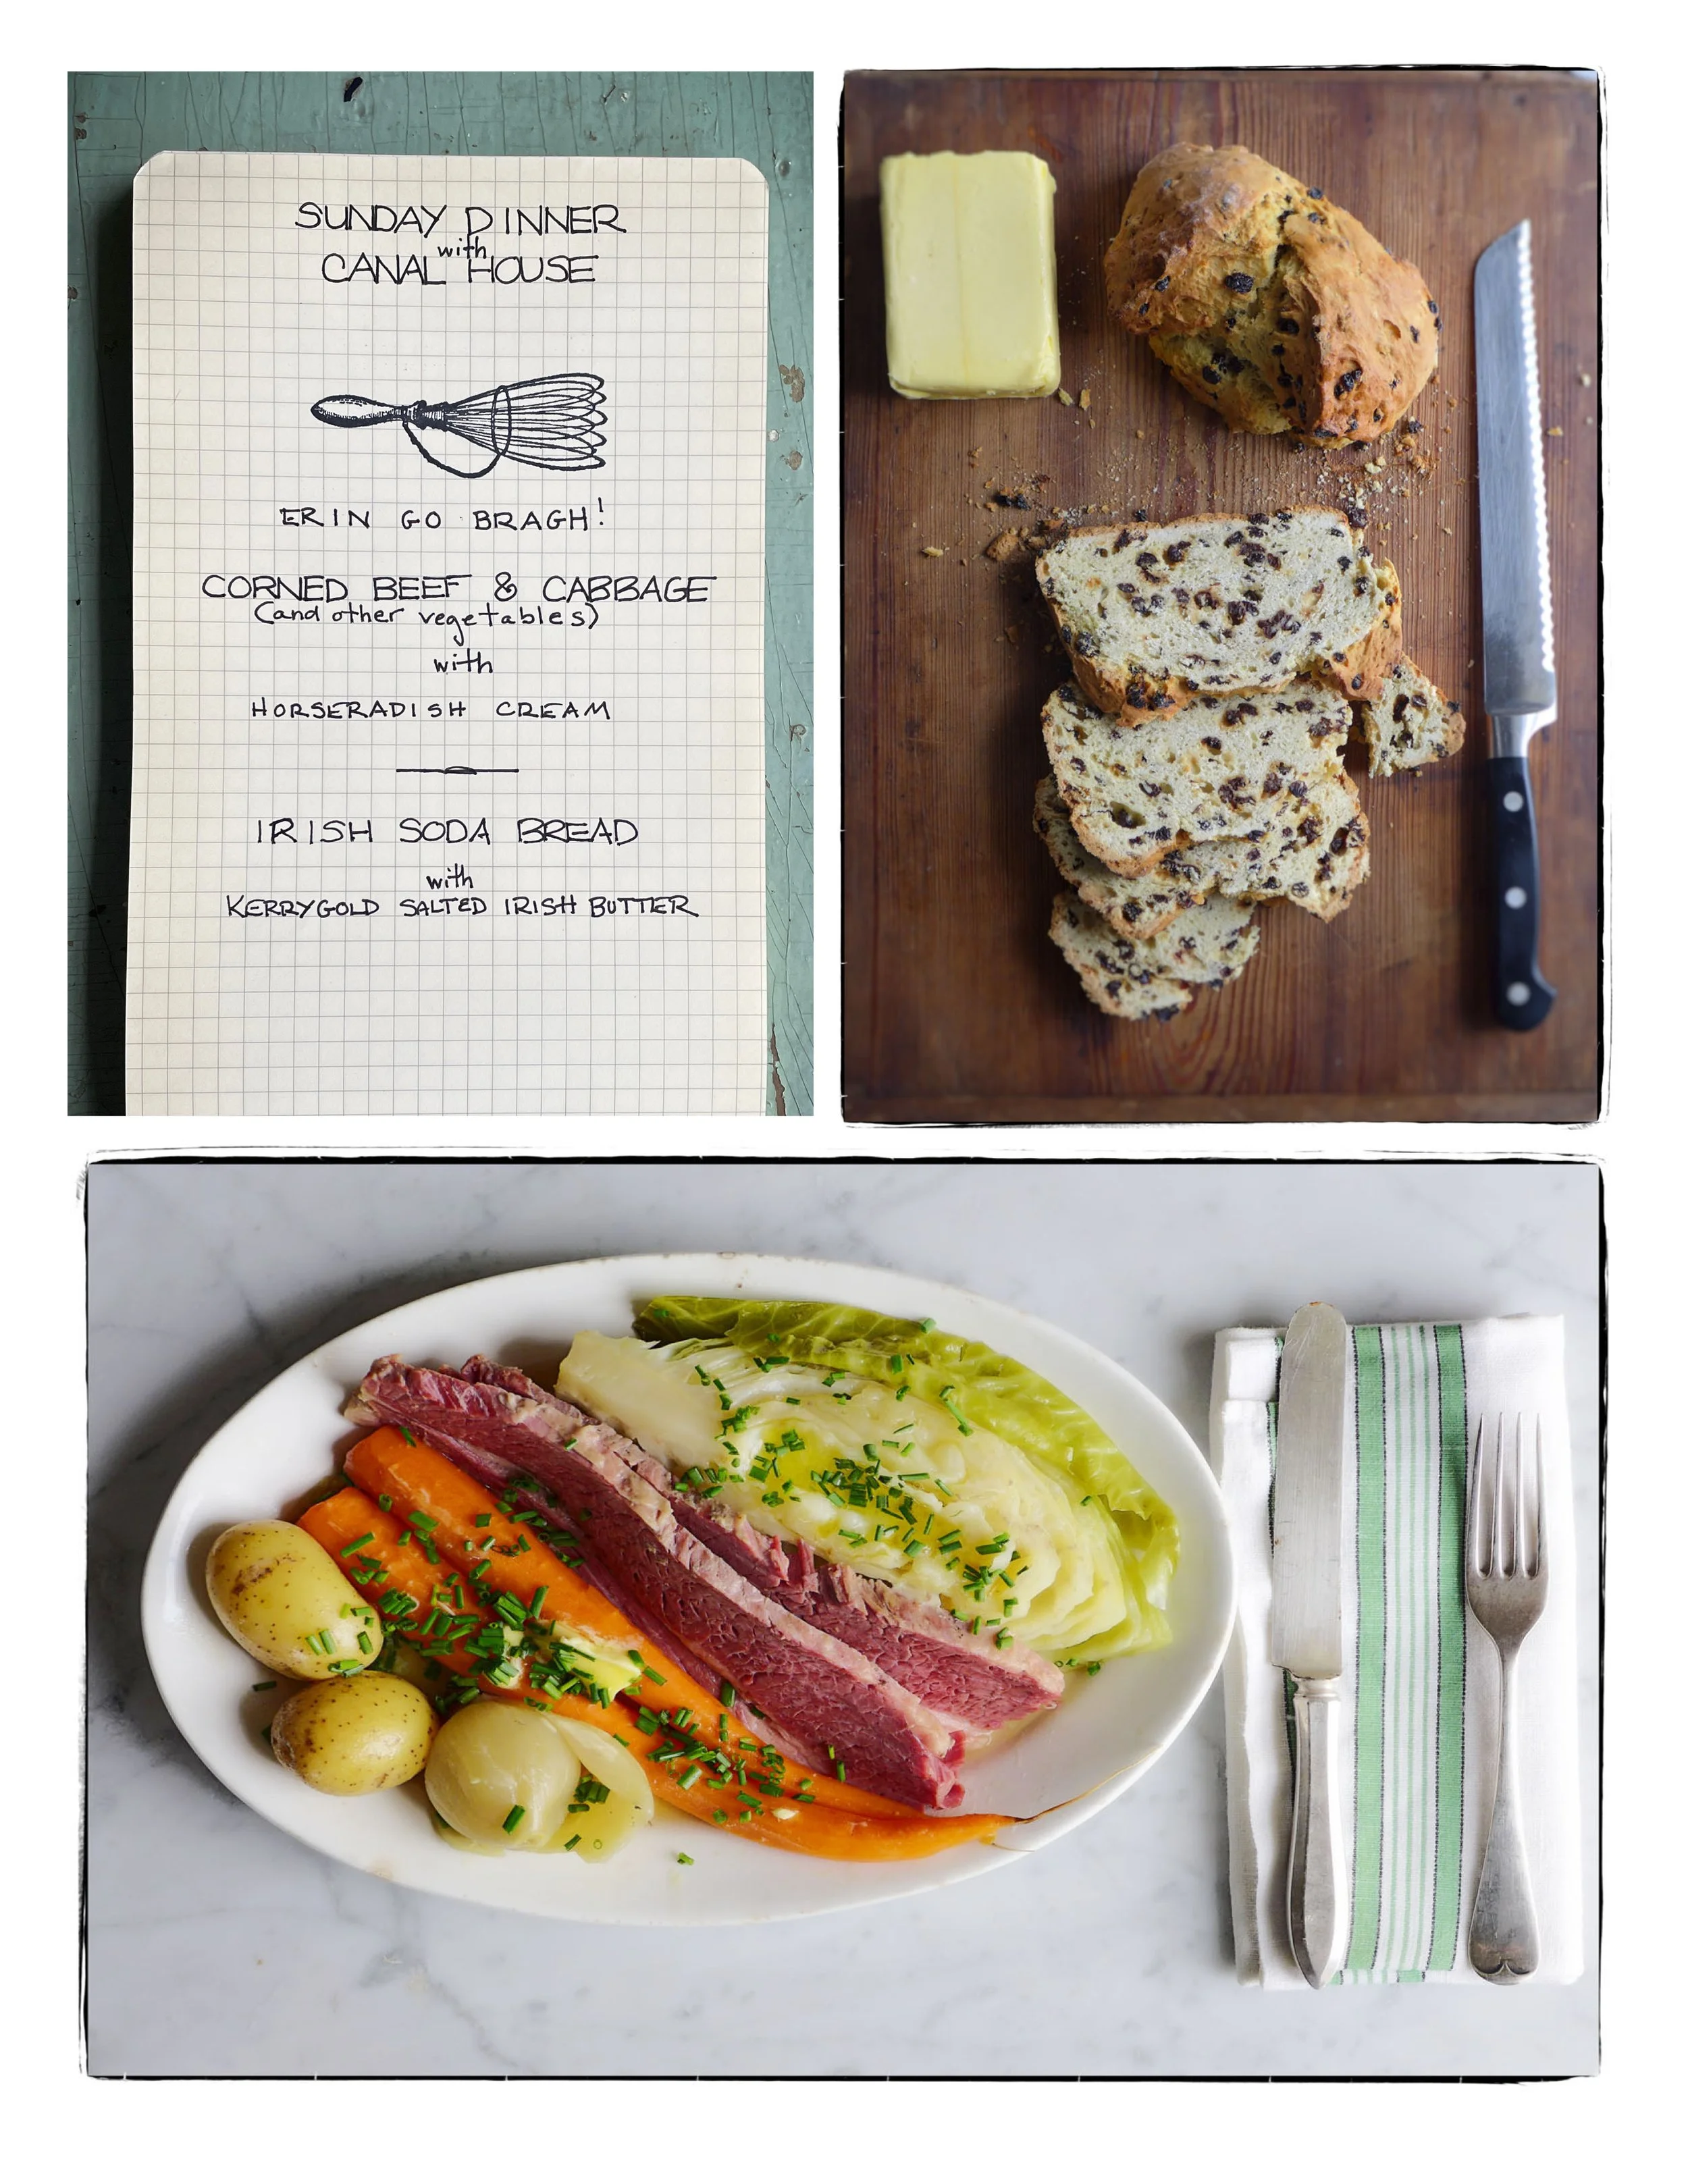
Counterclockwise from top left: Sunday St. Paddy’s Day Dinner menu; corned beef, cabbage, carrots, and “spuds” ; Irish soda bread with Kerrygold butter
We are traditionalists, so we go all out on St. Paddy’s Day and cook a classic corned beef and cabbage dinner, replete with waxy spuds, horseradish cream, and Irish Soda Bread with salted Irish butter.
It’s a very fine dinner, but it is an Irish American invention. In the late nineteenth century, Eastern European Jewish and Irish immigrants lived side by side on the Lower East Side of Manhattan. The Irish bought their meat from kosher butchers and bought what they found—brisket. Since brisket is a tough cut, they employed their tradition of corning pork (salting with a dry brine) to this cut of beef. After a long slow simmer, the brisket was transformed into the tender, flavorful corned beef we know today.
But our true favorite is the corned beef hash topped with poached eggs that we make for breakfast the following day. Èirinn go Bràch!
CORNED BEEF & CABBAGE Serves 6–8
If you prefer a leaner cut of corned beef, with slices that hold their shape when carved,
choose “flat” or “first cut”. The thicker “point” cut is marbled with fat and will be more tender and flavorful. Add a second brisket to the pot so you can have enough to make Corned Beef Hash (Canal House Cooking, Volume N° 3, page 91; Cook Something, page 281).
1 corned beef brisket (3–5 lbs.), rinsed
2 bay leaves
12 black peppercorns
8 large waxy potatoes, peeled
1–2 bunches carrots, peeled
1 head savory cabbage, cut into 8 wedges
1 handful fresh chives, chopped
FOR THE HORSERADISH CREAM
¼ cup peeled, finely grated horseradish or drained prepared horseradish
Juice of 1/2 lemon
1–2 bunches fresh chives, minced
2 cups whipped cream
Salt and freshly ground black pepper
Put the meat, bay leaves, and peppercorns into a large pot and cover with cold water by several inches. (Keep the meat submerged by weighing it down with a heavy lid.) Bring just to a boil, skimming off any foam from the surface. Reduce the heat to maintain a gentle simmer. Partially cover the pot with a lid and simmer until the meat is very tender when pierced with a skewer, 3–4 hours. Transfer the meat to a platter and cover with foil or plastic wrap.
Strain the broth, returning it to the pot. Put the vegetables into the pot and gently cook over medium heat until quite tender, 30–45 minutes for the potatoes; 20–30 minutes for the carrots and cabbage. Transfer the vegetables as they finish cooking to the platter with the corned beef. Reserve the cooking broth in the pot and keep hot over low heat.
Meanwhile, for the horseradish cream, fold the horseradish, lemon juice, and chives into the whipped cream in a medium bowl. Season with salt and pepper.
Reheat the corned beef in the hot broth. Transfer the meat to a cutting board, thinly slice, and arrange on a warm serving platter. Reheat the vegetables in the hot broth and arrange on the platter. Ladle some of the hot broth over all.

Full of Beans
Counterclockwise from top left: Sunday Dinner menu, Fromager d’Affinois and Medjool dates on toast, white beans with poached tuna and grilled sausages.
We often keep a pot of cooked brothy beans in the refrigerator (they’ll keep nicely for up to 5 days). It gives us an instant leg up on putting a meal together. We usually use cannellini but often cook what we have on hand or what sounds good to us. Canned beans are okay in a pinch, of course, but don’t really have the fresh sweet flavor and just-tender, somewhat toothsome texture of beans that you have cooked yourself. You get the point. Cook a pot of beans on Sunday, and you’ll eat well all week. We will use our cooked beans to make a quick cassoulet (our way), braised escarole and beans, tuna and sausages with white beans, beans with spicy black olive vinaigrette, or even beans on toast with olive oil and fried sage. For such humble food, beans have inspired some of our best ad hoc and most inspired meals. Why not make a pot and see what you cook up?
WHITE BEANS with POACHED TUNA & GRILLED SAUSAGES Serves 4
Choose beans that have been recently harvested and dried; this may be the most important factor in cooking a good pot of dried beans. As beans age, their outer shell becomes tough and impermeable. Sometimes really old beans will never get tender, even after hours and hours of cooking. Shop at a store that moves a lot of beans off their shelves, ensuring that you’re buying from a current crop. Though it may be hard to spot, look for a “best by” date on the package.
Two 8-ounce pieces fresh tuna
Salt
Really good extra-virgin olive oil
1 bay leaf
A few black peppercorns
2 lemons
4 Italian sausages
4 cups warm cooked white beans
Freshly ground black pepper
2 handfuls parsley leaves, chopped
Season the tuna with salt, put it into a wide pot, and barely cover it with olive oil. Add the bay leaf, the peppercorns, and a few strips of zest from one of the lemons. Poach the tuna over low heat until it turns pale and is just cooked through, about 10 minutes.
Remove the pot from the heat and let the tuna cool to just warm or to room temperature in the poaching oil.
Grill the sausages over a hot charcoal fire, gas grill, or in a skillet over medium-high heat until they are browned all over and cooked through, about 10 minutes.
Spoon the warm beans onto a serving platter and season with salt and pepper.
Arrange the sausages and tuna on the platter with the beans. Moisten the beans with some of the poaching oil from the tuna. Scatter chopped parsley on top and serve with lemon wedges.
Roast Lamb Tacos
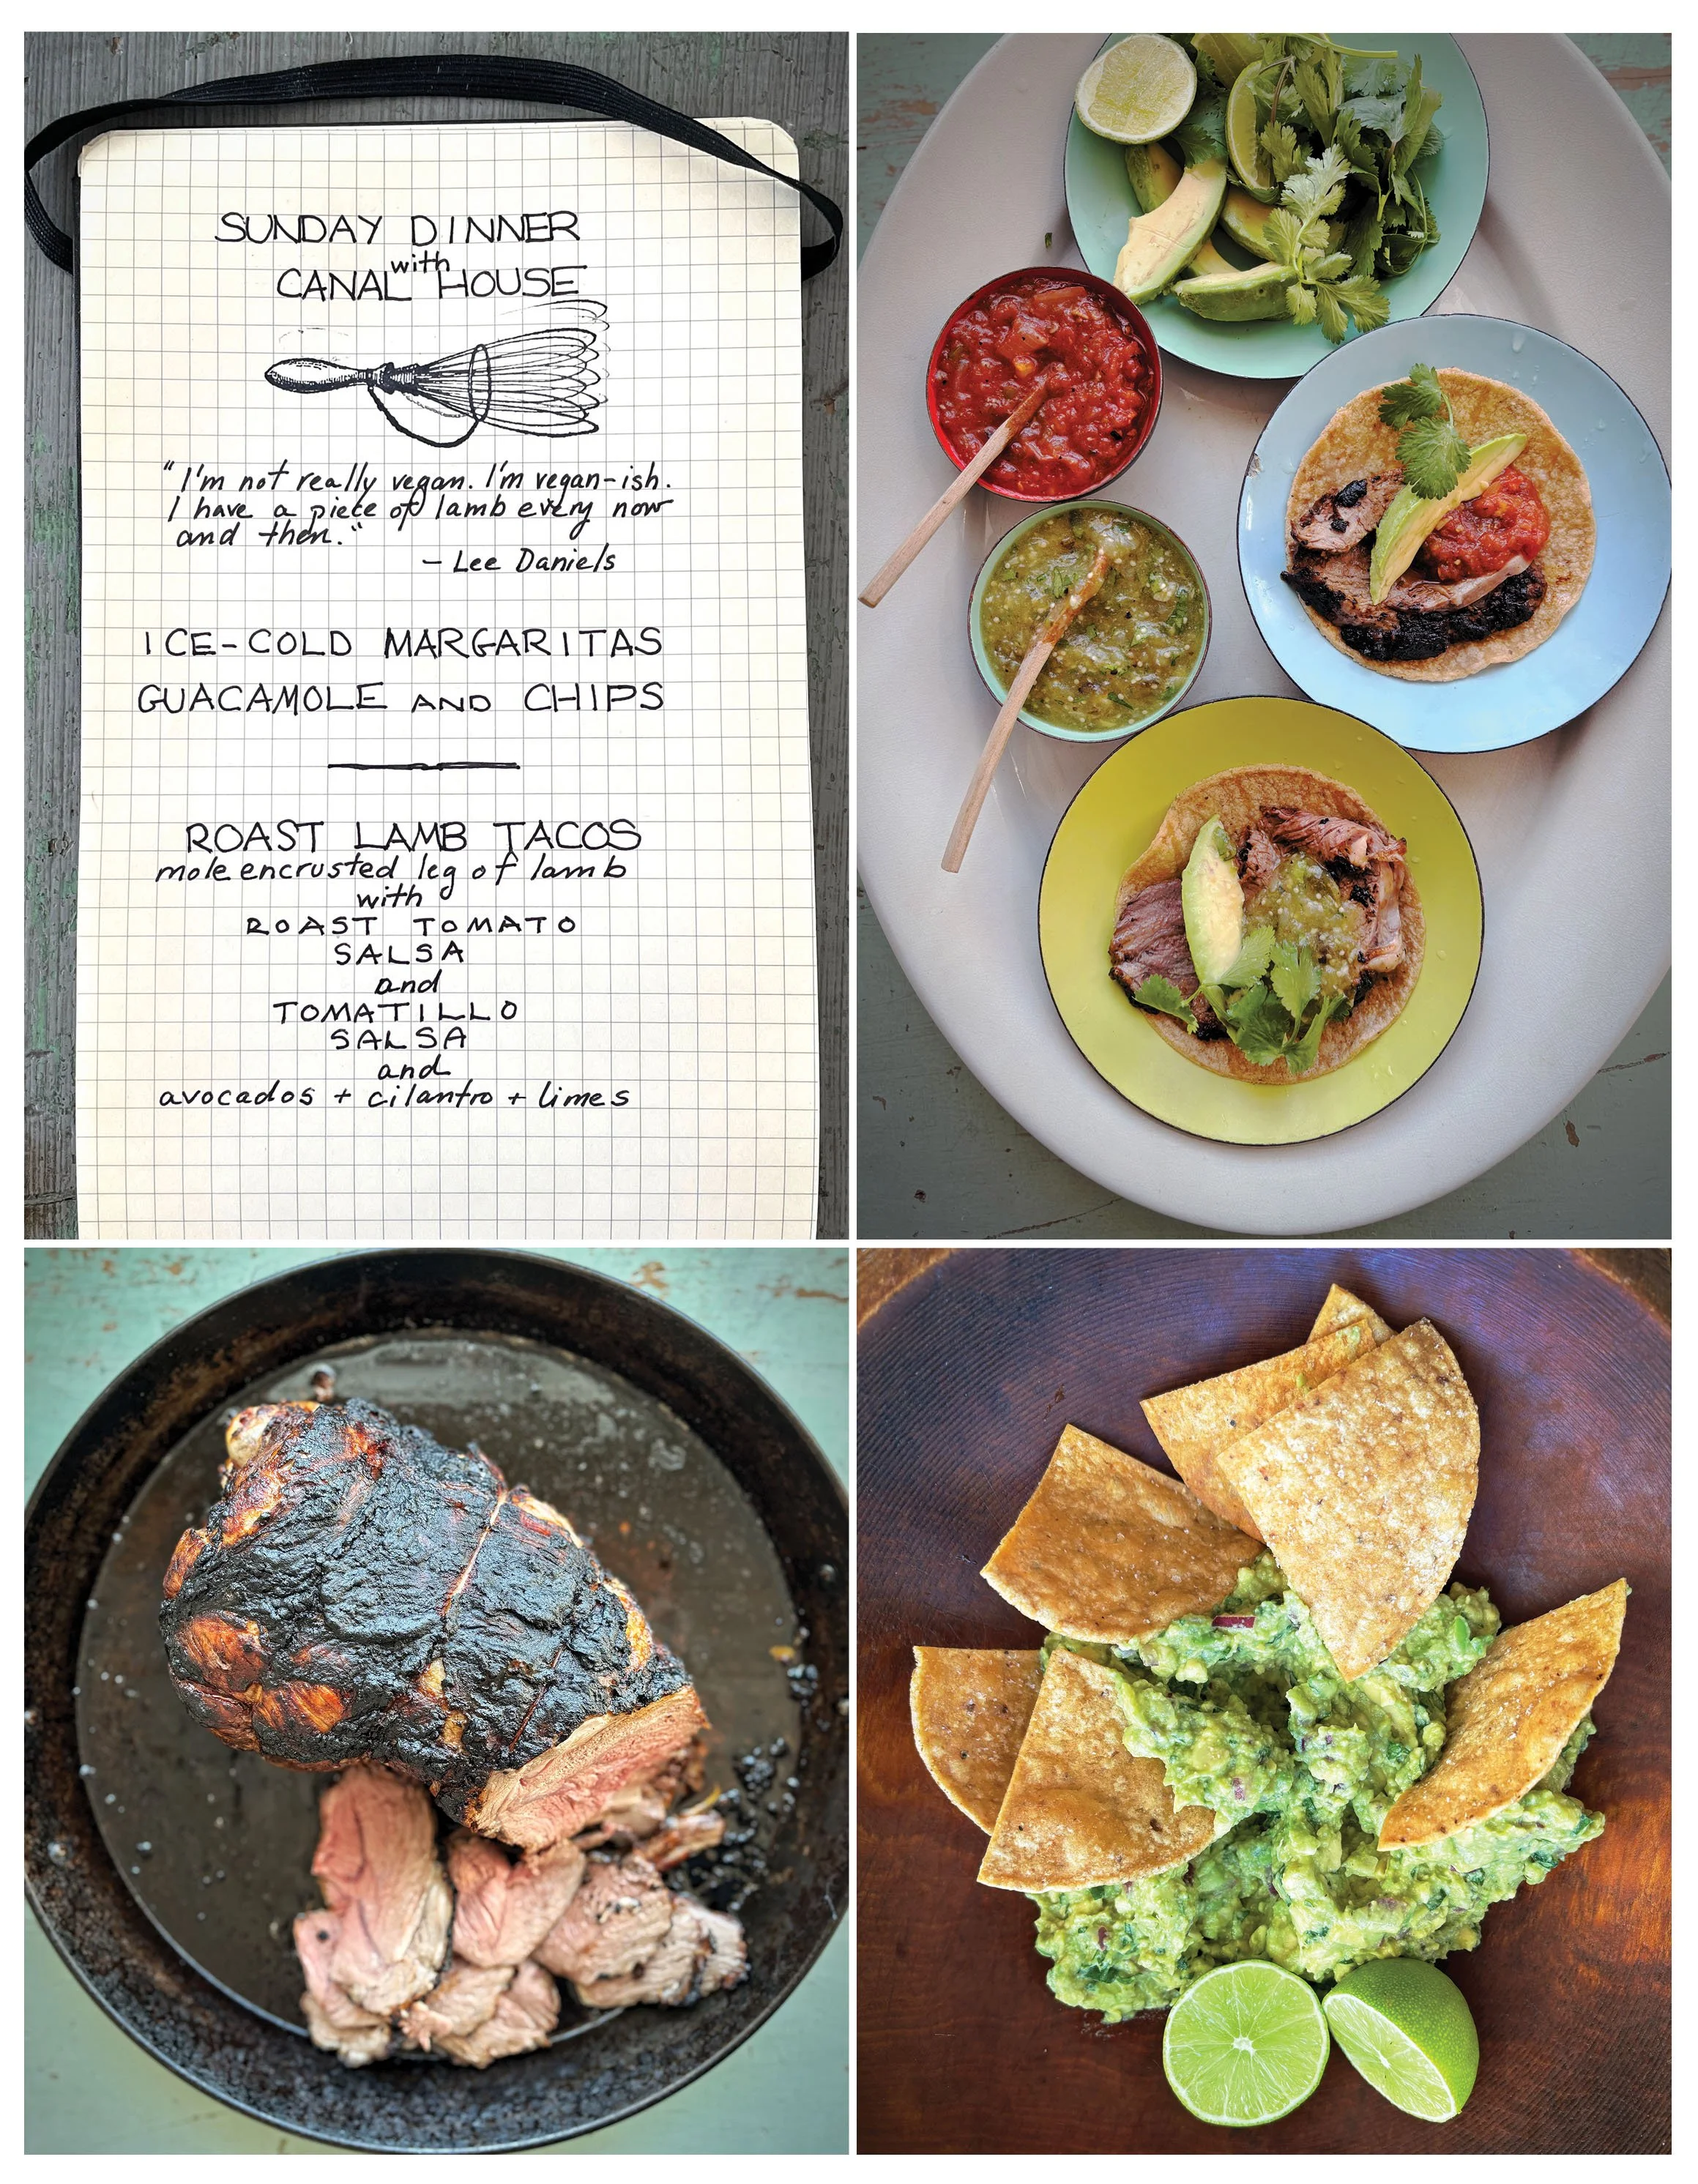
Counterclockwise from top left: Sunday Dinner menu, Mole encrusted Leg of lamb, guacamole chips and lime, assembled tacos with two salsas, and avocados.
ROAST LEG OF LAMB WITH GUAJILLO MOLE Serves a small crowd
Whole leg of lamb, semiboneless leg of lamb, boneless leg of lamb, it doesn’t matter, but the cooking times will differ depending on the cut. We found a beautiful semiboneless leg at the market, but more often, a boneless leg of lamb, wrapped in netting to hold the roast in shape, is available. Roasting the lamb to an internal temperature of 120°F in the thickest part of the roast is the important part.
1 leg of lamb
1 cup Guajillo Chile Mole (see recipe below)
Olive oil
2 cups Roasted Tomato Salsa (see recipe below)
2 cups Tomatillo Salsa (see recipe below)
Corn tortillas, warm
1 bunch fresh cilantro, rinsed, roots trimmed off
Limes, halved
Avocados, pitted, peeled, and sliced
Preheat the oven to 500°F. Slather the lamb all over with the mole. Put the lamb on an oiled roasting pan, fatter side up. Roast in the oven until well browned on top, 20–30 minutes. Reduce the oven temperature to 300°F and continue roasting the lamb until the internal temperature in the thickest part of the roast reaches 120°F, about 1 hour 30 minutes. Remove the lamb from the oven. Snip off and remove any string or netting. Let the roast rest for 15–20 minutes before carving.
To serve, arrange a few slices of lamb on a tortilla and garnish with either one of the salsas, a couple of slices of avocado, and some cilantro. Finish the tortilla with a squeeze of lime juice.
GUAJILLO MOLE Makes about 2 cups
You will only need about 1 cup of this rich and deeply flavorful Mexican sauce for the Roast Leg of Lamb, but it keeps well, covered, in the refrigerator or freezer.
6 whole guajillo chiles, wiped with a damp paper towel
1 cup hot chicken stock
½ cup raisins
1/3 cup blanched almonds
2 tsp. ground cumin
2 tsp. dried oregano
2 tsp. ground cinnamon
5 black peppercorns
½ tsp. salt
3 cloves garlic, peeled
2 tbsp. vegetable oil
Tear off the stems of the dried chiles and shake out the seeds. Heat a cast-iron skillet or other heavy skillet over medium heat. Toast the chiles in the skillet, pressing down with tongs and turning once or twice, until they are fragrant and turn a slightly darker shade, 30–60 seconds. Transfer the chiles to a medium bowl. Add the raisins. Pour the hot chicken stock over the chiles and raisins, set a plate on top of the chiles to keep them submerged, and set them aside to soak until soft and pliable, about 30 minutes.
Toast the almonds in the skillet over medium heat, stirring frequently, until pale golden brown, 6–8 minutes. Transfer to a plate to cool completely. Add the cumin, oregano, cinnamon, and peppercorns to the skillet and toast the spices over medium heat, stirring, until fragrant, about 30 seconds. Transfer to a small bowl to cool. Finely grind the almonds with the salt in a blender. Add the chiles, raisins, and their soaking liquid, along with the toasted spices, and garlic. Purée to a smooth paste.
Heat the oil in the skillet over medium heat. Add the spice paste and fry, stirring to keep it from burning, until it becomes a shade darker and is very fragrant, about 5 minutes. Remove the skillet from the heat and set aside.
TOMATILLO SALSA Makes about 2 cups
6–8 tomatillos (about 1 lb.), husked and rinsed
4–5 cloves garlic, unpeeled, crushed
1 jalapeno pepper
½ white onion, unpeeled, thickly sliced
Olive oil
1 tsp. salt
Juice from 1 lime
1 small bunch fresh cilantro, rinsed, and chopped
Position an oven rack in the upper third of the oven. Preheat the oven to 500°F. Put the tomatillos, garlic, jalapenos, and onions into a roasting pan and rub everything with a splash of oil. Transfer the pan to the oven and roast the vegetables until slightly charred, about 10 minutes. Remove the pan from the oven.
Slip the skin off the garlic and onions and discard. Remove the stem from the jalapeno and discard. Transfer the vegetables and any accumulated pan juices to a food processor and pulse until finely chopped. Transfer the salsa to a bowl and season with salt, lime juice, chopped cilantro, and a little olive oil to round out the flavor. Adjust seasonings to taste.
ROASTED TOMATO SALSA Makes about 2 cups
4 tomatoes, about 1 lb.
4–5 cloves garlic, unpeeled, crushed
1 jalapeno pepper
½ white onion, unpeeled, thickly sliced
Olive oil
1 tbsp. tomato paste
Salt
Sugar
Position an oven rack in the upper third of the oven. Preheat the oven to 500°F. Put the tomatoes, garlic, jalapenos, onions into a roasting pan and rub everything with a splash of oil. Transfer the pan to the oven and roast the vegetables until slightly charred, about 10 minutes. Remove the pan from the oven.
Slip the skin off the garlic and onions and discard. Remove the stem from the jalapeno and discard. Transfer the vegetables and any accumulated pan juices to a food processor and pulse until finely chopped. Transfer the salsa to a bowl and stir in the tomato paste and 1 tbsp. of olive oil. Season with salt and a pinch of sugar to bring out the sweetness of the tomatoes. Adjust seasonings to taste.
One of our favorite Sunday Dinners was not at a traditional dinner table. Instead, ensconced in comfortable chairs we gathered around a big coffee table emptied of its usual piles of magazines, books, and remote controls. While we sipped ice-cold Margaritas, Greyhounds, and Dos Equis, our host arranged bowls of salsas—tomatillo and roasted tomato—guacamole, juicy lime quarters, sliced scallions, cilantro, sliced avocado, crema, warm corn tortillas wrapped in a pretty dish cloth, on the table. He set a handsome mole-encrusted leg of lamb on a wooden cutting board right in the midst of everything. Carving a portion of the roast, he laid out the rosy slices of meat on the board. Then, other than occasionally slicing more meat, his host duties were over. Everyone got a plate and a pile of paper napkins but no silverware, this would be a hands-on affair. It was up to us to assemble the soft tacos—first a warm tortilla, then lamb, salsa, crema, avocado. There was no first or last course to signal a beginning or end, instead we talked and ate until afternoon turned into evening.
Layer Up
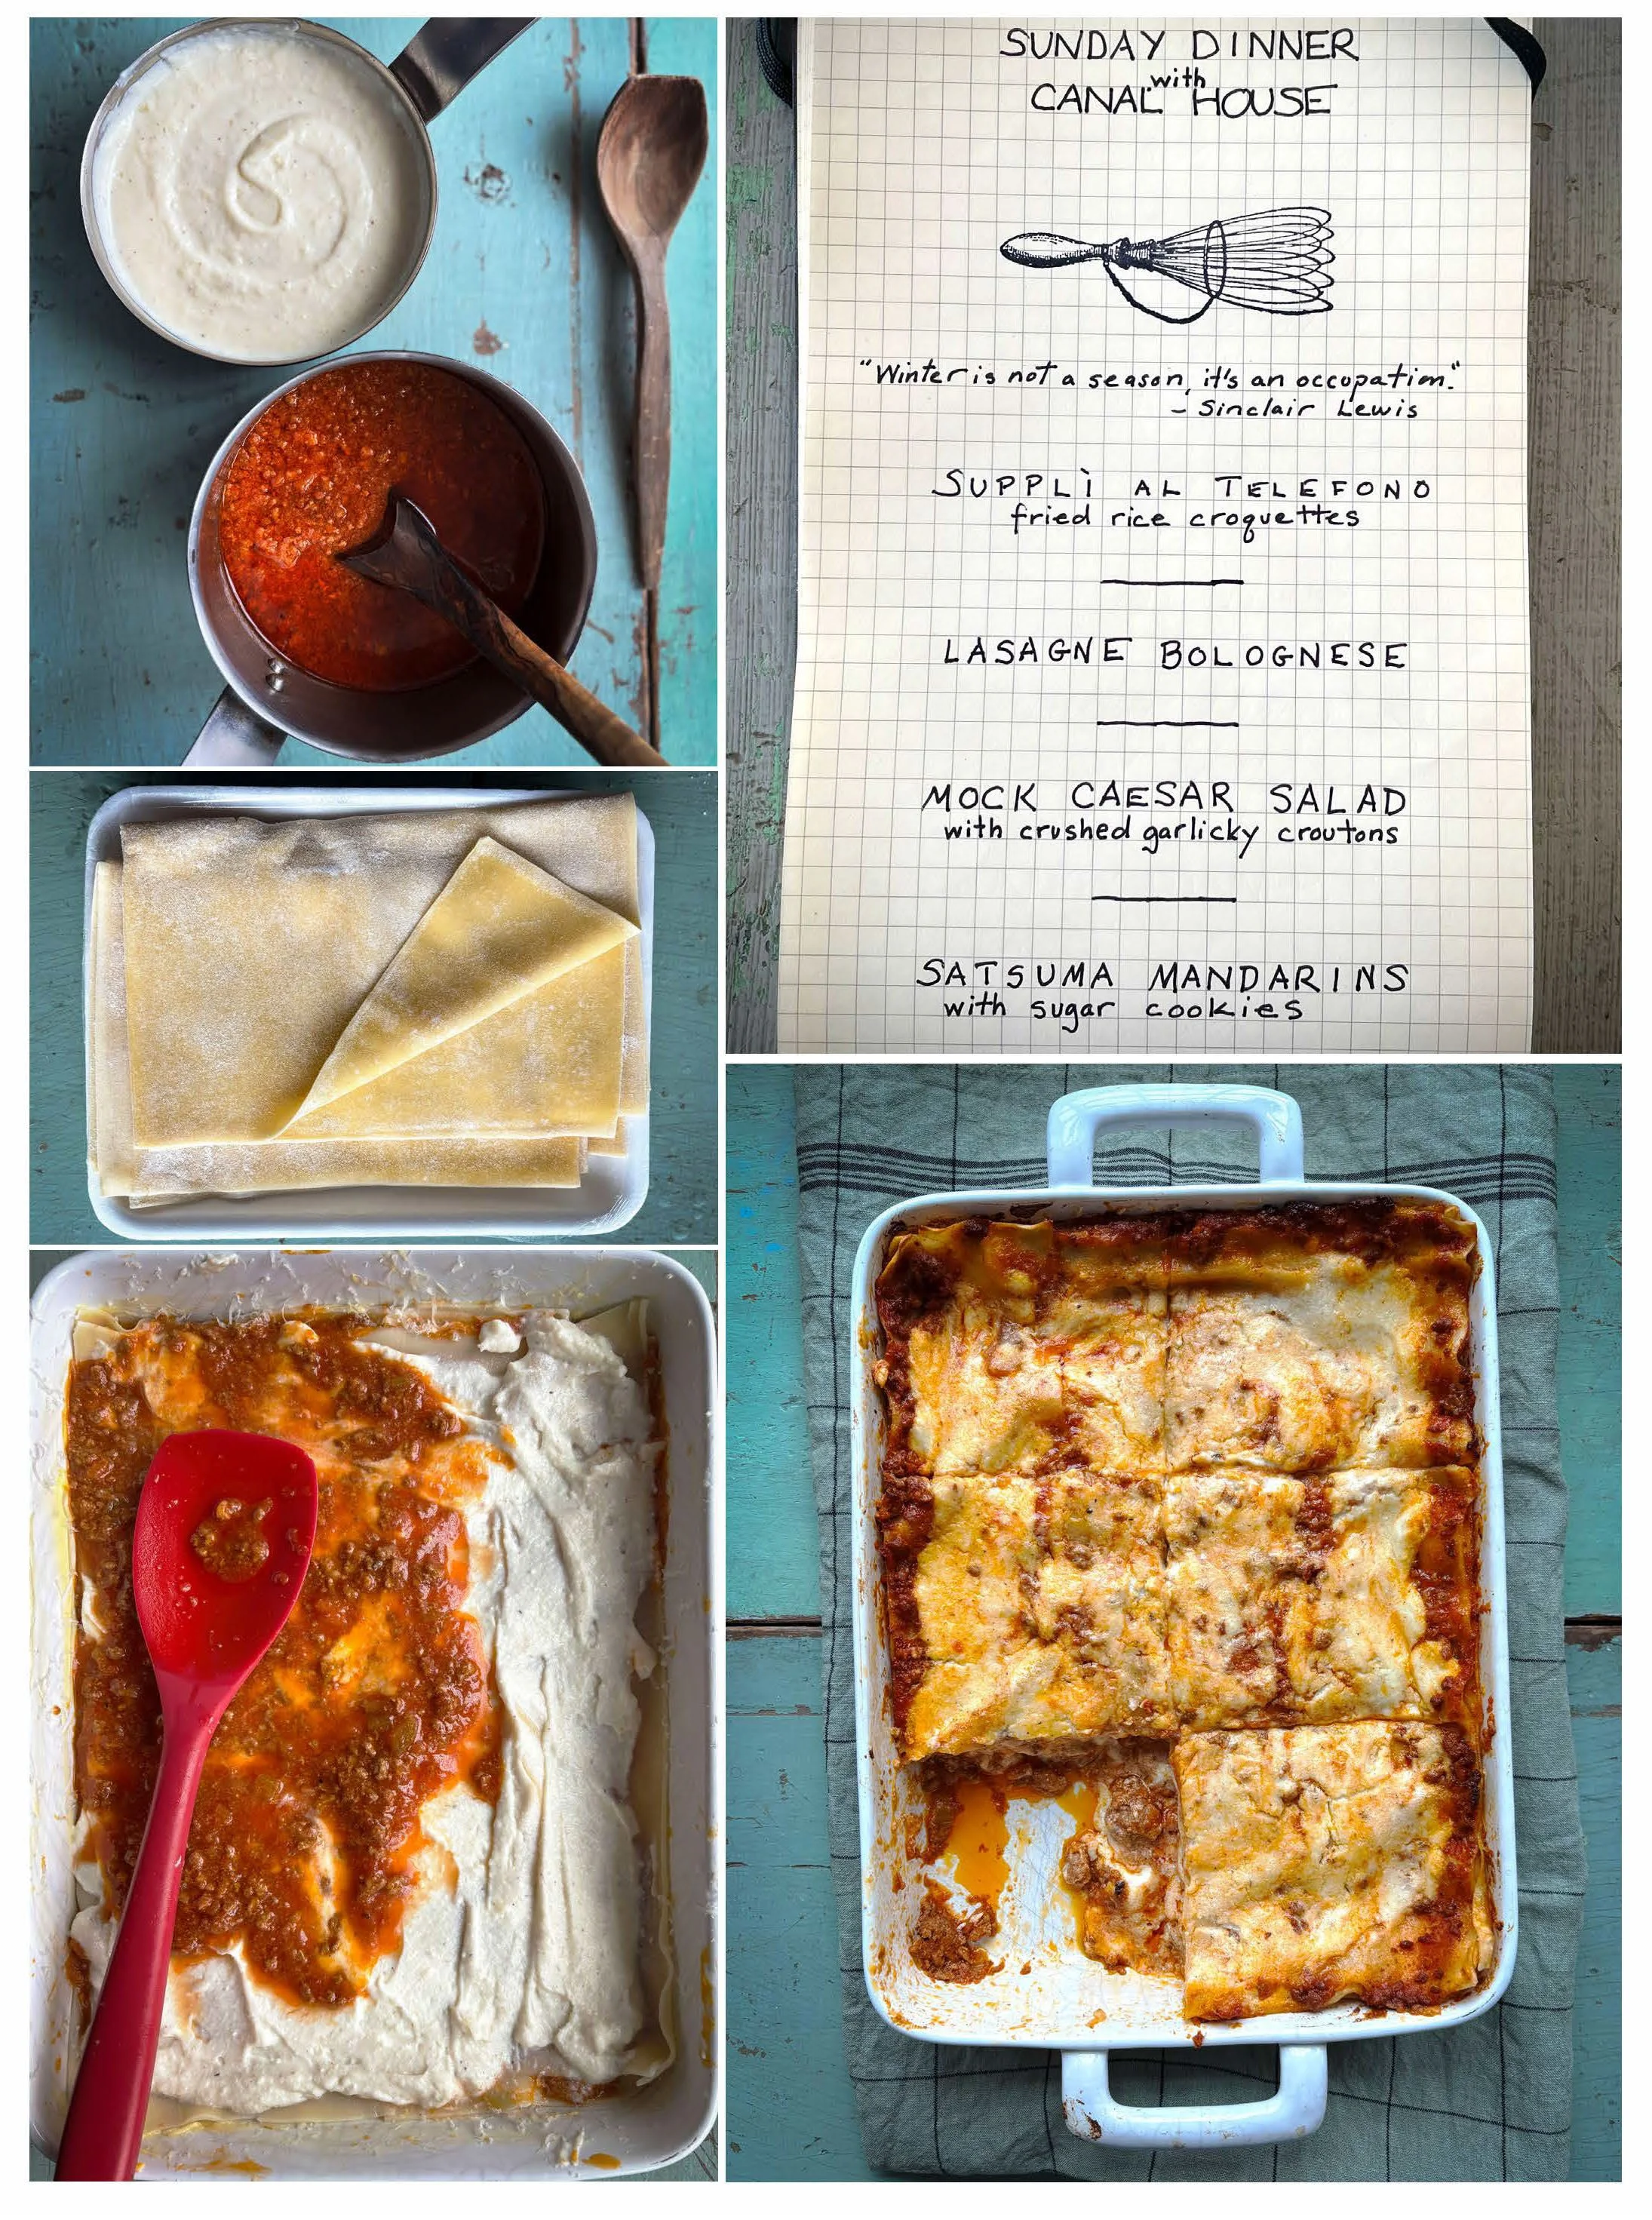
Counterclockwise from top left: two sauces—besciamella and bolognese; fresh pasta sheets; layering the lasagne; finished lasagne; Sunday Dinner ‘Italian Style’ Menu
LASAGNE BOLOGNESE Serves 4-6
One thinks lasagne is as much about the sauce as it is about the layers of pasta. But to us, it’s the luxurious nutmeg-flecked besciamella (Italian white sauce) that makes the dish sublime. Using fresh pasta, whether home-made or store-bought for this noble layered dish makes all the difference in the world. If you’ve only had those clunky lasagne made with thick sheets of dried pasta, the tenderness of fresh pasta will be a revelation.
1 tbsp. butter
1 cup (8 oz.) fresh ricotta
2 cups Besciamella (see recipe below)
Salt
Freshly grated nutmeg
2½ cups warm Ragù Bolognese (see recipe below)
1 cup (120 g.) grated Parmigiano-Reggiano
1 lb. fresh pasta sheets, cut into 8- to 10-inch lengths
Butter a deep 9 X 13-inch baking dish and set aside. Stir the ricotta into the besciamella, season with salt and nutmeg to taste, and set aside. Bring a large pot of water to a boil over high heat and add 1 tbsp. salt. Reduce the heat to maintain a gentle boil. Set the prepared baking dish, besciamella, ragù, and parmigiano on a clean work surface at arm’s reach from the stove so you can easily assemble the lasagne.
Cover the bottom of the baking dish with ½ cup of the ragù. Cook 1 sheet of the pasta in the boiling water until tender, about 2 minutes. Using tongs, lift the pasta out of the water, let most of the water drain off, then lay the sheet out flat over the ragù in the bottom of the dish. Repeat with more pasta to cover the ragù with a single layer of pasta, trimming the pasta to fit, and patching, if necessary.
Spread ½ cup of the besciamella evenly over the pasta. Spread ½ cup of the ragù evenly over the besciamella, then sprinkle with ¼ cup of the parmigiano. Add another layer of pasta, covering it with ½ cup of the besciamella, and covering that with ½ of the ragù, then sprinkle with more parmigiano. Repeat the layers again. Add the final layer of pasta, cover it with the remaining besciamella, then with the remaining ragù, and sprinkle the last bit of parmigiano on top.
Preheat the oven to 400°F. Bake the lasagne until it is bubbling around the edges and lightly browned on top, 20–30 minutes. Do not overcook. Let lasagna rest for at least 15 minutes before serving.
BESCIAMELLA Makes 2 cups
This classic Italian white sauce can be made ahead, covered tightly, and refrigerated for up to two days before assembling the lasagne, if you like.
4 tbsp. butter
¼ cup (30 g.) flour
2 cups hot milk
½ cup (60 g.) grated Parmigiano-Reggiano
¼ –½ tsp. or more to taste, freshly grated nutmeg
Salt
Melt the butter in a heavy medium saucepan over medium-low heat. Add the flour and cook for 1½–2 minutes, stirring constantly with a wooden spoon to prevent it from taking on any color whatsoever. Gradually add the hot milk in a slow, steady stream, stirring constantly with a whisk to prevent lumps. Increase the heat to medium and cook the sauce, stirring constantly with the wooden spoon, until it has the consistency of very thick cream, 5–10 minutes. Remove the pan from the heat.
Stir in the parmigiano and season with nutmeg and salt to taste. Lay a sheet of plastic wrap directly on the surface of the sauce until ready to use to prevent a skin from forming.
RAGÙ BOLOGNESE Makes about 6 cups
This recipe makes more sauce than you will need to make the Lasagne Bolognese. But do make the whole recipe, taking advantage of the time it takes to slowly simmer this classic Italian meat sauce. Toss extra sauce with cooked pasta or freezewhat you don’t use. A little ragù bolognese stashed in your freezer is like having money in the bank.
2 tbsp. butter
2 tbsp. extra-virgin olive oil
1 medium yellow onion, peeled and finely chopped
2 small ribs celery, finely diced
1 carrot, peeled and finely diced
2 oz. prosciutto, finely chopped
1 lb. ground beef chuck
1 lb. ground pork
Salt and freshly ground black pepper
½ whole nutmeg, finely grated
½ cup dry white wine
1 cup hot milk
One 28-oz. can tomato purée
1 cup chicken or beef stock
Heat the butter and oil together in a heavy large pot over medium heat. Add the onions, celery, and carrots and cook, stirring often with a wooden spoon, until the vegetables have softened and the onions are translucent, 5–10 minutes. Stir in the prosciutto. Add the ground beef and pork, season to taste with salt and pepper, and cook, breaking up the clumps of meat with the back of the spoon, until the meat is no longer pink, 5–10 minutes. Avoid frying or browning the meat.
Season the meat with nutmeg. Add the wine to the pot and cook until evaporated, 10–12 minutes. Reduce the heat to medium-low. Add the milk and cook, stirring occasionally, until absorbed, about 20 minutes.
Meanwhile, heat the tomato purée and stock together in a saucepan until hot, then add it to the meat. Reduce the heat to low and gently simmer, stirring occasionally, until the meat is tender, 5–7 hours. Add water if needed to keep the ragù loose and saucy. Season with salt and pepper.
This Sunday, more snow is in the forecast (maybe). What a splendid time to layer up! We’re making the magnificent Italian classic, Lasagne Bolognese—layers of silky fresh pasta, rich ragù bolognese, creamy, nutmeg-flecked besciamella (Italian white sauce), and grated Parmigiano-Reggiano. It’s a weekend-worthy project that never fails to please. So, why not tie on your apron and cook and eat along with us?
Lunar New Year
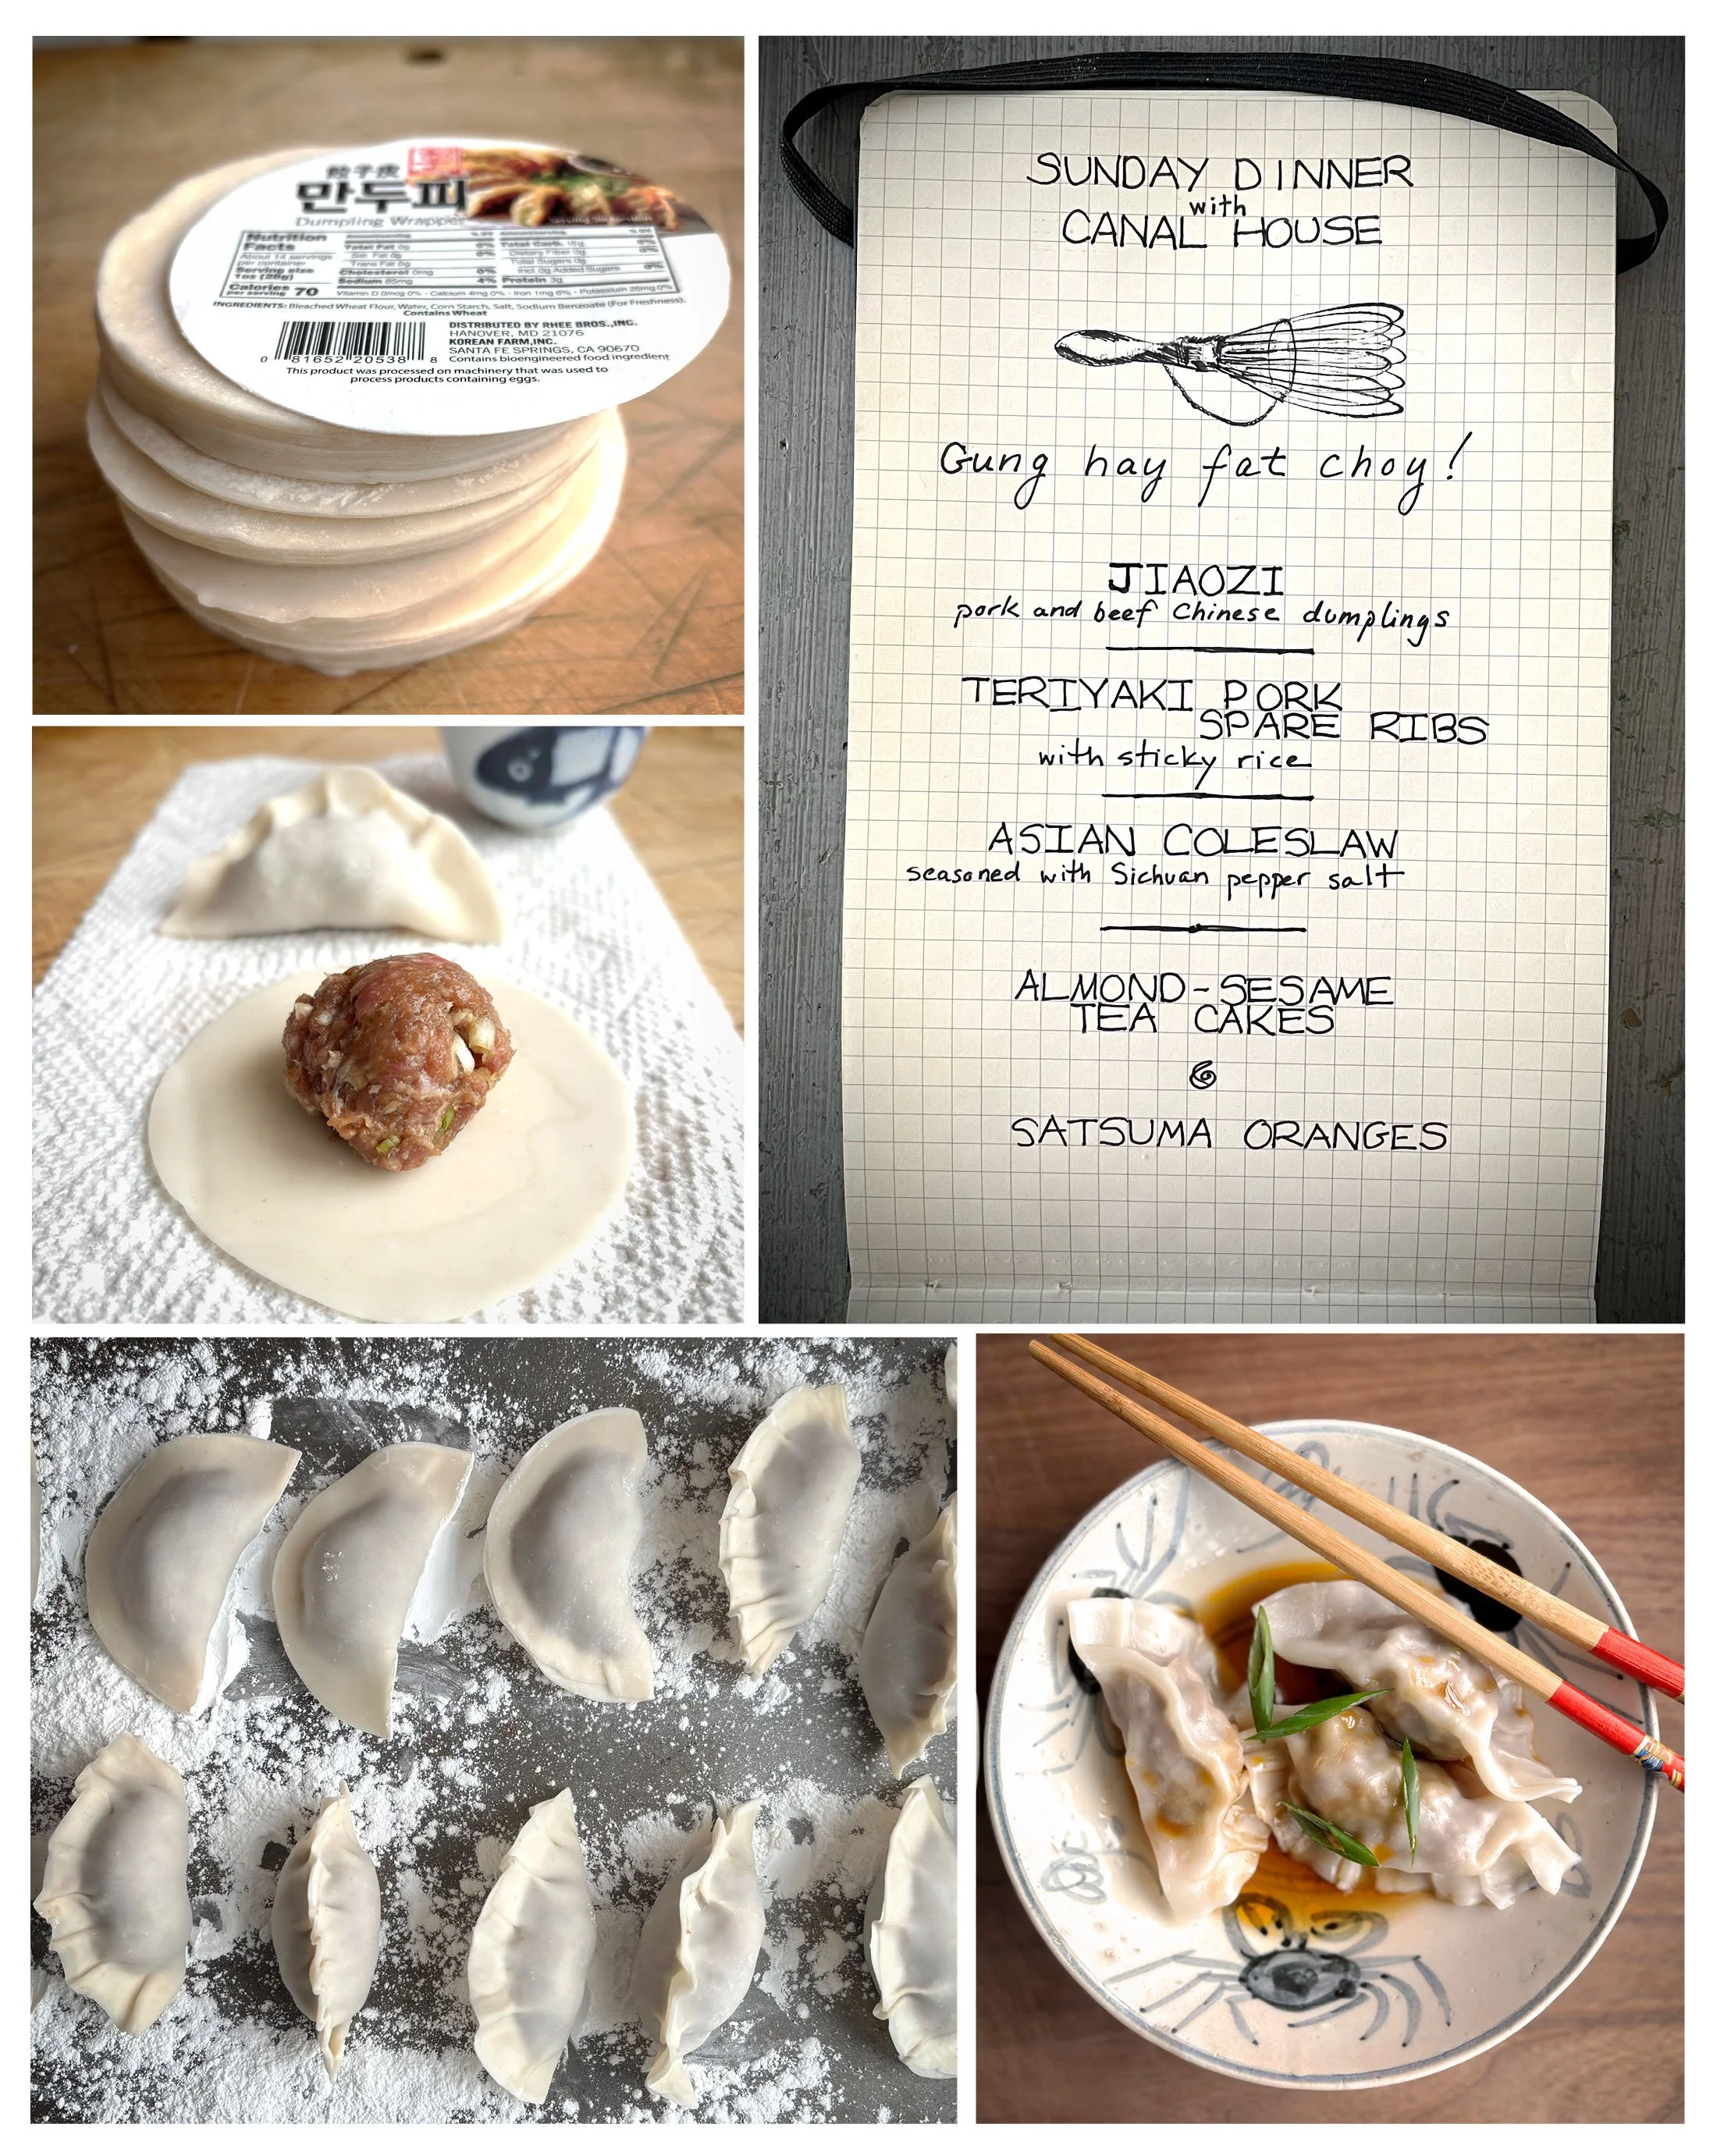
Counterclockwise from top left: dumpling wrappers; filling wrappers; filled dumplings; finished boiled and seasoned dumplings; Lunar New Year Menu
We may no longer be cooking Sunday Dinner at our restaurant, but if you know us, you know we’ll still be cooking Sunday Dinner at home for our family and friends. Tie on your aprons and cook and eat along with us.
This Sunday, we are jumping the gun by a couple of days and celebrating the Lunar New Year, which begins, this year, on Tuesday, February 17th. It’s the Year of the Fire Horse. Whoa!
In keeping with tradition, we make Jiaozi, Chinese dumplings, to usher in wealth and good fortune for the new year. Our Shuǐ Jiǎo (boiled Chinese dumplings) recipe was passed along to us from a beloved friend whose grandmother passed it along to him. Now we gladly share it with you and hope you will start your own Lunar New Year ritual of filling and folding—then devouring—these delicious dumplings.
Gung Hay Fat Choy!
Shuǐ Jiǎo
Pork and Beef Chinese Boiled Dumplings
Makes about 70
We use thin, white, 3.5-inch round dumpling wrappers made with wheat flour, water and salt, available in the refrigerated and/or frozen section at Asian markets. Although the thicker, Northern-style dumpling wrappers are typically used for boiled dumplings because they are sturdy and chewy, we prefer using the thinner, more delicate Shanghai-style wrappers as they are more tender when boiled.
The filling is best made the day of serving. It loses its freshness if made ahead. Shaped dumplings can be frozen. Frozen dumplings can be boiled straight from the freezer. No defrosting necessary.
For the filling:
1 lb. ground pork
1 lb. ground beef
3 tbsp. (about 2 oz.) finely grated, peeled fresh ginger
6 garlic cloves, peeled and minced (about 1 oz.)
6-8 scallions, trimmed, white and green parts separated, white parts finely chopped to make 1 cup (about 3 oz.); green parts thinly sliced
5 tbsp. soy sauce
Two 14-oz. packages thin, 3.5-inch round, white dumpling wrappers, defrosted, if frozen
Corn starch or potato starch for dusting
Rice vinegar
Soy sauce
Sesame chili oil
For the filling: Put the ground meat, ginger, garlic, white parts of scallions, and soy sauce into a large mixing bowl and mix thoroughly with your hands. Do a taste test of the filling: bring a small pot of water to a boil. Cook a scant tablespoon of the filling in the boiling water until it floats, about 2 minutes. Taste the cooked filling. Adjust the filling seasonings with more ginger, garlic, scallion, and/or soy sauce, if you like. This makes about 6 cups of filling. It can be covered tightly and refrigerated for up to 8 hours.
To make the dumplings: Dust a tray with some cornstarch and set aside. Fill a small dish with water. Remove the wrappers from their package, set on a flat dish, and cover with a slightly damp paper towel to keep them from drying out.
Put 1 dumpling wrapper flat on a paper towel on a clean work surface. Put about 1 scant tablespoon of the filling in the center of the wrapper. Shape the filling into an oval to make it easier to cover with the wrapper. Dip your finger into the water and wet the entire rim of the wrapper. Carefully fold the wrapper over the filling to make a half circle. Pinch the edges together to completely seal the dumpling. We crimp the edges, making pleats along the edge, but it’s not necessary.
Place the dumpling on the dusted tray, folded side up. Repeat filling and shaping the dumplings with the remaining filling and wrappers, setting them side-by-side on the tray, folded side up, as you work. If the dumplings get moist, soft and sticky, dust them with some of the cornstarch. The dumplings can be refrigerated for up to 4 hours before boiling and serving. They can also be frozen. Set the dumplings on a tray in a single layer without touching. Freeze the dumplings until frozen solid. Stack frozen dumplings in a plastic bag or airtight container and keep frozen until ready to boil and serve.
Fill a deep pot with water and bring to a gentle boil. Put 6-8 dumplings at a time into the pot and boil until they float, about 2 minutes, using a slotted spoon to coax any dumplings that settle to the bottom of the pot. Let them simmer for about 1 minute more. Using the slotted spoon, transfer dumplings to soup bowls. Season dumplings with a splash of rice vinegar, soy sauce, and a drizzle of sesame oil. Garnish with some of the sliced scallion greens. Serve piping hot.
Super Bowl Sunday
